
How to Set Up Eclipse for Web-application Development
Russell Bateman
Spring 2010
last update:
|
|
How to Set Up Eclipse for Web-application DevelopmentRussell Bateman |
For example, you may like to set the width of your Java code to 120 and show a line in the editor window so that you don't go past it. This is done by
Window -> Preferences -> General -> Editors
			-> Text Editors
.
To export these, ...
File -> Export... -> General -> Preferences.
Window -> Preferences
-> Java -> Code Style -> Formatter
, click Import and
then navigate to find the template you saved away after modifying the format.
I obsess over my code format and save my settings to
java-templat-formats.xml.
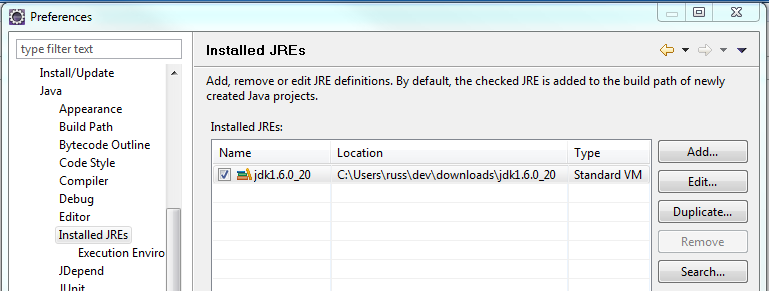
Window -> Preferences
-> Java -> Installed JREs
. What will be there already is the JRE
installed on your computer host for executing Java programs. In my humble
opinion, you don't want this; see
Setting up the Sun Java Developer's Kit.
To change it, click on the Location path, then click the Edit button. Navigate to where you've created a copy of Sun's Java Development Kit. For example, mine is at C:\Users\russ\dev\downloads\jdk1.6.0_20. While you're in the JRE Definition dialog, be sure to update the JRE name: so it's obvious that you're using your special one. The name can be anything you choose; I chose jdk1.6.0_20. You should see something like this:
Assuming you have this downloaded, unzippped and available, do this:
Window -> Preferences -> Server > Runtime
			Environments
.
The easiest way to set up these libraries is to create your first project. This can be a bogus project if you like. We'll delete it afterward.
Other... -> Web.
 ).
).
First, fetch the downloads we need.
Follow these steps to set up the JSF and JSTL libraries:
You should now see something similar to the following:
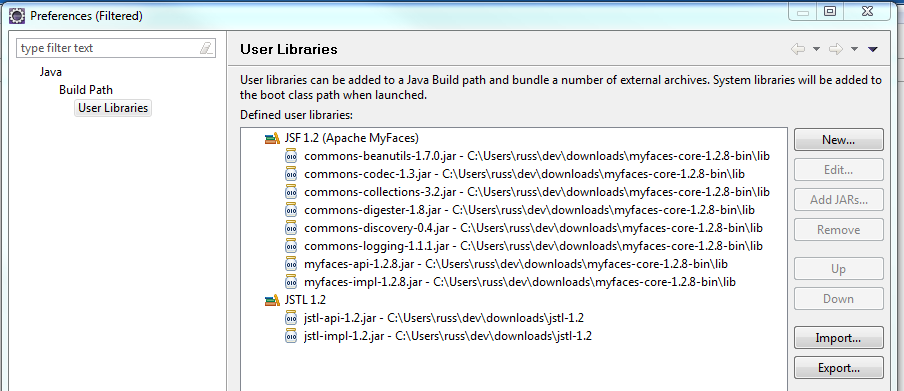
Dismiss the User Libraries dialog, then click to check both JSF and JSTL boxes to cause them to be added to the JSF capabilities for this workspace. Each time you set up project facets for a new Dynamic Web Project in Eclipse, you should automatically get these libraries.
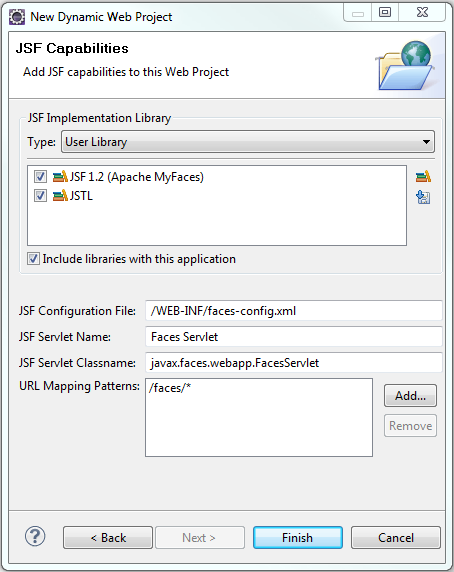
At this point, you're ready to create your first Dynamic Web Project in Eclipse. You can delete the bogus project from your workspace.
The file web/WEB-INF/web.xml for most projects should appear thus. I
have removed the <description> elements for brevity and
enhanced the <welcome-file-list> over what Eclipse
sometimes generates.
<web-app xmlns:xsi="http://www.w3.org/2001/XMLSchema-instance" xmlns="http://java.sun.com/xml/ns/javaee" xmlns:web="http://java.sun.com/xml/ns/javaee/web-app_2_5.xsd" xsi:schemaLocation="http://java.sun.com/xml/ns/javaee http://java.sun.com/xml/ns/javaee/web-app_2_5.xsd" version="2.5">Faces Servlet javax.faces.webapp.FacesServlet 1 Faces Servlet *.faces /faces/* index.html index.htm index.jsp default.html default.htm default.jsp javax.servlet.jsp.jstl.fmt.localizationContext resources.application javax.faces.STATE_SAVING_METHOD client org.apache.myfaces.ALLOW_JAVASCRIPT true org.apache.myfaces.PRETTY_HTML true org.apache.myfaces.DETECT_JAVASCRIPT false org.apache.myfaces.AUTO_SCROLL true faces org.apache.myfaces.webapp.MyFacesServlet 1 faces *.jsf faces *.faces </web-app> org.apache.myfaces.webapp.StartupServletContextListener
The file web/WEB-INF/faces-config.xml for most projects should appear' thus, usually with a different managed-bean name, a different to-view-id name, etc. This file is extremely variable and this is only a simple example of what to expect.
<faces-config xmlns="http://java.sun.com/xml/ns/javaee"
	xmlns:xsi="http://www.w3.org/2001/XMLSchema-instance"
	xsi:schemaLocation="http://java.sun.com/xml/ns/javaee
        http://java.sun.com/xml/ns/javaee/web-facesconfig_1_2.xsd"
	version="1.2">


      /index.jsp

         login
         /welcome.jsp


      user
      com.corejsf.UserBean
      session

</faces-config>