
Copyright ©April 2010 by
Russell Bateman and
Etretat Logiciels, LLC.
Permission is granted for any derivational use. You are forbidden only
from reposting the files of the tutorial and project without express
permission of the author.
|

|
|


|
|
Developing a JavaServer Faces (JSF)
Application in Eclipse
(emerging)
last update: 9 June 2010
There are some pretty good tutorials out there to teach this subject.
However, what made me write this one was that I did several of them,
they usually worked, but then I was never able to recreate my own
application using what I learned. Even if I started using the
tutorial project as my base, it quickly went south.
If you follow this tutorial to begin your own JSF application, the
same thing may happen to make your effort fail. Nevertheless, the
objective is to try to avoid that by giving you some nuts and bolts
information that those others do not. In particular, I'm going to try
to help you successfully navigate:
- the magic of the Eclipse Web App Library
- eliminating Eclipse console errors
- the difficulty of cryptic JSP/JSF constructs
|
|
|
(Note: In this document, I use British instead of American typographic
conventions for greater clarity. For instance, I end a sentence with a filename
in quotes placing the sentential period outside them because to put it
where it is correct in the United States would be to introduce potential
inaccuracy causing the reader to wonder if the filename was not to end in a
period, e.g.:
name the file "styles.css".
and not
name the file "styles.css."
Most American developers don't even know about this phenomenon: it's time our
publishers switched to follow the more logical British conventions.)
Table of Contents
-
Prerequisites to following this tutorial
-
Introduction to JavaServer Faces (JSF)
-
What is JSF?
-
Model - View - Controller
-
JSF continued...
-
faces-config.xml
-
Managed beans
-
Example
-
Backing beans...
-
Application: DVD catalog
Prerequisites to following this tutorial
We're not going to be able to spend time in this tutorial setting up Eclipse,
Java, Tomcat or the libraries needed for JSF work. This is all explained on my
Java Hot Chocolate website, probably where you went to find this tutorial in
the first place. Look around on the index page for topics with names like
"Setting up..."
This tutorial also assumes that you can read and write Java as well as
understand HTML, XML and XML-based structures such as found in web-page coding.
Last, this tutorial assumes you are already familiar with Eclipse and can get
around in it. Unlike other articles and tutorials on my site, getting around in
Eclipse will not be explained in any level of minutia here. You must know how
to create new classes, new JSPs, work the program editor, create a Dynamic Web
Project, configure everything necessary in Java Build Path, and other common
tasks. If you are lacking in any of this, please consult my website, the
Internet in general and the
Eclipse newcomers' and web tools platform (WTP) forums.
Introduction to JavaServer Faces (JSF)
First, as explained on Java Hot Chocolate's about page, I'm not pretending to
be some JEE guru who can mentor you to dizzying heights of web application
development acumen. In fact, I feel like a beginner myself and have met with
horrible failure over the years as I've made the switch from C and assembly,
operating system- and network-level work over the early years of my career.
It's the frequent failures that have motivated me to write things up as I learn
them, then return to what I write up and polish them into tutorials.
So, do not use this tutorial as the only way to learn JSF, but use it to get
started building Eclipse projects that use JSF, then move to sup at the feet
of more masterful authors.
Still, we're going to take a crack at the theoretical part.
What is JSF?
JavaServer Faces (JSF) is a user-interface (UI) component based the Java web
application framework. JSF is serverbased, that is the JSF UI components and
their state are represented on the server. A JSF application run in a standard
web container, e.g.: Tomcat, GlassFish, Jetty, etc. JSF defines a standard
life-cycle for the UI components.
JSF is part of the Java EE standard, formerly known as J2EE. Sun Microsystems
provides a reference implementation but there are also alternatives such as
Apache MyFaces, RichFaces (JBoss community) and more modern incantations.
JSF is a request-driven model-view-controller (MVC) web framework that uses XML
files to define its behavior.
Model - View - Controller
Model-View-Controller (MVC) is a software architecture, currently considered a
pattern in software engineering. The purpose of this pattern is to isolate
"domain logic" (the application logic for the user) from input and presentation
logic (the GUI). This has the side effect of permitting independent
development, testing and maintenance of each part.
The major impetus behind JSF was the inability of JSP to implement MVC. If you
began investigating JSF subsequent to mastering JSP, as did I, then you need to
set aside some of what you learned. Writing Java code inside the JSP (JSF) page
from now on is counterproductive and murky: a complete violation of the MVC
pattern.
The model is the domain-specific representation of the data
on which the application operates. Domain logic adds meaning to raw data (for
example, calculating whether today is the user's birthday, or the totals,
taxes and shipping charges for shopping cart items). When a model changes its
state, it notifies its associated views so they can be refreshed.
The model includes the database schema. Many applications use a persistent
storage mechanism such as a database to store data. This is encapsulated within
the model.
The view renders the model into a form suitable for
interaction, typically a user interface element. Multiple views can exist for
a single model for different purposes. Etc.
Last, the controller receives input and initiates responses by
making calls on model objects.
An MVC application is a collection of model/view/controller triplets, each
responsible for a different UI element or view.
Back to JSF
A JSF application consists of web pages containing JSF UI components. Your
application requires two configuration files. First, just as for JSP,
web.xml. Second, providing half of the controller implementation for
your MVC application, faces-config.xml.
As noted,
web.xml is identical in use and composition to this file in a JavaServer
Pages (JSP) application. JSF builds on JSP as a logical step beyond in the
sense that it uses JSP for its display technology, though technological
enhancements to that exist in Faces which won't be introduced here.
Concretely, you'll begin to recognize JSF in the .jsp page more by
special tags than by anything else, whereas you recognize JSP partly by the
presence of <% ... %> and other constructs, and partly by the unmistakable
presence of Java code.
faces-config.xml, the principal configuration file for JSF, defines:
- managed beans, data elements of the JSF application
(both "managed beans" and "backing beans"). These are a Java class that is
created dynamically as the JSF application runs. They can be defined in the
scope for which the bean is valid, at the level of "session," "request,"
"application" or "none."
-
- The navigation between web pages (.jsps).
-
- data validators, used to check the validity of UI input
-
- data converters, used to translate between UI and model
-
Managed beans
A managed bean is a type of Java bean or reusable software component
that is created and initialized with dependency injection. Dependency
injection is a technique for supplying external values upon which a
component or bean is dependent, usually for its initialization.
Example
Let's get into it. Consider the class Person, ...
	package com.etretatlogiciels.jsf;

	public class Person
	{
	  String firstName;
	  .
	  .
	  .
	}
Managed beans are "plain, old Java objects" (POJOs) declared in
faces-config.xml. For example, you can define a Java object
Person. Once you define the object in faces-config.xml you use
the attributes of Person in your UI components by binding the field,
say, firstName of an object of this class to a JSF input field.
JSF uses the
Java Unified Expression Language, used also by JSP, to bind UI components
to object attributes or methods. This "language" consists of the XML tags you
will come to recognize in the JSP/JSF code.
A managed bean is specified in faces-config.xml thus:
	<managed-bean>
	  <managed-bean-name>   Person                           </managed-bean-name>
	  <managed-bean-class>  com.etretatlogiciels.jsf.Person  </managed-bean-class>
	  <managed-bean-scope>  session                          </managed-bean-scope>
	</managed-bean>
The various scopes available for managed beans are:
<managed-bean-scope> session|request|application|none </managed-bean-scope>
The bean scope sets its lifecycle.
| | | |
| session | |
This scope means that an instance of the bean will persist during the
entire life of the session or connection between client and server. A
most common example of this is the commerce site "shopping cart".
|
| request | |
This bean exists (or is stored) for the length of a single request
(client to server). Subsequent requests force new copies to be
created with default initializations as you might expect. (Remember:
a managed bean is just a plain old Java object.)
|
| application | |
Application scope means an instance of the bean will persist during
the entire time the web application is up and running. This might
make good sense for an object in which a database source is embedded.
|
| none | |
This sort of bean isn't "stored" anywhere for any length of time;
it's just created on the fly as needed and garbage-collected once
there are no more references to it.
|
It is the framework within the Tomcat (etc.) container that ensures the
communication of values between HTML (user/presentation) and the component
(POJO).
Backing beans...
A typical JSF application includes one or more of these backing beans, as
components associated with UI components in a page. A backing bean defines
UI component properties, each of which is bound to either a component's value
or a component instance. A backing bean can also define methods that perform
functions associated with a component, including validation, event handling,
and navigation processing.
For example, in the schema of a DVD catalog, in the DvdTitle class,
there might be a getAll() method that fetches all the titles in the
database for list on a page (using an <h:dataTable ... >
construct). Or a backing bean might implement a clear() method for an
<h:commandButton ... type="reset" /> contruct that resets all
the edit fields, option lists, checkboxes and radio buttons to their default
values on a page.
A backing bean is not going to be part of the Controller. It's really part of
the Model. Although it can contain some controller helper functionality, it's
primarily part of the Model. Most of the Controller logic in JSF is in the
FacesServlet, faces-config.xml and the tag implementations.
And action processors, such as are found especially in Struts, aren't
controllers in the strict sense of the word. They're more of a business logic
function with ties to the dispatcher.
Application: DVD catalog
Let's create a web application that uses JSF. Start by downloading all the
libraries we're going to have to use. This is the trick. It isn't just a matter
of downloading Apache MyFaces and the JavaServer Pages Standard Tag libraries
(JSTL). Those would be enough for only a simple JSF application. There are lots
of libraries you must have in order to do a real one. But, let's start with
those. You should have set up Eclipse for web application development based on
How to Set Up Eclipse for Web Application
Development.
Of course, if you use Maven, it can sort out just about all the dependencies
you have assuming you can write the pom.xml file. We're not taking that
approach here and I'm not going to provide a pom file.
You may find as we go that you'll need to add
Apache log4j and still other libraries as we go.
There are some things I'm going to show step-by-step since they're part of
writing JSF applications
- Create a new Dynamic Web Project in Eclipse. For my purposes, I'm going
to call this project dvdcatalog. To do this, right-click in
Eclipse's Project Explorer view, choose New, then
Other..., then scroll down until you see a folder icon named
Web, expand it and click Dynamic Web Project. Then,
click Next, name the project and click Finish (which
will take all the defaults).
-
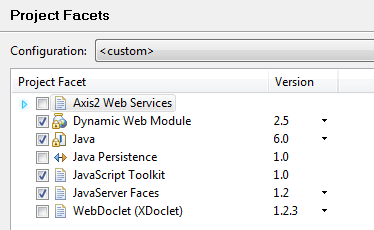
- Right-click on the new project and choose Build Path, then
Configure Build Path and then click on Project Facets
in the left-hand column. Check the box next to JavaServer Faces.
You will want checks in boxes next to Dynamic Web Module (2.5),
Java (6.0) and JavaServer Faces (1.2). You may leave
JavaScript Toolkit any way you want it for later use—we
won't be worrying about it in this tutorial.
Note: I'm assuming a brand-new Galileo workspace set up with JDK 1.6.0+
and Tomcat 6.x. If this is not your environment, you may need to
establish such an Eclipse environment to avoid misunderstanding or
frustration while following this tutorial.
-
- Click OK. (Do not click the link named further configuation
available....)
-
- Create a package name. Mine's com.etretatlogciels.dvdcatalog.
-
- Create Web App Library by copying all the JARs (just the JARs) gathered
in the preliminary step. These are listed above. You don't need
additional ones that might have come down with these.
-
- Click on project dvdcatalog and press F5. This will
refresh the files under the project such that Eclipse will populate the
Web App Library. See this by right-clicking on the project,
choosing Build Path, then Configure Build Path and
click the Libraries tab. Open Web App Library by
clicking on the little triangle next to it in the center window.
-
- Create log4j.properties under Java Resources: src in the
project. This has the effect of creating this file under the src
directory. If you don't want to see DEBUG output from the Tomcat server
or other components when you run, change "DEBUG" here to "INFO". There
are other modifications you'll want to make to this file should your
application go "real".
			# The root logger is assigned priority level DEBUG and an appender named
			# myAppender.
			log4j.rootLogger=DEBUG,myAppender

			# The appender's type specified as ConsoleAppender, i.e. log output to
			# the Eclipse console. (Could have been FileAppender.)
			log4j.appender.myAppender=org.apache.log4j.ConsoleAppender

			# The appender is assigned a layout SimpleLayout. SimpleLayout will
			# include only priority level of the log statement and the log statement
			# itself in the log output.
			log4j.appender.myAppender.layout=org.apache.log4j.SimpleLayout
How this works: when a component calls a log4j method to log a
message, log4j looks for a configuration file at the top of the
classpath, which is the root of your src directory for Eclipse. If
you want to subsume this file under a folder named, e.g.:
resources, you must tell log4j where to go to find it. For
more information on this, see my
notes on
log4j.
-
- Your web.xml and faces-config.xml files are already set up
on the path dvdcatalog/WebContent/WEB-INF. We won't modify them at
first. If you are missing good set-up there or faces-config.xml
altogether, it's because you skipped the step where you
established project facets above.
-
- Create two message files under your new package name,
messages.properties and messages_fr.properties. As part of
this tutorial, we're going to localize the application to French so that
you can see how this is done as it invades the JSP/JSF code to some
extent.
In messages.properties, put:
			# Common title and other common things...
			dvdcatalog.title  = DVD Catalog
			dvdcatalog.logo   = images/dvdcatalog-logo.png

			# login.jsp and invalidlogin.jsp
			login.title       = Login to the DVD Catalog
			login.username    = Username:
			login.password    = Password:
			login.button      = Login
			login.succeeded   = login has succeeded
			login.failed      = login has failed

			# validlogin.jsp and powerlogin.jsp
			validlogin.title  = Welcome to the DVD Catalog!
			validlogin.rights = You are authorized to release the missile.
			validlogin.button = View the catalog
And, in messages_fr.properties, put exactly the same properties,
but translated:
			# Common title and other common things...
			dvdcatalog.title  = Catalogue DVDs
			dvdcatalog.logo   = images/dvdcatalog-logo.png

			# login.jsp and invalidlogin.jsp
			login.title       = Autorisation d'acc�s au catalogue DVDs
			login.username    = Usager :
			login.password    = Mot de passe :
			login.button      = Autoriser
			login.succeeded   = autorisation est r�ussie
			login.failed      = autorisation a �chou�

			# validlogin.jsp and powerlogin.jsp
			validlogin.title  = Bienvenu(e) au catalogue DVDs !
			validlogin.rights = Vous �tes autoris�(e) � modifier son contenu.
			validlogin.button = Inspecter le catalog
If you can't reproduce the accents (you're on Linux or you just don't
know how), don't sweat it.
-
- Create a new folder styles underneath WebContent and place
a file into it named styles.css. This is done by right-clicking on
WebContent, choosing New, then Other...,
File (under the General folder), then naming it
"styles.css". Copy the following into it. This is another unimportant
feature of the tutorial incorporating CSS style control directly in your
work so that you're not left in any doubt how it's achieved.
p, h1, h2, h3, h4, h5, h6, th, td, li, dd { font-family: Candara; }
-
- Create a new folder images under WebContent and put a copy
of the image below into it. Name it dvdcatalog-logo.png.

-
- Create login.jsp underneath WebContent by right-clicking
on the project, choosing New, then JSP (you might have
to chase this down under Other...). Type the name in without the
extension and click Finish.
Type or copy the following code into this new file.
<%@ page language="java"
contentType="text/html; charset=ISO-8859-1"
pageEncoding="ISO-8859-1"%>
<%@ taglib prefix="f" uri="http://java.sun.com/jsf/core"%>
<%@ taglib prefix="h" uri="http://java.sun.com/jsf/html"%>
<%@ page import="java.util.Locale" %>
<!DOCTYPE html PUBLIC "-//W3C//DTD HTML 4.01 Transitional//EN"
"http://www.w3.org/TR/html4/loose.dtd">
<html>
<head>
<title> DVD Catalog </title>
<meta http-equiv="Content-Type" content="text/html; charset=ISO-8859-1">
<link rel="stylesheet" href="styles/styles.css" type="text/css" />
</head>
<%
// perform a trial set to France-French
Locale frn = new Locale( "fr" );
Locale.setDefault( frn );
%>
<body>
<f:view>
<f:loadBundle basename="com.etretatlogiciels.dvdcatalog.messages" var="msg" />
<h:form>
<table>
<tr>
<td> </td>
<td width="10"> </td>
<td></td>
</tr>
<tr>
<td colspan="3">
<h2>
<h:outputText value="#{msg['dvdcatalog.title']}" />
</h2>
</td>
</tr>
<tr>
<td colspan="3" align="center">
<h:graphicImage value="#{msg['dvdcatalog.logo']}" />
</td>
</tr>
<tr>
<td colspan="3">
<br />
</td>
</tr>
<tr>
<td align="right">
<h:outputText value="#{msg['login.username']}" />
</td>
<td> </td>
<td> [edit field] </td>
</tr>
<tr>
<td align="right">
<h:outputText value="#{msg['login.password']}" />
</td>
<td></td>
<td> [edit field] </td>
</tr>
<tr>
<td colspan="3"> </td>
</tr>
<tr>
<td colspan="3" align="center"> [button] </td>
</tr>
</table>
</h:form>
</f:view>
</body>
</html>
-
-
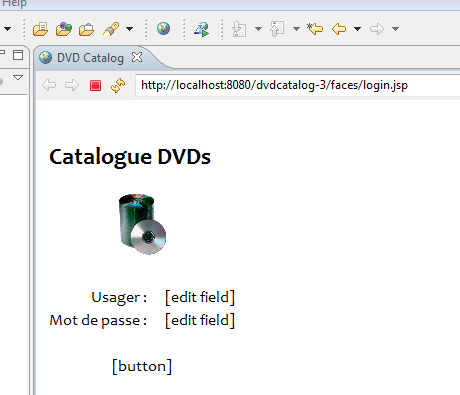
Now start the server and run login.jsp. This will use Eclipse's internal
browser. You should see something like this:
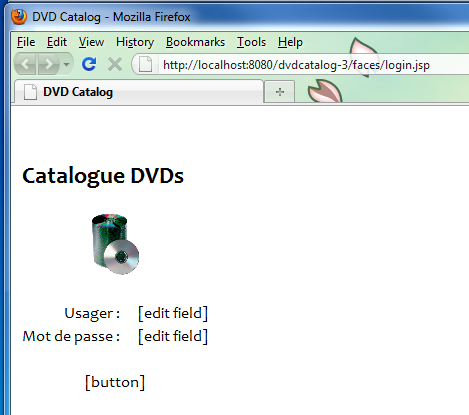
It's also possible to run this in a browser outside of Eclipse. Simply paste
the address into your browser:
What you're seeing is...
- The in-line Java code having set the locale to French, you're seeing the
effective localization as the
<h:outputText elements go
to get the strings out of messages_fr.properties instead of
messages.properties.
-
- login.jsp JSF constructs continue to be translated in that the
image noted in the message file is fetched.
-
- The JSP is working because, first, the in-line Java code, a feature of
JSP, is gathered into the "behind the scenes" servlet and, second, it's
displayed in the browser.
Excursus: how does JSP work?
JavaServer Pages work by being "compiled" into a virtual servlet that is then
executed. This servlet could be coded by hand in Java, however, the genius of
JSP is that you can do the presentation in a more comfortable HTML-looking way
instead of making calls to spew HTML code down the wire at the client browser.
Intermingled in the more or less recognizable HTML code of a JSP file are
optional Java statements that do things that couldn't be done from HTML. In our
case here, the block setting the locale to France-French as delimited using
<% ... %>. There are many other JSP constructs we could and
may use as our project grows in capacity. However, this is primarily a JSF
tutorial.
As noted elsewhere, JSF uses JSP as it's primary display technology. JSF is a
formalism originally based on JSP by which replacement of UI elements can be
done backed by beans yielding runtime information. This is what we're here to
learn.
Next steps: Replacing the input controls with JSF constructs...
...back, of course, by beans. In our first run, we simulated logging in, but
were unable to type in username and password or even submit the login request
to the application. Because managinge usernames and passwords is more complex
than anything we could perform using
HTML forms, and
difficult as well to perform using JSP constructs (in-line Java code), we will
create some beans to manage the process for us and make them do the work live
in our log-in page.
Set up class User
We'll start by setting up a bean to handle all authorization for the
application. We don't want our web application to allow just anyone to view the
list of our DVDs.
Right-click on the package you created in the project src folder. Add a
new class named User. Once it's created, add the obvious guts to it:
a username and password. I'm also going to add some logging because a) I always
do and b) I figure I'll probably need it later for debugging, maintaining and
supporting customers of my application (even though for now, this bean is
excedingly simple).
package com.etretatlogiciels.dvdcatalog;

import org.apache.log4j.Logger;

public class User
{
	private static Logger	log = Logger.getLogger( User.class );

	private String	name      = null;
	private String	password  = null;

	public User() { }

	public final String	getLoginname()					{ return this.name; }
	public final String	getPassword()					{ return this.password; }

	public final void   setLoginname( String loginname ){ this.name     = loginname; }
	public final void   setPassword( String password )	{ this.password = password; }
}
Test first, then code: how to run JUnit tests
In pursuit of test-driven development (TDD), let's first add a test of our
future User bean by creating a new Eclipse Source Folder, a package
and a new class, UserTest. Since we don't want to ship our tests out
with the application, we do this in a separate filesystem, test.
- Right-click on Java Resources: src, then New and,
finally, Source Folder.
A Source Folder in Eclipse is a special thing. You can create any
additional files and folders you want, but any Java code in them will not
be built unless they are in Source Folders. There are two ways to make
them Source Folders. First, as done here, you can create them that way.
Alternatively, you can promote an existing folder to the status of Source
Folder. We would have to do this if we created test as a simple
folder first.
You do not have to make Source Folders of any folders you create
underneath an existing Source Folder (like src). In fact, Eclipse
won't let you do that.
-
- Click Browse to establish the project.
-
- Type "test" into the Folder name: edit field.
-
- Click Finish.
-
- Now, right-click test and add a new package. Use exactly the same
name as your original package name created earlier in the tutorial. We
want this package to match the parent of our User class for
orthogonality's sake.
-
- Last, right-click on the package you just created and choose
New
			-> Other... -> Java -> JUnit -> JUnit Test Case
. Name
this new class "UserTest" and type "User" as the Class under
test: below.
-
- Click Next, then check the box next to User, but do
not check the ones next to the setters and getters (getLoginname,
setLoginname, etc.). This is because we don't want to write tests
of User's accessor methods.
-
- Click Finish and craft the new class to appear thus. (Formatting
is entirely optional.)
package com.etretatlogiciels.dvdcatalog;

import junit.framework.TestCase;

public class UserTest extends TestCase
{
	User	user = null;

	@Override
	protected void setUp() throws Exception
	{
		super.setUp();
		this.user = new User();
	}

	public void testLogin()        { fail( "Not yet implemented" ); }
}
Now, run this new test by right-clicking on UserTest and choosing
Run As -> JUnit Test. You should get a new tab in the Eclipse
workbench, JUnit, and a sort of console showing all the individual
tests failing (and the big, red bar of failure).

To put it naïvely, what testing first is all about is writing tests that
fail, then enhancing the software to fix the bugs revealed by the failed tests.
At first, the bugs aren't really bugs, but unimplemented features.
Next we choose to implement and test the setters. Since they return void,
there's nothing that can fail. However, when we test the getters, we'll see if
the setters worked.
Now replace the testLogin() method with
	public void testLogin()
	{
		Assert.assertNotNull( this.user );
	}
...and re-run the test. You'll see a green checkmark replace the blue X for
that one test in the previous illustration. This is success, if trivial,
because we're testing that getting a new instance of User, something
we're going to do for each and every test method, in setUp().

It may seem a bit stupid to test getters and setters. Indeed, most out there
share this opinion outside of a short list of caveats. See
On Testing Beans with JUnit. Nevertheless, outside of our refusal to
unit-test bean accessor methods, we'll always write a test here first before
attempting to implement actual code.
More UserTest
Now that we've got our bean and its test code set up, let's add more test code
for testing the login functionality. Enhance UserTest.testLogin():
	public void testLogin()
	{
		Assert.assertNotNull( this.user );

		// test a power user...
		this.user.setName    ( "russ" );
		this.user.setPassword( "test123" );
		Assert.assertEquals( LoginValidator.POWER_LOGIN, this.user.login() );

		// test a valid user...
		this.user.setName    ( "julene" );
		this.user.setPassword( "test123" );
		Assert.assertEquals( LoginValidator.VALID_LOGIN, this.user.login() );

		this.user.setName    ( "tester" );
		this.user.setPassword( "" );
		Assert.assertEquals( LoginValidator.VALID_LOGIN, this.user.login() );

		// test a non-existent user...
		this.user.setName    ( "Uncle Skeezix" );
		this.user.setPassword( "snagglepuss" );
		Assert.assertEquals( LoginValidator.INVALID_LOGIN, this.user.login() );
	}
Now we're left with a bunch of compilation errors. We're missing a
login() method in User and an entire class,
LoginValidator. First, the new method:
	public String login()
	{
		String	ans = LoginValidator.isUserAndPasswordValid( this.name, this.password );

		log.info( "User " + this.name
				+ " with password " + this.password
				+ " is logging in; status: " + ans + " user" );
		return ans;
	}
...which brings us to the validator. In our JSF login code, we'll want a
validator that either accepts the username and password typed in or throws a
ValidatorException. Out of convenience, we're also going to use this
class to manage users and passwords until we put those into persistence. Also,
we'll use it to hold an evaludation method that User.login() can call
to find out whether a user is a) valid, b) a power user (more on this later) or
c) not a user.
package com.etretatlogiciels.dvdcatalog.validator;

import java.util.ArrayList;
import java.util.HashMap;

import javax.faces.application.FacesMessage;
import javax.faces.component.UIComponent;
import javax.faces.context.FacesContext;
import javax.faces.validator.Validator;
import javax.faces.validator.ValidatorException;

import org.apache.log4j.Logger;

/**
 * This class is the JSF validator, but it also contains all the user and password
 * information and, as such implements a bit more for Login to use. The
 * usernames and passwords must not leave this class. Also, this class needs to operate
 * off a surer username/password store than the hack we have here.
 *
 * @author Russell Bateman
 */
public class LoginValidator implements Validator
{
	private static Logger	log = Logger.getLogger( LoginValidator.class );

	private static HashMap< String, String >	validUsers = new HashMap< String, String >();
	private static ArrayList< String >			powerUsers = new ArrayList< String >();

	static
	{
		validUsers.put( "russ",   "test123" );	powerUsers.add( "russ" );
		validUsers.put( "julene", "test123" );
		validUsers.put( "tester", ""        );	powerUsers.add( "tester" );	// see note!
	}

	/**
	 * This only validates the existence of users for logging in. It does not validate
	 * passwords. By simply returning (rather than throwing an exception), this method
	 * is saying the username is valid and we are okay to check the password (elsewhere).
	 *
	 * @param context - per-request state.
	 * @param component - the user interface component.
	 * @param value - the username.
	 * @throws ValidatorException
	 */
	public void validate( FacesContext context, UIComponent component, Object value )
		throws ValidatorException
	{
		String	user = ( String ) value;

		if( validUsers.get( user ) != null )
			return;

		if( false )
		{
			context.hashCode();
			component.hashCode();
		}

		FacesMessage	message = new FacesMessage();
		String			msg     = "User " + user + " does not exist";

		log.error( msg );
		message.setDetail( msg );
		message.setSummary( "Login is incorrect" );
		message.setSeverity( FacesMessage.SEVERITY_ERROR );
		throw new ValidatorException( message );
	}

	/* ------------------------------------------------------------------------
	 * The interfaces below are not properly part of the whole Validator thing.
	 * I just decided to put them here for relevance and convenience.
	 */
	public static final String	INVALID_LOGIN = "failed",
								VALID_LOGIN   = "succeeded",
								POWER_LOGIN   = "power";

	/**
	 * This method gives too much information to the log, but we're only doing
	 * this during construction. When we begin persisting our usernames and
	 * passwords, we'll stop doing it.
	 *
	 * @return "failed", "succeeded" or "power" that the user/password combination
	 * 			is authorized or authorized and it's a power user.
	 */
	public static final String isUserAndPasswordValid( String name, String x_password )
	{
		String	password = validUsers.get( name );

		if( password == null )
		{
			log.error( "No such user name " + name );
			return "failed";
		}
		else if( password.length() == 0 )
		{
			log.info( "User " + name + " did not require a password" );
			// (Note: you can have a user without password, but it cannot be a power user!)
			return "succeeded";
		}

		if( !x_password.equals( password ) )
		{
			log.error( "Password does not match " + name );
			return "failed";
		}

		log.info( "User " + name + " logged in" );

		if( powerUsers.contains( name ) )
		{
			log.info( "User " + name + " is a power user" );
			return "power";
		}

		return "succeeded";
	}
}
Once all the code has been added, we can run the JUnit test successfully and
we'll see this on Eclipse's console:
INFO - User russ logged in
INFO - User russ is a power user
INFO - User russ with password test123 is logging in; status: power user
INFO - User julene logged in
INFO - User julene with password test123 is logging in; status: succeeded user
INFO - User tester did not require a password
INFO - User tester with password  is logging in; status: succeeded user
ERROR - No such user name Uncle Skeezix
INFO - User Uncle Skeezix with password snagglepuss is logging in; status: failed user
From this point on, we'll spend less time on the step-by-step, test-driven
development and relegate the source code to links on a separate page. We do
this so we can concentrate on the more JSF-critical aspects of the tutorial.
Notes to include as we go...
If your JSP gives the error about not having a validation id, and you're sure
all is right, bounce Eclipse.