Appendix: Useful links
Preliminary, informative notes...
Apache NiFi and Apache NiFi Registry are two, separate product binaries
and are installed as such. Both come as binaries or Docker images for the
greatest convenience possible.
I have found that the Apache NiFi Registry 1.x (the latest as I write this
paragraph is 1.21.0) supports any version of Apache NiFi 1.x that integrates
the Registry.
Note that the first version of Apache NiFi to support this integration was
1.2.0. Prior to that version, the UI had no integration. In my work, I most
often use the latest Registry in support of NiFi 1.13.2 (because I have some
ancient custom processors that will not run in NiFi beginning 1.14.0).
Note that you do not need to back the Registry with Git if it's not convenient,
you don't care to or otherwise do not want to.
You do not need to support any sort of user model, users or group, and
authentication if it's inconvenient between Apache NiFi and Apache NiFi
Registry. Even if your NiFi instance itself requires users and groups (and,
obviously, it should), the Registry need not if you do not want that. The key,
as you will find out later on in these notes, is not to use https. See
Apache NiFi user interface; configure for Apache NiFi Registry
instance.
Set-up tutorial
These are notes following Getting Started with Apache NiFi Registry, a
video found at the indicated link above. This link is a few years old. I will
make comments here to correct or update its accuracy as I go.
In general, below, make your current working directory that of the NiFi
Registry's installed root. I keep my NiFi software for local development on the
path:
/home/russ/dev/nifi
and all the different versions that interest me in that location.
Steps...
- Ensure functioning Apache NiFi installation. Important: In the browser
you'll use for the rest of this tutorial, you'll want that installation's
UI running in a tab.
- Download and install Apache NiFi Registry corresponding in version to the
the NiFi installation of step 1.
$ unzip nifi-registry-1.15.0-bin.zip
$ cd nifi-registry-1.15.0/bin
- Start up the Registry:
- Launch the Registry's UI in a browser by opening a new tab and typing in
the URL localhost:18080/nifi-registry.
The default port is 18080, but you can change this in
nifi-registry-1.15.0/conf/nifi-registry.properties by altering the
nifi.registry.web.http.port to whatever you prefer. (You'll need
to relaunch as in step 2.)
- Create a bucket to organize our flows in the Registry
- Click on the Settings (wrench icon) at the upper right of the
window/tab open on the Registry.
- Click New Bucket button and name the first bucket, "Test." In the
current version of the Registry, we can add a Description; we'll
do that: "Our first bucket."
- Click the Create button.
If you wanted to create a bunch of new buckets, you could check
Keep this dialog open after creating bucket.
You could also prescribe that the bucket be publicly visible.
That would allow read access to unauthenticated users. Whether or not you
will want to do this depends on experience gained later. In this
tutorial, it buys you nothing.
- You should see the new bucket, Test, in the list.
- Connect our running NiFi instance to the Registry
- Go to the tab in which your Apache NiFi instance's UI is running.
- From its Global Menu ("hamburger menu"), select
Controller Settings.
- Then select the Registry Clients tab.
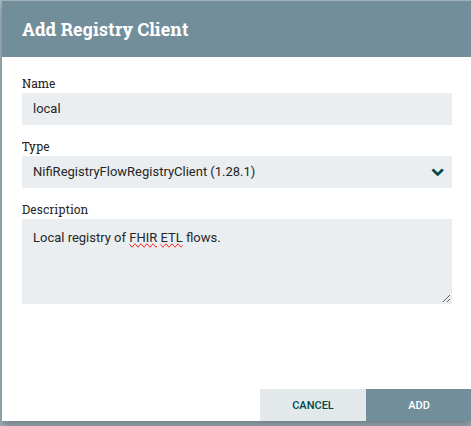
- Click the Register a new registry client (or + icon),
- Call (Name) our new Registry "local."
- Type its URL into the space provided, "https://localhost:18080".
(This URL will not likely be the one suggested when you click to
type it in, so you'll be replacing what's there.)
At least by NiFi Registry 1.28.1, this is replaced by a discovery
mechanism that reveals what Registries you are running.
- Provide a description if you like,
"This is our new, local registry with bucket, Test."
(This will appear usefully in places of the NiFi UI.)
- Now click the Add button and see your registry client in the
table.
- Click the Close button in the upper-right of the NiFi
Settings (Controller settings) dialog.
- Create a flow process group
- If you do not happen already to have a process group on your NiFi UI
canvas, you must create one in order to continue this tutorial. All this
work will be done in the Apache NiFi UI's tab in your browser. Here's
how:
- From the Components Toolbar, the large icons at the top of the
window, click and drag a new Process Group to your canvas. (If
you don't know which icon this is, hover briefly over each icon until you
see the right one named.)
- In the dialog that appears, Add Process Group, type in a name for
the group, "Test Group," and click Add. This gives us (an empty)
group to put into the Registry.
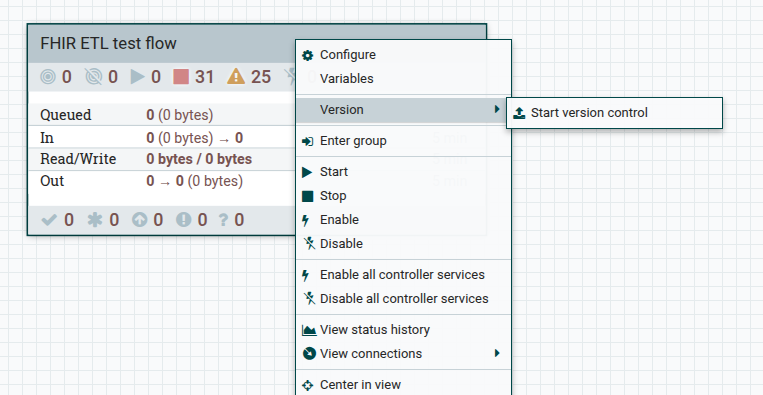
- Induct the flow process group into the Registry
- Right-click (in NiFi UI) on the title bar of the process group you want in
version control, choose Version, then Start version
control.
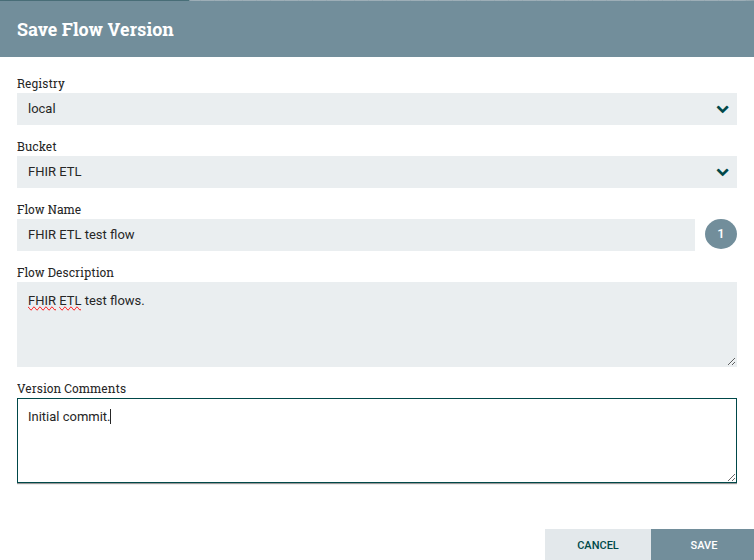
- A new dialog appears. I filled out mine as below (but, I have since
updated this document a little and different content appears
in the new images I've added):
-
Registry: Local
Bucket: Test
Flow Name: Test flow
Flow Description:
This is our test flow for experimenting with NiFi Registry
Version Comments: Initial commit.
- Click the Save button. You'll see a green checkmark to the left
of Test Group (the process group you created above).
This means that the process group is now under Registry (version)
control.
- Examine Registry
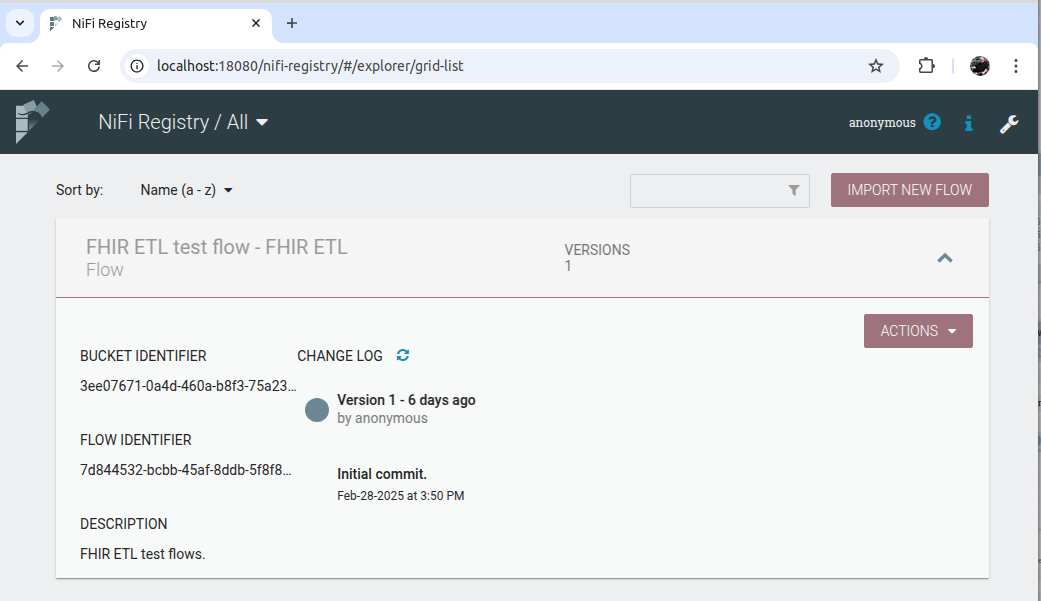
- Return to the NiFi Registry UI tab in your browser.
- Click the Close button in the upper right-hand corner of the
window.
- You should see a list of one flow named, "Test flow - Test" (or, in
my most recent case, "FHIR ETL test flow"), with a single version (1).
- Clicking on the flow in the list drops an information pane below it
containing formal identifiers, the flow's description and a changes log.
- Making changes to the NiFi process group

- Return to the Apache NiFi UI browser tab.
- Open (double-click) the process group (named "Test Group") and add some
flow elements to it. I'm going to add an instance of the
GenerateFlowFile processor to it.
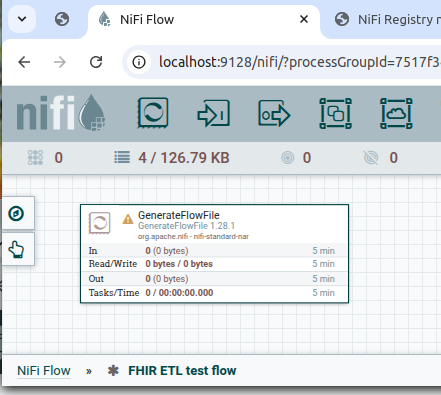
- Right-click on the canvas and choose to Refresh it.
- Notice at bottom-left that the "Test Group" process group no longer has a
green checkmark, but a big asterisk indicating it has changed.
-
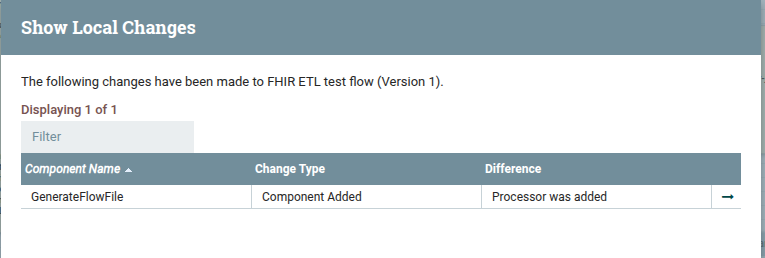
- Right-click on the canvas, choose Version, then
Show local changes see an alert listing the changes that have
been made to the process group since the last time it was saved.
I show "Processor was added" (GenerateFlowFile).
- Dismiss the Show Local Changes alert by clicking on Close.
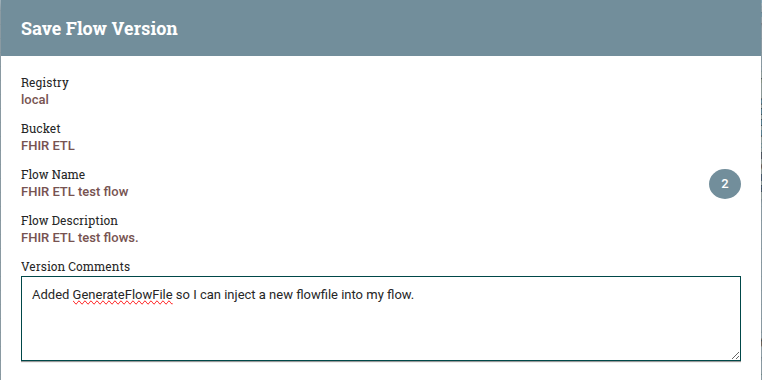
- Right-click again on the canvas, choose Version, then
Commit local changes. A new dialog surfaces,
Save Flow Version, to accommodate version comments and
confirmation, the Save button, of these changes.
Make a comment in Version Comments like "Changes made to flow."
Click Save.
Back out of the process group by right-clicking on the canvas and
choosing Leave Group. You will notice in the title bar of the
process group, to the left of its name, a green checkmark indicating that
the version being used in this NiFi flow is the latest.
- Importing the version-controlled flow into NiFi
- We can do this into another instance of NiFi by setting one up, launching
its UI in a browser, then connecting it as shown above,
Connect our running NiFi instance to the Registry.
Or, we can just import the version-controlled process group a second time
into the same instance that we have been using for this tutorial (which
is easier than setting up a new test instance of NiFi). We choose to do
this just to make this tutorial easier:
- Whether at the root of the NiFi instance or down inside a process group,
drag a new process group from the Components Toolbar to the
canvas.
You will see a dialog Add Process Group appear. It will offer to
allow you to Import from Registry. Click that. Choose the
version of the version-controlled flow (either the empty version 1 or
version 2 contain our two connected processors, GenerateFlowFile
and LogAttribute.
- Click on version two and click Import. You will see a second
"Test Group" process group added (alongside and named identically) to the
first.
- If we descend into the process group and change configuration (I'm going
to change
GenerateFlowFile's Scheduling → Run Schedule
to 10 sec from 0 sec), we see an asterisk replace the
green checkmark on the process group as we'd expect. The other one
doesn't change. We're going to carry through here:
- Right-click in the canvas and choose to Refresh it.
- Right-click again, choose Version, then
Commit local changes, add a different commit comment (in order
to recognize it later), "Changed run schedule to bug us less in testing."
Click Save.
- Right-click in the canvas and choose Leave group. At this point,
you'll see a green checkmark on the process group you just modified (and
committed), but a red up-arrow on the other (one that you didn't modify).
- Double-click the out-of-date process group to drill down into it.
- Right-click in the canvas, choose Version, then
Change version. You can select the new, third version, then
click Change, wait a while, click Close, and then see
(in the lower left-hand corner) the green checkmark indicating that the
flow is at the latest revision.
- Right-click in the canvas, choose Leave group, and see both
process groups are up-to-date.
Setting up a secure Apache NiFi Registry
To accomplish this which is a given in any production environment, you'll be
downloading the NiFi Toolkit (version matching the versions of NiFi and NiFi
Registry you are using). The name of this download will be something like
nifi-toolkit-1.15.0-bin.zip.
Perhaps I'll come back and do a tutorial here. Meanwhile, there is such a (n
old) tutorial at
Apache NiFi Registry → Links → Videos. About 10 minutes.
Setting up a secure Apache NiFi to integrate with a secure NiFi Registry
Prerequisite: the section just above on setting up a secure Apache NiFi
Registry.
Ditto for the video at
Apache NiFi Registry → Links → Videos. About 10 minutes.
Storing versioned flows in a Git repository
This one's also very important to be able to do; it's the only way your
versioned flows will be genuinely backed up and available across multiple
hosts.
You'll use a Git flow-persistence provider so that versioned flows in the NiFi
Registry are automatically stored in remove Git repositories such as GitLab,
GitHub, Bitbucket, etc. In fact, these professional versions of Git give you a
more straightforward accommodation of NiFi Registry than if you set up your
own, private Git server.
You must have created a new repository in Git to host your NiFi Registry. This
repository is cloned down in the directory where you installed your NiFi
Registry.
See the video at
Apache NiFi Registry → Links → Videos.
Appendix: a practical experience...
I'm going to use Apache NiFi and NiFi Registry 1.21.0 to set up from scratch
according from
Getting Started with Apache NiFi Registry. This is a more real
project I'm doing for work than back when I wrote the
Set-up tutorial before.
- Download...
- I downloaded and exploded the two tarballs to ~/dev/nifi.
Typically, because I develop to and test flows in a local instance of
NiFi, I neutralize the need for security. See
here.
- Launch...
- Once downloaded and installed, I launch the registry.
- Apache NiFi Registry user interface...
- Now I bring up the user interface in a browser:
http://localhost:18080/nifi-registry.
This reaches the Registry, gives me a nice page that says
"There are no buckets to display."
(Note that, by editing conf/nifi-registry.properties, I have the
leisure of modifying port 18080 if that's unsuitable for the
host on which I'm running the Registry.)
- I create a bucket by clicking the wrench button and name it "Test." I see
this new bucket listed.
- Apache NiFi user interface; configure for Apache NiFi Registry instance...
- Turning to Apache NiFi 1.21.0, I launch it
$ ~/dev/nifi/nifi-1.21.0/bin/nifi.sh start
and
- Go to the Main (hamburger) menu, choose
Controller Settings, then click REGISTRY CLIENTS tab,
Add, then name the new Registry Client
"Local registry 1.21.0."
- To configure the Registry Client I click the Edit
(pencil) button, then the Properties tab and set the address for
the 1.21.0 NiFi Registry instance:
http://localhost:18080 # (I may have changed the port number?)
Then, I click Update. This dismissed the dialog. Clicking on
the close (×) button at upper right, I dismiss the
NiFi [Controller] Settings window. I see NiFi's new/naked canvas.
- Create a flow...
- Unlike the quick-start guide, I don't have existing flow elements, so I
have to create some. We'll want a Process Group at the top...
- Drag an instance from the NiFi UI Toolbar of a Process
Group to the canvas and name it something distinctive,
"Top-level process group."
- Double-click the new Process Group to get inside.
- Add an Input Port and an Output Port.
- Between them, add an instance of UpdateAttribute and
configure it to have a new, dynamic property named
top.level.process.group. For its value, make it "entered!" and
click OK.
- Connect (a relationship arc) the Input Port to
UpdateAttribute and UpdateAttributes to the
Output Port.
- Right-click in empty canvas and choose Leave Group.
- Version-control the flow...
- Start version control on this Process Group by right-clicking
the new Process Group and choosing
Version → Start version control.
If I get an Error alert stating, "Error retrieving all
buckets," did I set an accurate URL in step 7 above? It's not
my NiFi instance's port number, but the port number of the NiFi Registry.
- I gave the Flow Name as "top-level.process" and a
Comment of "Initial commit." Then I dismissed the dialog.
- I note the green checkmark in the title bar of my Process Group.
- Inspect the controlled flow in the Registry...
- Return to the NiFi Registry's UI (in my browser). If I'm still on the
Settings page and I'm looking at the available bucket I created,
I'll need to click the maroon-colored Close button at
the upper right. I should see a page entitled,
NiFi Registry / All, and I versioned, "top-level.process" Test
flow, with a single version of 1. To see more verbosity, click the
downward-pointing sort of arrow.
- If I ever change some configuration in my flow, add or subtract a
processor, I can right-click on the Process Group and choose
Version → Commit local changes.
This went pretty well identically to the NiFi Registry quick-start
documentation and was successful. I also tried configuring an instance of
Apache NiFi 1.13.2 (so, older than the Registry we're running here) and it
worked flawlessly. This is good because it means NiFi's Registry version is
independent (at least in 1.x) from NiFi versions (those that support Registry
version control at all).
Importing a versioned flow...
Above we were primarily concerned with creating, saving and versioning flows.
Now, we'll import one.
- Launch the NiFi UI.
- Go to wherever you want to create a flow (either the root or
a Process Group.
- Grab the Process Group from the toolbar at the top of the canvas,
pull it down to the canvas (Add Process Group). Click on (the
name of this control changes depending on the version of NiFi you're
running, but I'll use 1.21.0) Import from Registry.
- You'll see the Import Version dialog. Ensure
- Registry is the name of the Registry you created.
- Bucket is the name of the bucket in which your flows have
accumulated.
- Flow Name is a pop-up menu listing all the flows you have
committed and versioned. Choose the name of the flow you want to
use. It is hoped that your flow names were adequately descriptive.
- Double-click on the desired version from the version list.
- Click the Import button.
Appendix: Useful links