
|
Eclipse and JDBCRussell Bateman |
|
Table of Contents
|
ForewordThis updates some work done by a private study group about five years ago. That syllabus didn't integrate the experience with Eclipse. This tutorial demonstrates setting up a small project that uses JDBC to access a MySQL database with all development done on Eclipse. Accessing other databases will be closely similar. Most of the code here is very old and written when I was very inexperienced. Take it for what it teaches you, but don't let it hold you back from writing it better or the right way. Some of this work will be done on on Windows 7 and some on Ubuntu Karmic Koala. Where there is a reason for you to care that it's one place or the other, I will try to remember to make a pertinent note. Also, I have added over time some appendices to cover more advanced topics like JOINs and stored procedures. IntroductionThis simple tutorial will tackle setting up MySQL, installing the JDBC connector (driver), creating a Java Project in Eclipse, creating and populating a database and otherwise running a few Java statements that enter, update or read data. The purpose of this tutorial is not to demonstrate how databases are exploited in modern-day Java, but to show the nuts and bolts of what is going on (because it all comes down to JDBC). There is nothing keeping you from managing the data in your application this way, it's just not the way modern applications are doing it. These use Hibernate, Spring, Spring plus Hibernate and other, higher-level frameworks. |
You're free to plagiarize this source code all you wish.
Note that the scheme by which I present source code in this article yields a slight deficiency I could not work around. (You'll encounter the problem later several times in this article: I'm warning you up front). It leaves a semi-colon in the CONNECTION_URL. This URL should appear correctly thus:
private static final String CONNECTION_URL = "jdbc:mysql://localhost/dvdcatalog?user=root&password=test123"
...and will not work correctly if the ';' immediately preceeding "password" remains. So, don't merely copy and paste the code without being aware of this problem.
It isn't the purpose of this tutorial to iron out the challenges of setting up Eclipse, but rather, how to use JDBC from within Eclipse. For discussions on setting up Eclipse, see this link. Please set up Eclipse JEE if you intend to write a web application using a Dynamic Web Project instead of a simple Java Project.
At this point, there are some things you can do that will be made simpler later when you want to use them. In particular, Eclipse DTP will have the MySQL driver in it once you've downloaded and signaled the MySQL JDBC connector. If you want to set up Eclipse DTP, then please see my companion notes to another tutorial on this. You don't have to follow the steps to set up Derby and follow the rest of the tutorial if you don't want to (though it will make using MySQL from DTP easier).
If you choose to create and maintain your database here using MySQL or third-party tools, you can skip this activity. (Please don't be confused by what I've said here. I'm not really making use of DTP in this tutorial. I'm just telling you that it exists and it's potentially useful.)
This can be an open-ended problem; myriad possibilities exist, but I'll try to corral the important points for you here.
On Ubuntu, there is nothing easier than to install new, world-class open
software like MySQL. Simply click on Applications -> Ubuntu Software
Center -> Get Free Software. Filter on "mysql". I installed: "MySQL
Server", "MySQL Administrator" and downloaded a tarball for the connector
(JDBC driver) identically to how I did this component from Windows:
mysql-connector-java-5.1.12.tar.gz (so, follow instructions for the
third item in the Windows section below except that you can be Unixy and use
the tarball instead of the ZIP file—it's up to you).
Other Linux platforms support differing advantages for installing software and often come with MySQL already set up. On RedHat Enterprise Linux (version 5), Fedora and CentOS, it's as easy as using yum. Starting the service, setting the password, etc. are easy too:
russ@rhel-32:~> sudo bash                                  # get root
root@rhel-32:~> yum install mysql-server mysql             # install the server
root@rhel-32:~> chkconfig mysqld on                        # configure to come up when host boots
root@rhel-32:~> /etc/init.d/mysqld start                   # kick it off now
root@rhel-32:~> mysqladmin -u root password <new-password> # set the admin password
root@rhel-32:~> mysqld -u root -p                          # test connectivity to MySQL
root@rhel-32:~> exit                                       # unget root
For Windows, it's a bit more work.
Where more than one possibility is presented to you, choose the .zip file for downloading.
To install the MySQL server, administration utility and connector (driver) software, go to http://www.mysql.com/downloads/.
To understand how setting up the JDBC connector fits into the bigger picture of libraries, please peruse Using different libraries in development. Otherwise, come back to follow these instructions after you've set up your first project.
The procedure outlined here will help you set this up the first time for your Eclipse workspace. If it's already set up, the steps are even more obvious.
This procedure should set up the MySQL JDBC connector for your project. For the next project in the same workspace, you will be able to abbreviate this process because it will already be set up, but you don't have to use it: you can create another one, use a different database vendor, etc.
When you've moved the workspace from one computer to another or something else happens to invalidate the workspace assumptions, that is, the various Build Path settings are broken because the User Libraries, including and especially (for this discussion) the Connectivity Driver Definition, you must rebuild all of this.
You'll continue to get the error:
A driver already exists with that name. Please provide a unique driver name.
...until you remove the workspace's internal (but wrong) knowledge of that driver. (This process is more complicated than for a "simple" User Library.)
To remove a driver definition so that you can re-add it from scratch to match its actual location on disk:
Now let's create a new project in Eclipse. Here, we'll just create a simple Java Project.
New -> Package.
New ->
		Class
. Be sure to click the public static void main(String[]
args) box so it will fill in a main() we'll use for testing
the class.
package com.etretatlogiciels.dvdcatalog;

import java.sql.Connection;
import java.sql.DriverManager;
import java.sql.SQLException;
import java.sql.Statement;

/**
 * JDBC interface for DVD Catalog application.
 *
 * @author Russell Bateman
 */
public class DvdJdbc
{
    private static final String CONNECTION_URL = "jdbc:mysql://localhost/dvdcatalog?user=root&password=test123";

    public static void main( String[] args )
    {
        try
        {
            Class.forName( "com.mysql.jdbc.Driver" ).newInstance();

            Connection conn = DriverManager.getConnection( CONNECTION_URL );
            Statement  stmt = conn.createStatement();

            try
            {
                String query = "INSERT INTO ";

                query += "dvdtitle (title, year, length, rating, url, stars)";
                query += " VALUES ('";

                for( int i = 0; i < args.length; i++ )
                {
                    query += args[ i ];

                    if( i+1 < args.length )
                        query += "', '";
                }

                query += "')";
                System.out.println( "Query: " + query );
                stmt.executeUpdate( query );
            }
            catch( SQLException e )
            {
                System.out.println( "SQLException: " + e.getMessage() );
                System.out.println( "SQLState:     " + e.getSQLState() );
                System.out.println( "VendorError:  " + e.getErrorCode() );
            }
        }
        catch( Exception e )
        {
            System.out.println( "Holy crap, Batman!" );
            System.out.println( e.getMessage() );
            e.printStackTrace();
            System.out.println( "Remember: mandatory fields include:" );
            System.out.println( "title, year, length, rating, url, stars" );
        }
    }
}
(Note: the following statement loads the driver class, creates an instance of it, and registers the driver.)
Class.forName( "com.mysql.jdbc.Driver" ).newInstance();
Now run the project by right-clicking on DvdJdbc.java in the Package
Explorer and choosing Run As -> Java Application. You
should get something like the following error output in your console window:
Holy crap, Batman! Unknown database 'dvdcat' com.mysql.jdbc.exceptions.jdbc4.MySQLSyntaxErrorException: Unknown database 'dvdcat' at sun.reflect.NativeConstructorAccessorImpl.newInstance0(Native Method) at sun.reflect.NativeConstructorAccessorImpl.newInstance(NativeConstructorAccessorImpl.java:39) at sun.reflect.DelegatingConstructorAccessorImpl.newInstance(DelegatingConstructorAccessorImpl.java:27) at java.lang.reflect.Constructor.newInstance(Constructor.java:513) at com.mysql.jdbc.Util.handleNewInstance(Util.java:409) at com.mysql.jdbc.Util.getInstance(Util.java:384) at com.mysql.jdbc.SQLError.createSQLException(SQLError.java:1054) at com.mysql.jdbc.MysqlIO.checkErrorPacket(MysqlIO.java:3562) at com.mysql.jdbc.MysqlIO.checkErrorPacket(MysqlIO.java:3494) at com.mysql.jdbc.MysqlIO.checkErrorPacket(MysqlIO.java:920) at com.mysql.jdbc.MysqlIO.secureAuth411(MysqlIO.java:4000) at com.mysql.jdbc.MysqlIO.doHandshake(MysqlIO.java:1285) at com.mysql.jdbc.ConnectionImpl.createNewIO(ConnectionImpl.java:2186) at com.mysql.jdbc.ConnectionImpl.( ConnectionImpl.java:787)) at com.mysql.jdbc.JDBC4Connection.(J DBC4Connection.java:49) at sun.reflect.NativeConstructorAccessorImpl.newInstance0(Native Method) at sun.reflect.NativeConstructorAccessorImpl.newInstance(NativeConstructorAccessorImpl.java:39) at sun.reflect.DelegatingConstructorAccessorImpl.newInstance(DelegatingConstructorAccessorImpl.java:27) at java.lang.reflect.Constructor.newInstance(Constructor.java:513) at com.mysql.jdbc.Util.handleNewInstance(Util.java:409) at com.mysql.jdbc.ConnectionImpl.getInstance(ConnectionImpl.java:357) at com.mysql.jdbc.NonRegisteringDriver.connect(NonRegisteringDriver.java:285) at java.sql.DriverManager.getConnection(DriverManager.java:582) at java.sql.DriverManager.getConnection(DriverManager.java:207) at com.etretatlogiciels.dvdcatalog.DvdJdbc.main(DvdJdbc.java:29) Remember: mandatory fields include: title, year, length, rating, url, stars
The error results from the fact that, after installing MySQL, we didn't in fact create a database table or give it some values and here we are trying to run against no database at all.
Let's create a database and populate it. This can be done one of several ways. These are all options on both Windows and Linux.
In this tutorial, we'll give a very quick nod to doing this from Java. Then, we'll cover doing it using tools that came with MySQL. We won't discuss using a third-party tool, though the process is similar and/or just as easily accomplished in such a utility. Covering Eclipse Data Tools Platform is an interesting discussion, but best left for another tutorial.
A bit out of order, some of the code in this tutorial expects that you've created a new database (in MySQL) named dvdcatalog. If you don't do this up front, some of the examples may fail. Eventually, you are shown how to do this by hand. The following example shows how to get in trouble here: in order to connect to the database, you supply a URL that contains an expectation that dvdcatalog exists, that there is a user root, and that its password is test123. Missing any of this, you'll fail (and, if new at this, you might not immediately realize why).
private static final String CONNECTION_URL = "jdbc:mysql://localhost/dvdcatalog?user=root&password=test123";
.
.
.
Connection conn = DriverManager.getConnection( CONNECTION_URL );
You should create a database and table(s) by hand using the command-line interface or, perhaps, a GUI administrator utility. This is because it would be fairly unusual to do it any other way, though you could.
To do this programmatically, from Java, you must have a connection to an already existing database table. The code for doing this is here. (Again, the caveat for the spurious semi-colon in CONNECTION_URL.)
package com.etretatlogiciels.dvdcatalog;

import java.sql.Connection;
import java.sql.DriverManager;
import java.sql.SQLException;
import java.sql.Statement;

/**
 * JDBC interface for DVD Catalog application.
 *
 * Create a new database and a table programmatically, from Java.
 *
 * @author Russell Bateman
 */
public class JdbcCreate
{
    private static final String CONNECTION_URL = "jdbc:mysql://localhost/dvdcatalog?user=root&password=test123";

    public static void main( String[] args )
    {
        try
        {
            Class.forName( "com.mysql.jdbc.Driver" ).newInstance();

            Connection conn = DriverManager.getConnection( CONNECTION_URL );
            Statement  stmt = conn.createStatement();

            try
            {
                System.out.println( "Create a new database..." );
                stmt.executeUpdate( "CREATE DATABASE tryit;" );
            }
            catch( SQLException e )
            {
                System.out.println( "SQLException: " + e.getMessage() );
                System.out.println( "SQLState:     " + e.getSQLState() );
                System.out.println( "VendorError:  " + e.getErrorCode() );
            }

            try
            {
                System.out.println( "Use the new database..." );
                stmt.executeUpdate( "USE tryit;" );
            }
            catch( SQLException e )
            {
                System.out.println( "SQLException: " + e.getMessage() );
                System.out.println( "SQLState:     " + e.getSQLState() );
                System.out.println( "VendorError:  " + e.getErrorCode() );
            }

            try
            {
                String table = "CREATE TABLE try_a_table( "
                             + "id INTEGER AUTO_INCREMENT NOT NULL PRIMARY KEY,"
                             + "year INTEGER(4)"
                             + ");";
                System.out.println( "Create a new table in the new database..." );
                stmt.executeUpdate( table );
            }
            catch( SQLException e )
            {
                System.out.println( "SQLException: " + e.getMessage() );
                System.out.println( "SQLState:     " + e.getSQLState() );
                System.out.println( "VendorError:  " + e.getErrorCode() );
            }
        }
        catch( Exception e )
        {
            System.out.println( "Holy crap, Batman!" );
            System.out.println( e.getMessage() );
            e.printStackTrace();
        }
    }
}
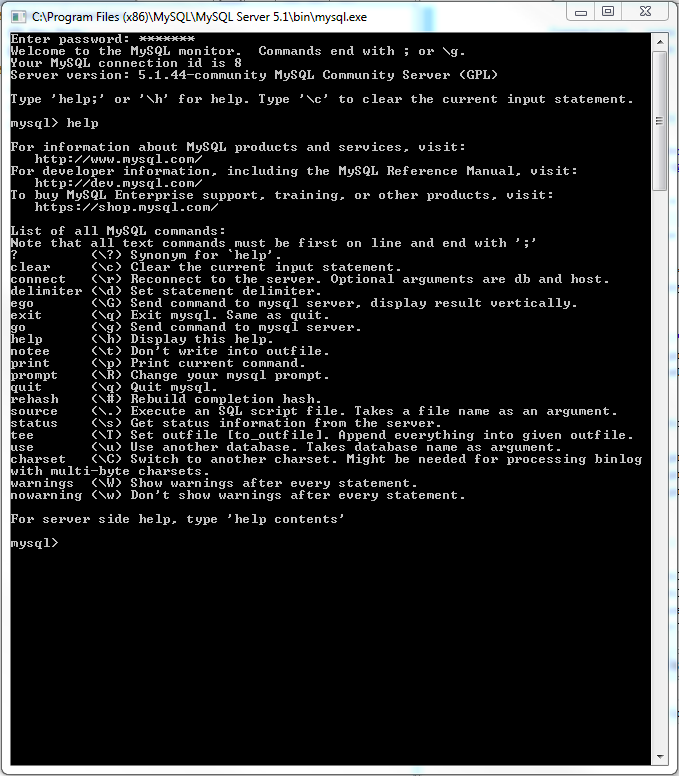
Arguably, the simplest way to set up a trivial database and one or more tables is to use the command-line environment that comes with MySQL. Also, it works identically between Windows and Linux. Here, I log in using the password I set when I installed the MySQL server. Then I type help.
Mostly, we'll just use SQL statements to create a table with schema. SQL is not case sensitive, so you may use case to indicate keywords or just ignore it altogether. I use upper case for keywords in my coded SQL statements, but I don't use it when I'm typing at the command line.
create database dvdcatalog; show databases; dvdcatalog
should appear along with others like mysql and test
(and tryit if you ran the code to create a table from Java in
the earlier example).
mysql> create table dvdtitle -> ( -> id integer auto_increment not null primary key, -> title varchar(255), -> year varchar(4), -> length int, -> rating int, -> url varchar(512), -> stars varchar(512) -> );- Assuming no errors, show that table:
describe dvdtitle.- (If you create the table, but then decide later you've made a mistake, just remove it thus: )
mysql> drop table dvdtitle;You'll just recreate it the way you want it. If you want, you can create it in a file, create-dvd.sql, ...
CREATE TABLE dvdtitle ( id INTEGER AUTO_INCREMENT NOT NULL PRIMARY KEY, title VARCHAR(255), year VARCHAR(4), length INTEGER, rating INTEGER, url VARCHAR(512), stars VARCHAR(512) );...then invoke the statement from the command line here:
mysql> source C:\Users\russ\dev\j2ee\create-dvdtitle.sql mysql> Query OK, 0 rows affected (0.07 sec)The advantage to keeping important statements of schema in SQL scripts like this is that a) it's easier to correct and resubmit the statement and b) it provides a minor level of back-up for re-creating the database.
Run the project again
Now that you've done this much, try running the application again by right-clicking on DvdJdbc.java. You'll get a different error in the Eclipse console window. (All these false starts are only to get you used to what errors look like and what they mean.)
Query: INSERT INTO dvdtitle (title, year, length, rating, url, stars) VALUES ('') SQLException: Column count doesn't match value count at row 1 SQLState: 21S01 VendorError: 1136You can look up details on MySQL (vendor) error simply by searching for the error number on the web: "mysql error 1136"—in this case, what's reported is enough. The reason this doesn't work is because a closer look confirms that DvdJdbc was originally written as a command-line utility to use to populate the database and the data to write to the table was supposed to have been passed on the command line.
Here we're trying to insert a new row in our recently created table using createStatement() and executeUpdate():
Statement stmt = conn.createStatement(); . . . stmt.executeUpdate( "INSERT INTO dvdtitle( title, year, length, rating, url, stars ) VALUES( ... );" );The problem is that we don't actually have any values to insert since we're not gathering them yet. Our test code assumes we're using this class from a command line where we'll supply the data. At this point, we'll abandon the DvdJdbc class in the rest of the tutorial.
To get on with our examples on actual data in the database, we'll insert two rows of use in our exercise on reading data.
Insert two data rows
This is because we have as yet put no data (rows) into the table. Let's go back and put two in. We're using a numeric rating system (for US ratings) and keeping the film rating just as a number:
Rating Index G 0 PG 1 PG-13 2 M-17 3 R 4 X 5
- Insert a row into the table:
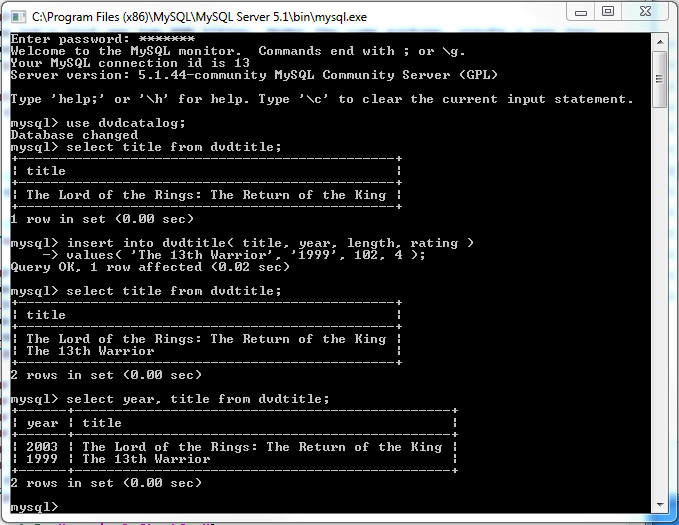
mysql> insert into dvdtitle( title, year, length, rating ) -> VALUES -> ( -> 'The Lord of the Rings: The Return of the King', -> '2003', -> 252, -> 2 -> );- Insert a second row into the table:
mysql> insert into dvdtitle( title, year, length, rating ) -> VALUES -> ( -> 'The 13th Warrior', -> '1999', -> 122, -> 4 -> );Because I had only put one title in before I quit writing for the day, I had to add the second the next day. To futher illustrate using the command-line utility, here's what I did:
Read data rows (list DVD titles)
Now let's list our two DVD titles. Under the same package, create a new Java source file, DvdList.java.
- Create a new class, DvdList. Right-click on the package icon, then choose
New -> Class. Be sure to click the public static void main(String[] args) box so it will fill in a main() we'll use for testing the class.- Type the class code in. (Mind the earlier caveat for the spurious semi-colon in CONNECTION_URL.)
DvdList.java:
package com.etretatlogiciels.dvdcatalog; import java.sql.Connection; import java.sql.DriverManager; import java.sql.ResultSet; import java.sql.SQLException; import java.sql.Statement; /** * JDBC interface for DVD Catalog application. * * @author Russell Bateman */ public class DvdList { private static final String CONNECTION_URL = "jdbc:mysql://localhost/dvdcatalog?user=root&password=test123"; public static void main( String[] args ) { try { ResultSet result = null; Connection conn = DriverManager.getConnection( CONNECTION_URL ); Statement stmt = conn.createStatement(); try { result = stmt.executeQuery( "SELECT title, year FROM dvdtitle ORDER BY year;" ); } catch( SQLException e ) { System.out.println( "SQLException: " + e.getMessage() ); System.out.println( "SQLState: " + e.getSQLState() ); System.out.println( "VendorError: " + e.getErrorCode() ); } /* Here we can traverse the results and list the movie titles... */ while( result.next() ) { String title = result.getString( "title" ); String year = result.getString( "year" ); System.out.println( year + " " + title ); } } catch( Exception e ) { System.out.println( "Holy crap, Batman!" ); System.out.println( e.getMessage() ); e.printStackTrace(); } } }Now run the new Java source in the project by right-clicking on DvdList.java and choosing
Run As -> Java Application. You should get something like the following error output in your console window:1999 The 13th Warrior 2003 The Lord of the Rings: The Return of the KingNow that we've got the two titles and read them back, let's look at some more command-line examples of things to do. These are statements you can code in Java, as part of a larger, more useful program.

Issuing SQL statements in Java
From the two previous code samples, you have learned how to:
- Write to (update) a database (use executeUpdate() if only we had used the command line to specify something).
- Read (select from or query) a database (use executeQuery()).
Prepared statements in Java
(For a much more extensive example of PreparedStatements than the one given here, see http://www.jdbc-tutorial.com/jdbc-prepared-statements.htm.)
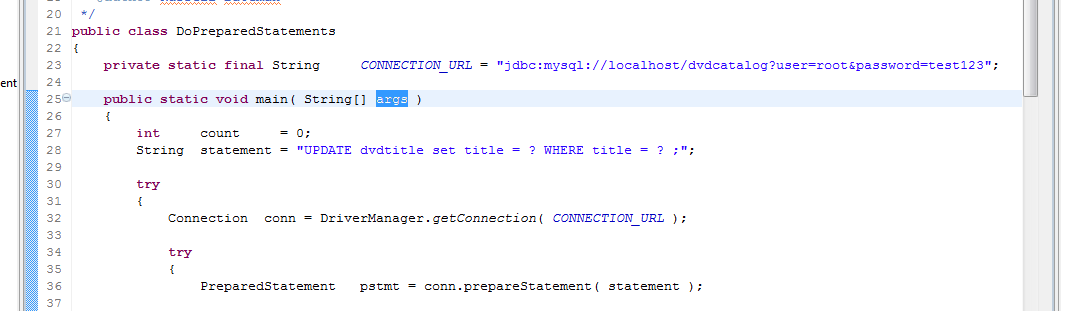
With two sample entries entered into our table by hand, we could use Java to do that instead. However, let's learn how to make a change to one of them and, at the same time, learn how to use a prepared statement—which would be very useful in creating rows too. Here's the code. (Mind the earlier caveat for the spurious semi-colon in CONNECTION_URL.)
DoPreparedStatements.java:
package com.etretatlogiciels.dvdcatalog; import java.sql.Connection; import java.sql.DriverManager; import java.sql.PreparedStatement; import java.sql.ResultSet; import java.sql.SQLException; import java.sql.Statement; /** * JDBC interface for DVD Catalog application. * * @author Russell Bateman */ public class DoPreparedStatements { private static final String CONNECTION_URL = "jdbc:mysql://localhost/dvdcatalog?user=root&password=test123"; public static void main( String[] args ) { int count = 0; String statement = "UPDATE dvdtitle set title = ? WHERE title = ? ;"; try { Connection conn = DriverManager.getConnection( CONNECTION_URL ); try { PreparedStatement pstmt = conn.prepareStatement( statement ); pstmt.setString( 1, "The 13th Warrior" ); pstmt.setString( 2, "The Thirteenth Warrior" ); System.out.println( "SQL statement: " + pstmt.toString() ); count = pstmt.executeUpdate(); if( count == 0 ) System.out.println( "There were no rows matching the criteria" ); else if( count == 1 ) System.out.println( "1 row matched the criteria and was updated" ); else System.out.println( count + " rows matched the criteria and were updated" ); } catch( SQLException e ) { System.out.println( "SQLException: " + e.getMessage() ); System.out.println( "SQLState: " + e.getSQLState() ); System.out.println( "VendorError: " + e.getErrorCode() ); } System.out.println(); /* Here we can traverse the results and see what changed... */ try { ResultSet result = null; Class.forName( "com.mysql.jdbc.Driver" ).newInstance(); Statement stmt = conn.createStatement(); try { result = stmt.executeQuery( "SELECT title, year FROM dvdtitle ORDER BY year;" ); } catch( SQLException e ) { System.out.println( "SQLException: " + e.getMessage() ); System.out.println( "SQLState: " + e.getSQLState() ); System.out.println( "VendorError: " + e.getErrorCode() ); } /* Here we can traverse the results and list the movie titles... */ while( result.next() ) { String title = result.getString( "title" ); String year = result.getString( "year" ); System.out.println( year + " " + title ); } } catch( Exception e ) { System.out.println( "Holy crap, Batman!" ); System.out.println( e.getMessage() ); e.printStackTrace(); } } catch( Exception e ) { System.out.println( "Holy crap, Batman!" ); System.out.println( e.getMessage() ); e.printStackTrace(); } } }What we've done is to replace the Statement of DvdJdbc with PreparedStatement, then use question marks as variables in place of hard title names. Then, we perform variable replacement using some methods inside this class. (We also jettison the use of command-line arguments for gathering data for the rows.)
Instead of running this example as we have others (like DvdList.java), let's debug it to see what's happening. We first need to set a breakpoint so that we can stop in the debugger. Set a breakpoint (in your code) on line 28 below (assuming it's the same line number in your code: change it if it's not).
You do this by double-clicking in the column to the left of the one in which you see the line numbers. Or, you can right-click in that column and choose Toggle Breakpoint. When the breakpoint is set, it appears something like this:

Launch the Eclipse debugger
Now, to launch the debugger, right-click on DoPreparedStatements.java and choose
Debug As -> Java Application. The Debug Perspective will come up and execution will halt at the where you've set the breakpoint. We'll step through to watch a few things. To control this, look above the source code window until you seeThese are the debugger controls. Starting with the green arrow, from left to right, the controls in red are the most useful to us right now:
- Run/continue...from the current breakpoint.
- Suspend (ignore this control).
- Halt debugger...before returning to Java or other perspective.
- Disconnect (ignore this control)
- Step into...the next method on the current line; if the line's code is complex enough, it may be challenging to understand where this will go.
- Step over...the current line (executing it).
- Step out of...the current activation (method); this works even after having stepped down into a class for which there is no source code.
- Drop to frame, Use step filters, etc. (ignore the rest).
Step into code using debugger. Stop at the executeUpdate() method call. Click on pstmt in the Variables tab to see the fleshed out statement that will be executed. You will see how the variables have been replaced. If you proceed, you should succeed in changing the erroneous title, "The Thirteenth Warrior" to the correct title, "The 13th Warrior".
If you keep stepping, you'll walk through reading (using "SELECT") to enumerate the two movie titles in the database table.
Debugging PreparedStatements
In MySQL, you can stop after the calls to setString(), etc. and use toString() to render the prepared statement (with parameter replacement) to see the finalized query statement. However, this isn't guaranteed to work. In fact, if you're querying an Oracle database, it will not and there's no solution to this.
This is because each database is free to implement the prepared statement the best and most efficient way it sees fit and this does not alway mean by direct parameter replacement. Things can be done in a more efficient way leaving what comes back from toString() nonsensical and useless. If a database weren't free to play fast and heavy with this interface, PreparedStatement would only be useful for defending against buffer-overflow attacks and not for increasing the efficiency of queries.
Where to go from here?
For more on SQL, you could read O'Reilly's Head First SQL, download some pre-made table scripts and/or try some of my Head First, chapters 5-9 notes and scripts.
Or, you can continue reading here to see where you should go in your personal toolstack.
Modern database use in an application falls into two categories. First, persistence, where an application's state is stored over time. Second, substance, the actual business data that gives the application a raison d'être. You have just examined to the ground-floor level of how this is done.
A database may be used to save state (persistance) from one instance of an application to another. This can include anything from the position and size of windows on a desktop to the name of the last client profile under treatment. This information may or may not be deemed worthy of residing in the principal application data, a full featured relational database manager such as provided by MySQL, PostgreSQL, Microsoft SQL, Oracle, etc. In this case, it may be relegated to a separate instance (table) in one of those or to a different, small-scale database like Apache Derby altogether.
Decisions about application data design are made and implemented to benefit the purpose of the application and the setting in which the application is used (web clients, office thick clients, formal, informal uses, etc.). But, in the end, it's just data. Successful exploitation of data is measured for a developer by how easily data can be created, read, manipulated and otherwise maintained.
When table data is used by the developer, it's necessarily promoted to a data construct such as struct in C or a special class in Java. The JDBC example shown here has no such structure and is impractical beyond the purposes of this tutorial. Indeed, the row of data, one per film, suggests structure to any developer. Reaching an organized and useful state requires a great deal of effort. JDBC does nothing to help this. Hence, the existence of great frameworks such as Hibernate.
At the JDBC level, the Java developer has no more tools at his fingertips than the C programmer. He must read a row, then dredge the data out of the row, field by field, type by type and populate the fields in a class instance he creates for this purpose. That's no different than what is done in non-object oriented languages like C.
A framework for doing this such as Hibernate takes over JDBC—already shielding the developer from variations between the SQL spoken by different vendor databases (MySQL versus Microsoft SQL, for instance)—and solves the problem of presenting the data as an instance of a class you prepare for it. There are tutorials to take you beyond today's level.
In the meantime, check for additional bits of information I have added (and will continue to add) in appendices here.
Appendix: Tips on the MySQL command-line tool
To make MySQL's window wider, right-click on the title bar, choose Properties and Layout.
Here is a quick crib sheet with some information on using command-line MySQL to continue what was shown above.
shell> mysql [database-name] —initial launch command, database name is optional shell> mysql < batch-file —batch mode command shell> mysql -e "source batch-file" —Windows last-ditch batch mode command Additional shell command-line arguments
-h hostname -u username -p —provide hostname, user and password (prompted for) on command line --force —continue even if some of the statements produce errors MySQL commands
Besides proper SQL commands and what typing "help" gets you in the tool, consider these:
mysql> show databases; —shows available databases on server mysql> use database-name; —select which database to focus on mysql> select database(); —shows which database is being used/current mysql> show tables; —lists the tables in the database mysql> describe table; —shows the table schema mysql> source batch-file; —processes SQL statements from batch-file Appendix: MySQL references and problem-solving
For more MySQL-specific commands, see http://www.pantz.org/software/mysql/mysqlcommands.html.
For a tutorial on writing SQL statements, visit w3Schools.com.
As shown by some of the error (exception) handling in the Java code, you can get some pretty good detail on what's going on wrong. For example, if you got something like:
SQLException: Column 'interests_id' not found. SQLState: S0022 VendorError: 0...you could Google for the SQL state. At Mapping MySQL Error Numbers to SQLStates, you'd find ER_BAD_FIELD_ERROR suggesting, in this case, that the exception occurred as the result of calling ResultSet.getInt( "interests_id" ) though the ResultSet being traversed doesn't have a field by that name in it.
Appendix: Some bibliography and links
Here are links to tutorials and technologies useful in relation to the subject of this article.
- Companion notes on Setting Up and Using Eclipse Data Tools Platform; mine as notes on a tutorial linked to by Lars Vogel.
- Tutorial on the Eclipse Data Tools Platform.
- Java Persistance API (JPA) by Lars Vogel; this is a non-Hibernate, yet standardized approach.
- sqlzoo.com appears to be a useful site.
Hibernate and Spring...
Christian Bauer and Gavin King, Java Persistence with Hibernate, Manning Publications, November, 2006, New York. This is the bible.
Craig Walls, Ryan Beidenbach, Spring in Action, Manning Publications, August, 2007, New York.
- Hibernate home
- SpringSource home
- Hibernate and Spring Tutorial
Appendix: A JOIN example
(Note: I didn't want to leave this tutorial without a reference to two SQL constructs, JOIN and UNION, even if I simply cannot cover every possible feature of SQL.)
Imagine these tables that are part of a scheme to host subscribers to a service that coordinates them with their favorite collegiate teams. (It's a stretch to think such a service would be useful, but it helps create an example. I just saw Social Networking, so I'm thinking about colleges, students, etc.)
t_subscribers +---------------+--------------+------+-----+---------+----------------+ | Field | Type | Null | Key | Default | Extra | +---------------+--------------+------+-----+---------+----------------+ | name | varchar(64) | NO | PRI | NULL | | | gender | char(1) | YES | | NULL | | | age_group | char(1) | YES | | NULL | | | subscriber_id | int(11) | NO | UNI | NULL | auto_increment | +---------------+--------------+------+-----+---------+----------------+ t_schools +---------------+--------------+------+-----+---------+----------------+ | Field | Type | Null | Key | Default | Extra | +---------------+--------------+------+-----+---------+----------------+ | school_id | int(11) | NO | PRI | NULL | auto_increment | | name | varchar(64) | YES | | NULL | | | teamname | varchar(64) | YES | | NULL | | +---------------+--------------+------+-----+---------+----------------+ t_schoollist +---------------+--------------+------+-----+---------+-------+ | Field | Type | Null | Key | Default | Extra | +---------------+--------------+------+-----+---------+-------+ | school_id | int(11) | NO | | NULL | | | subscriber_id | int(11) | NO | | NULL | | +---------------+--------------+------+-----+---------+-------+The intermediate table, t_schoollist, is set up such that any subscriber can elect interest in 0, 1, or more teams.
How to generate a list for a given person of his or her favorite schools? We perform a JOIN of the school_id fields of the school list and schools tables plus of the subscriber_id fields in the subscriber and school list tables. Then using the resulting table we select the name of the school(s) out of the school table where (on that row) the name of the person is the one for whom we're generating the list.
SELECT school.name FROM t_schools AS school INNER JOIN t_schoollist AS list ON list.school_id = school.school_id INNER JOIN t_subscribers AS person ON person.subscriber_id = list.subscriber_id WHERE person.name = 'Russ';The intermediate table, t_schoollist, contains two schools that interested Russ when he signed up for the service. If Russ is subscriber 1 and Georgia Tech is 103 and Brigham Young University is 79. The filled tables might appear thus:
t_subscribers +---------+--------+-----------+---------------+ | name | gender | age_group | subscriber_id | +---------+--------+-----------+---------------+ | Russ | m + 5 | 1 | | Julene | f + 5 | 2 | | Thayne | m + 3 | 3 | | Allan | m + 4 | 4 | ... . . ... | Richard | m + 2 | 1039 | +---------+--------+-----------+---------------+ t_schools +-----------+--------------------------+--------------+ | school_id | name | teamname | +-----------+--------------------------+--------------+ ... ... ... | 54 | University of Utah | Running Utes | ... ... ... | 79 | Brigham Young University | Cougars | ... ... ... | 103 | Georgia Tech | Bulldogs | ... ... ... | 248 | Utah Valley University | Wolverines | +-----------+--------------------------+--------------+ t_schoollist +-----------+---------------+ | school_id | subscriber_id | Notes: +-----------+---------------+ | 103 | 1 | Russ likes school #103 (GT) | 79 | 1 | Russ likes school #79 (BYU) | 79 | 2 | Julene likes school #79 (BYU) | 54 | 4 | Allan likes school #54 (UofU) ... .... Thayne has no entry(ies) in this table | 248 | 1039 | Richard likes school #248 (UVU) +-----------+---------------+Note that Thayne's subscriber_id was not put into t_schoollist because he didn't choose a favorite team. (This is obvious only because we're assuming he didn't go back to redo his preferences later and so no team for him is found somewhere in the rows of t_schoollist that are represented by the ellipsis.)
The reason this example is interesting is to illustrate how to implement what would be a variable-length array in Java or C of, in this case, favorite schools in your database table. The output from the JOIN statement for subscriber Russ is:
+--------------------------+ | name | +--------------------------+ | Brigham Young University | | Georgia Tech | +--------------------------+I would like to draw attention to the observation that a JOIN...ON statement's primary function is to equate associated fields in two different tables.
For more on JOIN see here.
Appendix: A UNION example
It's somewhat more difficult to justify the example of a UNION. It is used to coordinate (conjoin) two SELECTs and is a very special and seldomly operation that only makes sense if:
- both tables have the same number of columns
- both tables are basically identical
- uniting both tables leads to important functionality
To continue the JOIN example above, let's suppose I create, in addition to the concept of an array of school teams a subscriber is interested in, also an array of sports that those schools participate in. If I then have two tables with the same number and types of columns such as you see below, there's little point in using UNION to create anything.
t_sportlist +---------------+--------------+------+-----+---------+-------+ | Field | Type | Null | Key | Default | Extra | +---------------+--------------+------+-----+---------+-------+ | sport_id | int(11) | NO | | NULL | | | subscriber_id | int(11) | NO | | NULL | | +---------------+--------------+------+-----+---------+-------+ t_schoollist +---------------+--------------+------+-----+---------+-------+ | Field | Type | Null | Key | Default | Extra | +---------------+--------------+------+-----+---------+-------+ | school_id | int(11) | NO | | NULL | | | subscriber_id | int(11) | NO | | NULL | | +---------------+--------------+------+-----+---------+-------+ mysql> SELECT * FROM t_schoollist UNION SELECT * FROM t_sportlist; +-----------+---------------+ | school_id | subscriber_id | +-----------+---------------+ | 103 | 1 | | 79 | 1 | | 79 | 1 | | 54 | 1 | | 4 | 1 | 4 was a sports_id; it's not meaningful as a school_id | 4 | 2 | ibid | 4 | 3 | ibid +-----------+---------------+This only extends t_schoollist by a fallacious and useless set of rows. MySQL is happy to allow me to do this despite it being a meaningless operation.
However, if, as in the current w3schools quick-reference guide coverage of UNION, we had two tables of employees, one set from the United States and another from Norway, uniting them into a worldwide employee list would make perfect sense. Note that only the first row of any field (column) duplicates will be retained, so additional coumns, if any must be used in order not to lose anything.
t_employees_norway +------+-------------------+ | e_id | e_name | +------+-------------------+ | 01 | Hansen, Ola | | 02 | Svendson, Tove | | 03 | Svendson, Stephen | | 04 | Pettersen, Kari | .. ... +------+-------------------+ t_employees_usa +------+-------------------+ | e_id | e_name | +------+-------------------+ | 01 | Turner, Sally | | 02 | Kent, Clark | | 03 | Svendson, Stephen | | 04 | Scott, Stephen | .. ... +------+-------------------+ mysql> SELECT e_name FROM t_employees_norway UNION SELECT e_name FROM t_employees_usa; +--------------------+ | e_name | Notes: +--------------------+ | Hansen, Ola | | Svendson, Tove | | Svendson, Stephen | | Pettersen, Kari | ... | Turner, Sally | | Kent, Clark | | Scott, Stephen | the Stephen Svendson from the USA table has been lost (he ... might be a different person than the one in Norway!) +--------------------+So, if there were an additional column in these tables, such as a discrete employee id, an address or telephone number, and we retained that column in the SELEcT statement above, Stephen Svendson would not have been lost from the resulting table.
Appendix: Stored procedures
Stored procedures are used to keep a piece of frequently used SQL statements locally (in the database) for whatever advantage that can be: a reduction in the amount of redundant SQL code on the wire, faster execution thereof, etc. (It isn't my purpose here to educate on this question, but only to show a handy example.)
In order to create a stored procedure, you must change the SQL statement delimiter from semicolon (;) to something else since you'll be needing the normal delimiter inside the procedure code. Not changing it will prevent you from creating the stored procedure. Here, we'll use "//" as our termination delimiter.
Conceptually, ...
DELIMITER // stored procedure definition... DELIMITER ;Here's how to define a simple stored procedure. We'll assume that t_subscribers is a table containing a list of subscribers to a service (names, telephone numbers, other information). We'll define a procedure to get a list of those. This isn't a really good example of a stored procedure in terms of important or compelling functionality, but it's simple and easy to understand. The actual SQL code for the procedure is in blue here:
DELIMITER // CREATE PROCEDURE GetAllSubscribers() BEGIN SELECT email, telephone FROM t_subscribers; END // DELIMITER ;Then we run the stored procedure to make certain GetAllSubscribers() works. (Remember, SQL isn't case-sensitive and neither does it matter how you write getallsubscribers.) Note the output here from a sample table I already have:
mysql> CALL GetAllSubscribers(); +-------------------------+------------+ | email | telephone | +-------------------------+------------+ | [email protected] | 8013710431 | | [email protected] | 8013681717 | | [email protected] | 8015551213 | | [email protected] | 8015551212 | +-------------------------+------------+Example
Here's another example, completely using the command-line tool. Again, the table used is so primitive that it's not compelling functionality.
mysql> DELIMITER // mysql> CREATE PROCEDURE GetAllSports() -> BEGIN -> SELECT name FROM t_sports; -> END // Query OK, 0 rows affected (0.00 sec) mysql> DELIMITER ; mysql> CALL GetAllSports(); +------------+ | name | +------------+ | Baseball | | Basketball | | Football | | Lacrosse | | Soccer | | Volleyball | +------------+ 6 rows in set (0.00 sec) Query OK, 0 rows affected (0.00 sec)There is a way to define variables in store procedures. Please refer to a tutorial on why and how you would do this. Stored procedures can also have parameters. Consult your tutorial on how to do this. Stored procedures can also have conditional control statements like IF, CASE and they support various looping constructs. They are therefore very powerful.
A good tutorial on store statements as well as all other MySQL topics is MySQL Tutorial.
There are good reasons for NOT resorting to stored procedures in SQL. Some are religious, some are very concrete. Make certain you really want to use this feature.
Examining a stored procedure
You can see what's in a store procedure after its definition using a command:
mysql> SHOW CREATE PROCEDURE GetAllSubscribers; +-------------------+----------+----------------------------------------------------------------------------------------------------------+----------------------+----------------------+--------------------+ | Procedure | sql_mode | Create Procedure | character_set_client | collation_connection | Database Collation | +-------------------+----------+----------------------------------------------------------------------------------------------------------+----------------------+----------------------+--------------------+ | getallsubscribers | | CREATE DEFINER=`russ`@`localhost` PROCEDURE `getallsubscribers`() begin select * from t_subscribers; end | utf8 | utf8_general_ci | latin1_swedish_ci | +-------------------+----------+----------------------------------------------------------------------------------------------------------+----------------------+----------------------+--------------------+ 1 row in set (0.00 sec)It's possible to list out stored procedures. Simplisitically, ...
mysql> SELECT * FROM information_schema.routines; +-------------------+-----------------+----------------+-------------------+--------------+----------------+--------------+----------------------------------------+---------------+-------------------+-----------------+------------------+-----------------+----------+---------------+---------------------+---------------------+----------+-----------------+----------------+----------------------+----------------------+--------------------+ | SPECIFIC_NAME | ROUTINE_CATALOG | ROUTINE_SCHEMA | ROUTINE_NAME | ROUTINE_TYPE | DTD_IDENTIFIER | ROUTINE_BODY | ROUTINE_DEFINITION | EXTERNAL_NAME | EXTERNAL_LANGUAGE | PARAMETER_STYLE | IS_DETERMINISTIC | SQL_DATA_ACCESS | SQL_PATH | SECURITY_TYPE | CREATED | LAST_ALTERED | SQL_MODE | ROUTINE_COMMENT | DEFINER | CHARACTER_SET_CLIENT | COLLATION_CONNECTION | DATABASE_COLLATION | +-------------------+-----------------+----------------+-------------------+--------------+----------------+--------------+----------------------------------------+---------------+-------------------+-----------------+------------------+-----------------+----------+---------------+---------------------+---------------------+----------+-----------------+----------------+----------------------+----------------------+--------------------+ | GetAllSports | NULL | test_tmts | GetAllSports | PROCEDURE | NULL | SQL | BEGIN SELECT name FROM t_sports; END | NULL | NULL | SQL | NO | CONTAINS SQL | NULL | DEFINER | 2010-11-05 09:56:00 | 2010-11-05 09:56:00 | | | russ@localhost | utf8 | utf8_general_ci | latin1_swedish_ci | | GetAllSubscribers | NULL | test_tmts | GetAllSubscribers | PROCEDURE | NULL | SQL | begin select * from t_subscribers; end | NULL | NULL | SQL | NO | CONTAINS SQL | NULL | DEFINER | 2010-11-04 10:59:55 | 2010-11-04 10:59:55 | | | russ@localhost | utf8 | utf8_general_ci | latin1_swedish_ci | +-------------------+-----------------+----------------+-------------------+--------------+----------------+--------------+----------------------------------------+---------------+-------------------+-----------------+------------------+-----------------+----------+---------------+---------------------+---------------------+----------+-----------------+----------------+----------------------+----------------------+--------------------+ 1 row in set (0.00 sec)Listing existing stored procedures is very ugly and little portable (i.e.: what works on MySQL will not in Microsoft SQL or PostgreSQL).
Appendix: MySQL in the real world
I thought it might be interesting for many to understand how, after writing your Java application and creating its database, a commercial host might help you install and run it in a real world setting.
Backing up MySQL
Use mysqldump to dump your database as a (potentially rather huge) script of SQL commands. In fact, this is an excellent way to back up your database on a regular basis:
- Run mysqldump on your database.
- Use gzip to compress it.
- Squirrel it away for safe-keeping.
You can easily write a cron job to do this automatically, over ssh, when it's on the remote server.
Installing your database
Your commercial host may have a web-based application or other procedure for creating your database in its permanent home (including users if more than just yours). After taking care of that, you've got a new database that's empty.
Using scp, you can copy the compressed output from mysqldump to the remote server where you explode it using gunzip. Then, after sshing into the remote server, use mysql and special options (redirecting stdin to the uncompressed file).
It's that easy.
Appendix: Oracle
I'm not too interested in Oracle; it's certainly not affordable. However, I use it in my profession, so I thought I'd add some things I want to remember here. These are commands you do in, for example, SQuirreL. In Oracle, unlike MySQL, there is only "one" database, so you don't "use" a database of more than one.
Oracle commands
select * from cat; —shows available tables in database Oracle error codes
If you see error codes, for example in SQuirreL, you can visit Oracle Error Codes for a handy look-up and explanation of them.
Oracle peculiarities
There are some real peculiar things with Oracle when you're coming from the MySQL (and other) world. There's no auto-increment of the primary key, for instance. Here's how to create such a table.
CREATE TABLE t_partner ( oid NUMBER PRIMARY KEY, name VARCHAR2(64), public_key VARCHAR2(64), private_key VARCHAR2(64) ); CREATE SEQUENCE partner_sequence START WITH 2000000 INCREMENT BY 1; CREATE OR REPLACE TRIGGER partner_trigger BEFORE INSERT ON t_partner * FOR EACH ROW BEGIN SELECT partner_sequence.nextval INTO :new.oid FROM dual; END; / INSERT INTO t_partner ( name, public_key, private_key ) VALUES ( 'ParrotWorld', 'Polly want a cracker?', 'Chocolate' ); SELECT * FROM t_partner; DROP TRIGGER partner_trigger;Only after creating the trigger will the insert statement work. I give the syntax for dropping the trigger after you're done: adding triggers to a database isn't to be done lightly.
* Note: SQuirreL won't execute the create-trigger statement for you. You have to bring up Oracle's Run SQL Command Line application separately. Copy the statement (on one line if you wish), but then press Enter and add the slash. That's odd, but that's how it works.