Though it's been years now—I really got started under the version just
prior to Europa—I still remember the bewilderment of trying to get going
in Eclipse. This isn't really a tutorial on how to do it, but an exposé
on how to reach Eclipse with your project and existing Java code, or what
obstacles you'll overcome in beginning to cooperate with others on a project in
Eclipse. To the extent that this document makes reference to Eclipse
particulars, it was written to Eclipse Galileo.
Among topics covered are:
Working on conventional Java projects in Eclipse
Source code control systems like cvs and svn
What kind and how to create new projects from "external" source
code
How to set up use of libraries (JARs) your project consumes
Using a server/container such as Tomcat
You'll be so enthusiastic about Eclipse after reading this that you'll want to
set it up. When that moment arrives, click here.
You can get all this information more accurately via Eclipse's Help
menu. You can also get help at the
Eclipse newcomers' forum where many brighter folk than I wait to answer
your questions. Still, this short article is a good place to start especially
if you're investingating Eclipse or trying to climb the first little foothill
before tackling the great mountain.
You should probably understand that Eclipse is developed by a (rather huge and
worldwide) open source community with considerable backing by many corporate
entities that does not result in this IDE being beholden to any. Its widespread
adoption makes it the premier tool for Java, JEE and application development of
many types.
There are other, excellent Java environments like NetBeans, but Eclipse is what
most real Java and JEE developers use. (I apologize to NetBeans users; it's a
fantastic tool and easier to use at first. In power, however, it quickly gives
way to Eclipse.)
Architecturally, Eclipse owes much to its plug-ins—modules forming what
we all think of as its nucleaus, but also countless ancillary ones that tailor
it in specific directions. See a list
here of different "Eclipses" for different purposes. This list is not
exhaustive; this is just the list that eclipse.org itself distributes.
In addition, Eclipse is the basis for other, commercial IDEs such as
FlexBuilder® from Adobe.
If you don't work in Java, this document probably isn't the one you want to
read. Though I'm a (very old) C guy, I now work almost exclusively in Java and
am writing for Java. If you are wondering which Eclipse to download, I suggest
you download Eclipse IDE for Java EE Developers unless you are certain
you never want to develop web applications. With this IDE, you can develop both
superb web and non-web applications.
The Eclipse project and workspace
The concept of a project needs little introduction. Even those as I who
originate from a 1980s command-line environment can think of a project as being
the ensemble of resources including source, configuration, library support and
tool stack needed to create an application.
In Eclipse's case, however, there is an additional concept of "workspace."
The Eclipse workspace is like a sandbox in which you can work on more than one
project, but all projects share something in common (like the same sand) in
that they tend (though this can be violated) to use the same configuration in
terms of JDK, the same version of Java compliance, the same set of compiler
errors and warnings, the level of JEE aspects (JavaServer Faces), Java, XML,
etc. validation rules, the same code format templates, and the same containers
or servers (like Tomcat or GlassFish).
The workspace configuration is not hard and fast for you can make
project-specific settings divorced from the assumptions guiding other projects.
Look for Enable project-specific settings in many places in Eclipse
preferences.
Project layout
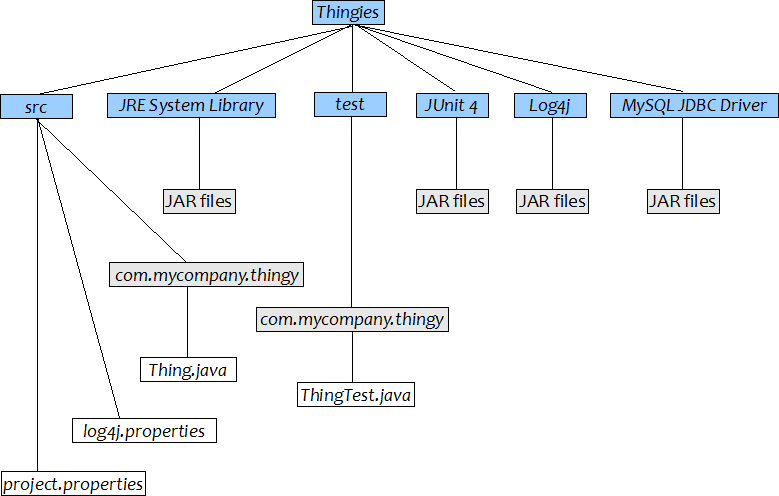
Eclipse lays projects out according to industry best-practices for Java
development although it exercises some choice over areas in which there is any
leeway. Here is a brief illustration of a project named Thingies with
one Java class, Thing and a JUnit test for it. Thingies uses
MySQL and log4j. All Java projects use the JRE System Library. Project
Thingies has some configuration done in project.properties.
As the default option, packages appear as one entity, but underneath the
directory structure is maintained, as can be seen in the Navigator
View (not shown here).
In the example below, the best practice of separating test code from production
source code is illustrated.
Eclipse also provides a Dynamic Web Project whose layout appears different.
Seen from the Project Explorer, this is sometimes confusing or
unrecognizable, but in the end, it's the same. Under Java Resources
are found the src and test subdirectories. The libraries consumed
(JAR files) are under the Libraries subdirectory.
The biggest difference between a mere Java project and a Dynamic Web Project is
the presence of Eclipse's WebContent subdirectory. This doesn't have to
be called by that name, you are free to rename it to anything you want, like
web. webroot, etc. What's under this directory is what's deployed
to a web server container such as Tomcat including JSPs, HTML, CSS, images, XML
configuration files, etc.
WebContent subsumes the WEB-INF subdirectory which is mandated
for web application deployment.
The build subdirectory is where Java class files are placed temporarily
before being exported to a WAR file for deployment.
Source code origins
There are two possible origins of your source code—out of which you'll
build and application:
a source code control system such as Subversion
code you're free to create or import into Eclipse
The difference isn't particularly visible on the surface when you edit your
code, but consuming code from source control requires the same, specific
actions required when you work from the command line, namely, that you worry
about it being up to date before you start editing and commit it when you feel
you have something to hang onto.
When you create a new project in Eclipse, you must decide what the origin of
your code will be. If you consume it from source code control, then you must
not take the default when the create-project wizard comes up, but instruct it
to Create project from existing source.
Uncontrolled source code
If, on the other hand, you are creating a brand new project (that you may or
may not check into source code control later) you can take the default. Once,
however, you commit the project to source code control, you should create a new
project that consumes it as if you were a new developer coming on board. (This
may not in fact be true, but it's how I see it and do it.)
Importing projects
The last place you can get source is by importing it from an existing project,
Eclipse or not. I have the least amount of experience with this and so cannot
say much of it other than it's done by File -> Import... > General
-> Existing Projects into Workspace. I don't think personally that
this approach is the best for creating projects from code under source control.
Saving (and sharing) configuration
Eclipse doesn't use the Windows registry for anything; all is kept in the
filesystem. You cannot share workspaces or projects between computer hosts. You
cannot share them between users of the same host, at least not simultaneously.
What you can do is to use File -> Export -> General ->
Preferences to save your preferences and share them with colleagues.
Use File -> Import -> General -> Preferences to retrieve
those preferences into another (colleague's or your own) workspace.
Use File -> Import -> Existing Projects into Workspace to
get a project that exists in another workspace into a new one. However, the
best alternative for doing this is to use a source-code management tool like
Subversion to keep your (entire) project in a repository that can be shared
between your own different computer hosts as well as those of colleagues.
Source code control systems
While I have a great deal of long experience (long ago) with CVS, I have never
used it from (or with) Eclipse. I have, however, used Subversion in three
different environments with (and from) Eclipse including under Windows
simultaneously with TortoiseSVN
and under Linux using command-line svn.
I surmise, however, that CVS doesn't greatly complicate the matter and that
competent plug-ins for Eclipse exist for this means of controlling source code.
If you are starting out fresh, I nevertheless strongly suggest using the more
modern Subversion. One plug-in for this is called
Subclipse.
You'll commit (have already committed) pretty much everything to CVS or
Subversion, except class files and JARs that are built from (by) your Eclipse
project.
Assuming you've created the classes in Eclipse or they are already in
traditional Java arrangement, you can consume them from
cvs/svn. With a Subversion plug-in like Subclipse you
right-click on the file or folder, choose Team, then you have an array
of options to choose from for committing, updating, reverting, ignoring,
comparing versions, etc.
Beginning to develop
All you have to do to begin developing is to create a new project, then the
packages and source code for that project. Name your project the same as your
application if the latter is composed of only one project. If you need to
create "subprojects" (there is no such thing in Eclipse) that together make up
the application, the names you give them are completely arbitrary.
Let's say that you have several different libraries, each a fairly monumental
piece of work in its own right. Maybe one of them is a port of some piece of
open source code, another is a proprietary library that's going to be consumed
by your team and another one in your company. Maybe your application consists
of a service that's a separate back end of a piece that will have a presence on
the web. Your architecture is a function of your own imagination and though
Eclipse doesn't support so-called subprojects, any project can be a
"subproject" of another, typically residing in them same Eclipse workspace for
convenience.
Many commercial application consist of dozens or more projects. Any resulting
complication only becomes a problem when they are interdependent and you can no
longer resolve build order in ant or Maven. It is not the purpose of
this article to solve or make suggestions for that. I'm only lifting the covers
for you to see a bit ahead.
It will become quickly obvious to you that Eclipse structures projects
according to its interpretation of Java best practice. This may differ slightly
from yours. You don't have to be satisfied with Eclipse. You can change this as
you build your project. This isn't covered in here.
Using existing source
The original, motivating purpose behind this article was to corral all the
things I was used to saying in the Eclipse beginniners' forum about getting
started with an already existing source base. Therefore, my succeeding remarks
will tend to assume this, but much is relevant no matter where your source is
or whether it's under control or not. If you're cooperating with other
developers, however, your code will be under control.
Each developer will create his (or her) new project by right-clicking in the
Package Explorer view (usually the leftmost pane in the workbench if
you haven't restructured it), choosing New, then Java Project.
You may have to explore a deeper, more complex menu to reach this or other
types of projects, but you'll quickly grow comfortable doing this without me
detailing the several paths to it.
When the wizard comes up to create your new project, click Create from
existing source and navigate to where you've checked out your sources. (The
wording is a little different for web projects, but you'll recognize it and it
works the same way.)
Typically, you'll use the subdirectory above your src subdirectory. It's
a little tricky to integrate your project into an Eclipse one, however, if
you've followed conventional Java practice (in the original project or
filesystem structure) it shouldn't be too hard.
Remaining new-project steps
Thereafter, you will need to right-click on the project and use
Build Path to set up other, broad categories or aspects of your
project. As many of these as I can think of are addressed below.
Specifying the JRE and Java-compliance level
You can specify multiple JREs for Eclipse to work with. Then, you can change
between them when this suits your needs and even force one project to use one
and another to use a different one.
Typically, a developer with multiple JDK/JRE needs would privately install each
JDK (always install JDKs not mere JREs) locally, in separate subdirectories.
Always install only JDKs from Sun Microsystems.
To add one or more JDKs to Eclipse (acquaint Eclipse with your multiple JDKs),
pull down the Window menu, choose Preferences, then click on
Java and expand it using the triangle control to the left. Click on
Installed JREs and use that dialog to acquaint Eclipse with each of
the JDKs you wish to use in development (by Adding each, specifying
its path).
Changing the JRE to be used
This might arise if you have a project for an application or subproject of your
appliction, like a library (JAR), that must run on a Java 1.4 virtual machine
(or Java 1.4 JVM). This happened to me once upon a time because I maintained
Java software that had to run on the NetWare operating system. Though ready to
ship, Novell decided against releasing the Java 5 JVM for its now legacy
platform. Some of my libraries and applications still had to run there; others
had begun to give up support of that platform and we moved them ahead to Java
5.
The JRE to be use with a project can be specified at creation time, in the
creation wizard's first dialog. Thereafter, you change this by right-clicking
on the project, choosing Build Path, then Libraries and
choose a different JRE System Library [Java xxx]: Click the Libraries
tab, click JRE System Library, then Remove, then Add
Library, JRE System Library, then Next whereupon you can
re-specify this.
The upshot of this decision is the Java runtime library (set of JARs) that your
project consumes. Among other aspects of Java programming, it affects whether
the generics, enumerations and annotations of Java 5 are supported and all the
other things that change from Java release to Java release.
Java-compliance level
Somewhat separately from the JRE version, you can vary for the workspace or for
the individual project which version of Java to hold the code to. This means
you can constraint the code not to use generics, enumerations, annotations or
other features new to Java 5 by setting the compliance level to 1.4.
You cannot, however, set the compliance level to Java 5 if you're using a Java
1.4 JDK/JRE.
Change the compliance level by right-clicking on the project, choosing
Preferences, then Java Compiler. Then you can choose to
change the compliance level for the entire workspace (all projects not
enforcing their own settings) or for the specific project.
Using a different output folder
Changing the default one set up by Eclipse either at project creation or,
later, by using Build Path.
For a Java Project, the default output folder (where the compiled
.class files go) is <project-name>/bin. I suggest you use
this default for simplicity's sake: you'll never have to change it when
creating new projects. If you wish, however, you can change it to something
else by clicking Browse... and creating a new one. You may be asked if
you wish to delete the original one; you can confirm this without fear since
Eclipse will simply rebuild the project and put the resulting files into the
new place.
I do not advise the use of checking Allow output folders for source
folders. This appears to do little more than dump .class files in
with .java files.
Output folder for the Dynamic Web Project (web application)
Do not change Eclipse's default here,
<project-name>/build/classes. I prefer it to be
<project-name>/WebContent/WEB-INF/classes, but this will not work.
For example, if you're trying to write a JSF-based application, you'll end up
with this problem and the solution I found
to overcome it.
There are reasons to change this, but by the time you need to do so, you'll
know more about it than I do. At the last place I worked, we developed a
server containing quite a number of servlets. The official servlet API states
the classloaders will operate first from WEB-INF/classes and then from
WEB-INF/lib. And, there are other, deeper reasons, but I won't go into
them here.
Specifying (and adding) a different source folder
Changing the default one set up by Eclipse follows somewhat the same logic as
specifying the output folder. However, there is more need for multiple source
folders.
If you like to maintain your source code remotely from your production code,
you'll want to create a new folder at the root of your project, with packages
all parallel to what's in your src folder, named test. In order
for the code and resources under this new folder to be built and consumable
(say, for running or debugging), you'll need to make test a "Source
Folder."
This is done by right-clicking it, choosing Build Path, then
Use as Source Folder.
Note that, at least by the Galileo release, the Package Explorer
displays the src folder as Java Resources: src. If you open the
Navigator view (Window -> Show View -> Navigator),
you'll see a "filesystem" view of your Eclipse project. The Package
Explorer can be a little parsimonious, sparing you from seeing a lot of
irrelevant files and folders in your project that do not directly contribute to
the business of writing Java code, XML configuration, JSPs, etc. The
Navigator view shows it all with no surprises.
Similarly, dynamic source configuration files such as log4j.properties,
messages.properties, messages_fr.properties,
messages_de.properties, this_or_that.xml, etc. must also be in
source folders both to work when you run or debug your application and to be
included in the ultimate deployment file(s).
I like to keep mine separate in a resources subfolder. So, just as for
test, I create it, then make it a source folder (see above).
Using different libraries in development
There are a number of system libraries you will want or need to use in the
development of your application. Each project must have these tailored
specifically.
I refer to these libraries as "system libraries"; they are mostly predefined by
Eclipse. You reach the dialog by right-clicking on your project, choosing
Build Path, then Configure Build Path and clicking the
Library tab. Then, click Add Library. You'll see:
Connectivity Driver Definition—your favorite JDBC connector such
as mysql-connector-java-5.1.12-bin.jar
EAR Libraries—libraries in a special JAR format for deploying
multiple JEE modules
JRE System Library—see discussion on JDK/JRE above
JUnit—JUnit 3 or 4, JARs that help you write test code
Plug-in Dependencies—I don't know anything about this one
Server Runtime—Apache Tomcat, Sun GlassFish, etc., whatever you've
chosen to use as your container
User Library—see next discussion topic
Web App Libraries—gives a list of Dynamic Web Projects
whose output (JARs) can be consumed automatically by this project
Now, it's my impression that committing your project's files to Subversion
(or CVS) should make it so that when your teammate checks out the project,
these will already be set up. This is not the case for User Library.
Read on...
Setting up third-party libraries for consumption
This means which of your own or third-party JARs you must consume. For a
discussion of Build Path -> Configure Build Path -> Libraries ->
Add Library -> User Library, see
JARs and Eclipse Build Path: Setting up the library in Build Path.
This tutorial demonstrates creating one library project, a consuming
application project, and the wiring between them.
While the system libraries spoken of previously will in all likelihood be there
when the project is checked out subsequent times by additional teammates, the
user libraries do not, at least sometimes if not all the time, show up intact.
I'm in the habit of having to respecify them each time I create a new project
using controlled source code. Maybe I've been doing something wrong all this
time. Consider this a warning.
One annoyance of pushing a JAR from a library project to its consuming
project(s) is the lack of Eclipse support for this. You will need to
write—and invoke—an ant script (or use Maven) to
accomplish this with the requisite refresh of the consuming project.
I may come back here at some point and show both an ant script and a
step-by-step for doing this.
Linking source outside the Eclipse project
When you have a component that's related to your Eclipse project, but not part
of it, you can "add" in its source such that you can browse it, edit it, etc.
by right-clicking on the project, choosing
Build Path -> Link Source...
then browsing to the parent of that source tree. The "parent" is in essence the
subdirectory dominating the hierarchy beginning with src (and probably
contains com/acme/fun/etc.).
Then, click OK and the component will appear as an
Eclipse Source Folder
directly under the project.
Adding the thing may create errors in the Problems view that you'll
have to ignore. Most of the time, these errors are simply created by the fact
that its sense of package is confused. There will be an error to the effect
that
The declared package "com.acme.fun" does not match the expected package "src.com.acme.fun"
You can safely right-click the added folder and delete it. You will no longer
because to see or edit the sources it contained and the errors it created will
disappear.
Appendix: Setting up Subclipse
To set up to use the Subclipse (Subversion helper plug-in) in Eclipse, follow
these instructions:
Pull down the Help menu, then choose Install New
Software....
Click the Add button and type in
Subsclipse for Name: and
http://subclipse.tigris.org/update_1.6.x for Location:.
Click OK.
Check the box next to Subclipse and then Next.
You should see a list of (about 7) items that will be installed; click
Next.
Accept the license agreement and click Finish.
You will probably need to reassure Eclipse that you're serious about
using this unguaranteed software. You will probably also relaunch Eclipse
at its request.
This installs the plug-in and sets it up to be updated automatically depending
on your update settings (see Help -> Check for Updates).
Appendix: Integrating Maven
Maven is a superb build tool, but that until recently has been hard to
integrate with Eclipse. Most just use it in parallel, however, integration has
greatly matured. Click
here for notes and links on Maven.
Appendix: Using containers like Tomcat
Using a contain such as Tomcat is much easier within Eclipse than you might
think. The Eclipse Web Tools Platform, an enhanced basic Eclipse with lots of
web application development tools, makes this very easy. You simply specify a
"server" when you create your project. Once you begin launching your
application, for example, by right-clicking on a JSP and choosing
Run As -> Run on Server
(or Debug As -> Debug on Server), Eclipse launches a web browser
with the URL pointed toward your container, be it Tomcat, GlassFish, JBoss, or
any other supported server.
To set up a Tomcat server in a workspace where Dynamic Web Projects will be
developed, perform the following:
Right-click in the Project Explorer
and choose New -> Other....
Scroll through the folders until you find Server, expand it,
then click Server.
Click Next.
Expand the Apache folder and click, e.g.: Tomcat v6.0
Server.
Click Next.
At this point, if you had a Dynamic Web Project, you could add it to the
list of those recognized (configured) to be run by Tomcat.
Click Finish.
Other sorts of servers, as you may have seen while creating the Apache Tomcat
server, are set up this way. These include IBM WebSphere, JBoss,
JOnAS, Oracle OC4J Standalone Server, and a few others. Still
others may be added by installing additional third-party software, usually the
formal plug-in installation mechanism in Eclipse.
Appendix: Updating code and workspaces between computer hosts
Of course, you can bring home a copy of your workspace or project from the
office and dump it on top of what you had last night. Tomorrow, you reverse
directions and bring what you did tonight into the office.
Disaster, you see. Even if you could name and constitute your user libraries
identically, each time you replace files, you're clobbering them and you have
to remove all the user libraries using Build Path -> Configure Build
Path -> Libraries and then re-add them (using the Add
Library button).
Source-code control
The best way to synchronize coding and other work you do on your Eclipse
project is to assemble your project from a source code repository. You check
out the code and other sources to your filesystem, then create a new Eclipse
project using, instead of the default which is to create the project locally to
the workspace, the project root as committed to Subversion (or CVS, etc.).
No more thumb drive between home and office. No more need to rebuild the
library configuration.
You can cooperate with other developers simply through the use of the
Team option for each file. The same problems and caveats that existing
outside IDE development using a source code-control system apply.
You do not commit to Subversion, for example, any .class files or JARs
built dynamically as part of a build. However, you would (you have some
latitude in this, but here's how I do it) commit JARs from one project
ordinarily expected in another. In other words, if you have an ant
script that builds and copies JARs from project A to project B's
WEB-INF/lib folder, for example, you would commit those in project B
(but probably not try to commit the JAR as built in project A in project A).
Similarly, you should commit libraries from third parties like Apache, Sun,
etc. that your projects need to build.
When another developer changes a third-party library, this can be momentarily
disturbing as it may break a great many things as soon as you do an update. You
must react to this by readjusting Build Path -> Libraries to
compensate. However, as you aren't going to overwrite what you do, since only
the sources under Subversion control are changed, you don't have to keep
redoing library configuration.
Creating a new project from existing sources
To create a new project, you must...
create a new project of the appropriate type, the same one as originally
created, be it Java or Dynamic Web Project (or yet some other, but as a
Java developer I'm giving it mostly from that perspective).
specify the source code as coming from wherever you checked it out to
from Subversion; this happens on the first page of both Java and Dynamic
Web Project wizards.
set up the Java compiler compliance level to match the project
set up a Tomcat or other server in the workspace as needed
if the test folder in the project isn't recognized as an Eclipse Source
Folder (which is almost certainly has not), right-click on it and make it
a Source Folder.
set up the Java compiler warning and error levels to match what
everyone else is doing on your team.
organize the libraries via Build Path; add non-user libraries
too such as JUnit; also, the Web App Libraries.
Appendix: Library and client projects
Imagine you have two projects. The one is an application, but it depends on
another, a library for that application (and, perhaps, for still others).
Here it might be best to use two projects, one for the library and one for the
library's client (the application). A project dependency must be set up from
the client project to the library project. This will allow for checking out/in
the projects separately to a tool like Subversion. It keeps the projects
isolated.
To setup the dependency, put both projects into the same workspace. Right-click
the client (application) project and choose Java Build Path -> Configure
Build Path. Click the Projects tab then the Add button.
Select the library project.
The application will now automatically pickup any changes made to the library.
There is a Project configuration tutorial in the Java Development User Guide
provided in Eclipse Help; it discusses different project configuration options.
Appendix: Some random, but perhaps useful ideas...
If you're thinking in terms of source-code control (CVS, Subversion, etc.),
every branch of a project must be a new and different project in Eclipse;
the projects have nothing to do with each other formally speaking.
If you work with lots of projects it is good practice to separate them into
different workspaces: perhaps one for development, one for maintenance
etc. You can launch Eclipse twice with different workspaces
simultaneously. There is an option to set a name in Eclipse's title bar
you can use to keep things straight.
You can group projects using working-sets in the Project Explorer
view, a simple but good way to organize projects.
It's possible to define dependencies, project B opens and closes if project A is opened or closed.