|
|
MongoDB Sharding: Step by step |
Russell Bateman
17 September 2013
last update:
Table of Contents |
|
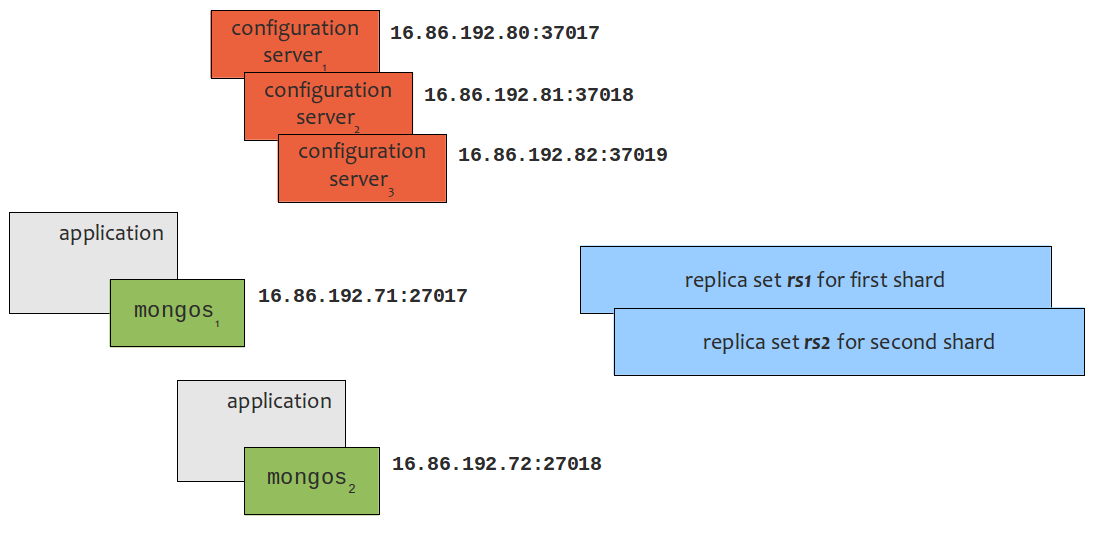
Consider the illustration above (click to see full resolution). The purpose of these notes is to demonstrate how to set this architecture in MongoDB including two shards, each with one replica set, configuration servers and the sharding routers. We'll be using IP addresses instead of hostnames and the port numbers seen above.
Sharding means splitting documents up such that some go to one shard while others go to another. This helps your database architecture scale by solving a number of problems like geographic locality or over-burdening of read and write operations on any given element in your overall database, see Sharding Introduction: Purpose of Sharding.
A replica set is a vector, ideally, of redundant storage nodes for documents in MongoDB. When a replica set is involved in a sharding scenario, it will only hold some of the documents while the others are held by replica sets in other shards. Each node of a replica set runs on a computer host and is as if a fully functioning database node. Its purpose is to hold everything that its sibilings have in case one or more of its siblings become inactive and unable.
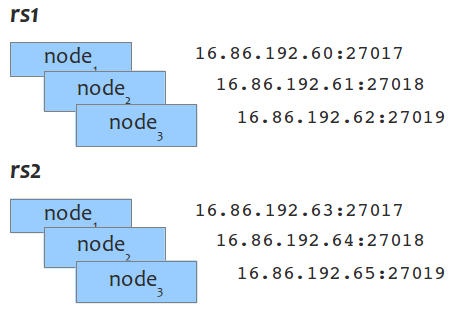
The replica sets are shown in detail to the right here (click to see full resolution). Following are the commands to set them up. Note that incidental options, such as --fork, --dbpath, --logpath, --logappend, etc. are not shown. These as well as --port and --replSet should be placed in a configuration file, equivalent to the installed file, /etc/mongodb.conf, probably on a path like /data/mongodb/mongodb.conf in a real, production installation. Please see mongod.
The following bash commands occur on six different computer hosts as indicated by the command prompts. As replica sets don't interact between each other, we can reuse the same port numbers in the second set.
16.86.192.60 # mongod --port 27017 --replSet rs1
16.86.192.61 # mongod --port 27018 --replSet rs1
16.86.192.62 # mongod --port 27019 --replSet rs1
16.86.192.63 # mongod --port 27017 --replSet rs2
16.86.192.64 # mongod --port 27018 --replSet rs2
16.86.192.65 # mongod --port 27019 --replSet rs2
With the mongod dæmons all launched on the six hosts, we're ready to finish erecting the two replica sets.
Immediately, you'll need the set names, computer hostnames (IP addresses) and port numbers above for setting up replica sets in the MongoDB shell.
Launch the MongoDB shell on one of the three replica node hosts that will belong to this replica set. Here, we'll use the first one:
16.86.192.60 # mongo --port 27017
With the MongoDB shell launched, type in the replica set configuration. Refer to the earlier commands to know what hostnames and ports are to be used. You could copy and paste this to a file, fix the hostnames (and ports if you wish to use different ones), then copy and paste it into the MongoDB shell. That will work.
The first command defines the replica set configuration assigning it to a variable, config. Using that variable, initiate the set, then use the rs.conf() command to echo back the save configuration. Also, you'll see the shell prompt change to indicate that the replica set has been fully set up and that you're on the PRIMARY. Last, use the rs.status() command to view the new replica set (in all its glory).
Some of these commands will take a few seconds or even a few minutes to complete. Some of what you'll see the shell say back to you is shown here. If you issue the status command before every node is up, you'll see what it displays change each time you issue it. (When running ordinarily and there is a problem with nodes in the set, you'll see it change too.) You can see a more verbose illustration of this at MongoDB Replica Example: Launch the MongoDB shell.
MongoDB shell version: 2.4.6
connecting to: test
> config =
{
    _id:"rs1",
    members:
    [
        { _id:0, host:"16.86.192.60:27017" },
        { _id:2, host:"16.86.192.61:27018" },
        { _id:3, host:"16.86.192.62:27019" }
    ]
}
> rs.initiate( config )
{
"info" : "Config now saved locally.  Should come online in about a minute.",
"ok" : 1
}
}> rs.conf()
{
"_id" : "rs1",
"version" : 1,
"members" : [
{
"_id" : 0,
"host" : "replica:27017"
},
{
"_id" : 2,
"host" : "replica:27018"
},
{
"_id" : 3,
"host" : "replica:27019"
}
]
> rs.status()
This happens exactly as rs1, with the different hostnames (IP addresses) as shown in the graphic. This time the configuration is as below and the port numbers use can be the same this is a different set.
> config =
{
    _id:"rs2",
    members:
    [
        { _id:0, host:"16.86.192.63:27017" },
        { _id:2, host:"16.86.192.64:27018" },
        { _id:3, host:"16.86.192.65:27019" }
    ]
}
Soon, you'll need the details of one of each replica set of again when you configure the
sharding routers. Let's plan on using the first node of each we set up:
rs1/16.86.192.60:27017 —we'll use this for mongos1
rs2/16.86.192.63:27017 —we'll use this for mongos2
Configuration servers (or "config servers") are the cookie jar in MongoDB sharding in that they bookkeep all the information needed by the sharding routers to determine where to put data entrusted to them (or that they're asked to find). Think of the mongos dæmon as the Boy Scout you ask to go find something or to deliver your document; the configuration server is his map and compass.
A sharding set-up needs only one configuration server in a testing set-up. For production, three configuration servers are best practice for redundancy. In any case, there can be only one or three—not two or more than three. Here, we set up three. (The point about using a configuration file, /data/mongodb/mongodb.conf, and what we're not showing here s left up to you.) Again, the following lines are executed on different computer hosts.
Each configuration server is set to listen on a different port number although, since they're on separate hosts, we could make them all listen on the same port number.
16.86.192.80 # mongod --configsvr --port 37017
16.86.192.81 # mongod --configsvr --port 37018
16.86.192.82 # mongod --configsvr --port 37019
There is nothing to do in the MongoDB shell.
Remember these hostnames (IP addresses) and port numbers for immediate use to set up
the configuration servers.
16.86.192.80:37017 —config server1
16.86.192.81:37018 —config server2
16.86.192.82:37019 —config server3
The sharding router is the Boy Scout, as explained above, that performs the magic on behalf of your application to work with the shards in persisting or finding your documents.
To set up these routers, you'll need all the information noted in previous steps.
The bash commands to launch the two sharding routers are performed on each respective host. It relies on the configuration server information you remembered from setting up these earlier. Remember that best practice is to do this in a configuration file somewhere like /data/mongodb/mongodb.conf and there will be more stuff in there (stuff that's not crucial to our sharding example here).
16.86.192.71 # mongos --port 27017 --configdb 16.86.192.80:37017,16.86.192.81:37018,16.86.192.82:37019
16.86.192.72 # mongos --port 27018 --configdb 16.86.192.80:37017,16.86.192.81:37018,16.86.192.82:37019
Next, the very last steps are performed in the MongoDB shell. First, launch the shell for the first mongos dæmon, listening on port 27017. Do this on host 16.86.192.71, the port number is the one you assigned to the mongos dæmon when you launched it:
16.86.192.71 # mongo --port 27017
Add the shard which is known by its replica, which is to say that the argument is in the form replica-name/replica-nodename:replica-portnumber.
MongoDB shell version: 2.4.5
connecting to: 27017
> sh.addShard( "rs1/16.86.192.60:27017" )
Similarly, for the second mongos dæmon, listening on port 27018, launch the shell on its computer host using its associated port number:
16.86.192.72 # mongo --port 27018
Finally, add this second shard. Remember, this is for the second shard which means the second replica set.
MongoDB shell version: 2.4.5
connecting to: 27018
> sh.addShard( "rs2/16.86.192.63:27017" )
...and you've finished!
Note: if you are only setting up one shard, then you do not need to consider the information in this section.
You should enable sharding on a per-collection basis. This is because sharding documents requires keys used by MongoDB to determine where to put (or from where to read) any document. The keys are known as shard keys and must be carefully chosen for efficiency.
However, first you must shard specific databases. You could be using more than one database in your schema. For example, you may be keeping usernames and addresses separate from payments and have two databases, userdb and paymentdb.
There is a good example of this in Deploy a Sharded Cluster: Enable Sharding for a Database.
You must enable sharding on each mongos instance. The first mongos instance is listening on port 27017. Launch the MongoDB shell:
16.86.192.71 # mongo --port 27017
Then issue this command to that shell. Let's pretend we've got a database named userdb:
> sh.enableSharding( "userdb" )
We do exactly the same thing on the other mongos host which listens on port 27018.
Launch the MongoDB shell again.
16.86.192.71 # mongo --port 27017
Imagine that inside our userdb, we have a collection named users and we want to shard them in such a way as to get all who live in the western hemisphere to go to the first shard and the others to the second shard.
> sh.shardOn( "userdb.users", { "country" : 1, "_id" : 1 } )
TODO: This section needs development. How do we insist on ISO countries CA, US, MX, BR, etc. going to shard 1 versus shard 2 in our example?
Commands scraped from the article above without explanatory text.
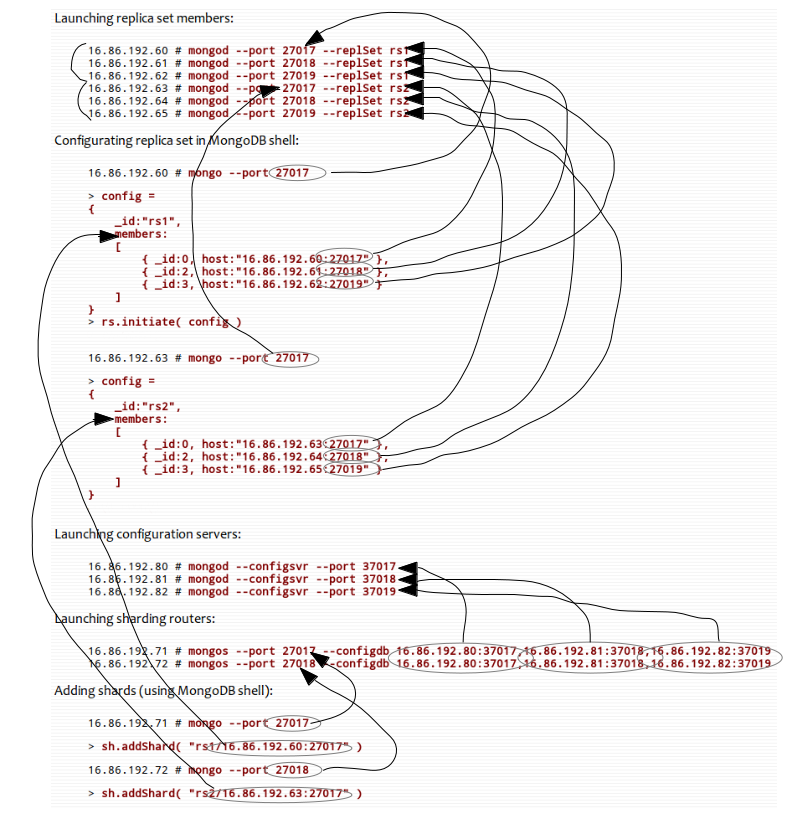
Launching replica set members:
16.86.192.60 # mongod --port 27017 --replSet rs1
16.86.192.61 # mongod --port 27018 --replSet rs1
16.86.192.62 # mongod --port 27019 --replSet rs1
16.86.192.63 # mongod --port 27017 --replSet rs2
16.86.192.64 # mongod --port 27018 --replSet rs2
16.86.192.65 # mongod --port 27019 --replSet rs2
Configuring replica sets in MongoDB shell:
16.86.192.60 # mongo --port 27017
> config =
{
    _id:"rs1",
    members:
    [
        { _id:0, host:"16.86.192.60:27017" },
        { _id:2, host:"16.86.192.61:27018" },
        { _id:3, host:"16.86.192.62:27019" }
    ]
}
> rs.initiate( config )
16.86.192.63 # mongo --port 27017
> config =
{
    _id:"rs2",
    members:
    [
        { _id:0, host:"16.86.192.63:27017" },
        { _id:2, host:"16.86.192.64:27018" },
        { _id:3, host:"16.86.192.65:27019" }
    ]
}
Launching configuration servers:
16.86.192.80 # mongod --configsvr --port 37017
16.86.192.81 # mongod --configsvr --port 37018
16.86.192.82 # mongod --configsvr --port 37019
Launching sharding routers:
16.86.192.71 # mongos --port 27017 --configdb 16.86.192.80:37017,16.86.192.81:37018,16.86.192.82:37019
16.86.192.72 # mongos --port 27018 --configdb 16.86.192.80:37017,16.86.192.81:37018,16.86.192.82:37019
Adding shards (using MongoDB shell):
16.86.192.71 # mongo --port 27017
> sh.addShard( "rs1/16.86.192.60:27017" )
16.86.192.72 # mongo --port 27018
> sh.addShard( "rs2/16.86.192.63:27017" )
Though badly executed, the following scribbles should help tie together the pieces of the puzzle. (OpenOffice/LibreOffice Draw isn't helpful here unless you can do Bezier curves, which I haven't mastered.)
It was asserted here and there in the above that best practice would have you make use not of the bash command line for launching mongod and mongos, but of configuration files. Here is a list of those with suggested content. Paths to /etc/init are Ubuntu upstart scripts; others, at /data/mongodb/mongodb.conf are equivalent to the configuration files shipped by MongoDB, Inc as /etc/mongodb.conf.
The port numbers, replica set names, etc. are chosen from above. They are only examples and I'm not completing the examples to provide each individual file, i.e.: each replica node. So, a node from rs1 is chosen as example; obviously an rs2 would have a different value for the replSet option.
Timeouts, limits and other details are copied out of this file from MongoDB, Inc.'s default distribution with the difference mostly in the path to the configuration file. Notice, in particular, how the configuration file path is made known to the dæmon by the upstart launching.
description "Keeps mongod (replica node) running between boots"

limit nofile 20000 20000
kill timeout 300         # wait 300s between SIGTERM and SIGKILL.

start on runlevel [2345]
stop on runlevel [06]

script
  ENABLE_MONGODB="yes"
  if [ -f /etc/default/mongodb ]; then . /etc/default/mongodb; fi
  if [ "x$ENABLE_MONGODB" = "xyes" ]; then
    exec start-stop-daemon --start --quiet --chuid mongodb \
        --exec /usr/bin/mongod -- --config /data/mongod/mongodb.conf
  fi
end script
A replica node must know the name of the replica set to which it belongs.
port=27017
replSet=rs1
fork=true
dbpath=/data/mongodb
logpath=/data/mongodb/mongodb.log
logappend=true
description "Keeps MongoDB configuration server running between boots"

limit nofile 20000 20000
kill timeout 300         # wait 300s between SIGTERM and SIGKILL.

start on runlevel [2345]
stop on runlevel [06]

script
  ENABLE_MONGODB="yes"
  if [ -f /etc/default/mongodb ]; then . /etc/default/mongodb; fi
  if [ "x$ENABLE_MONGODB" = "xyes" ]; then
    exec start-stop-daemon --start --quiet --chuid mongodb \
        --exec /usr/bin/mongod -- --config /data/mongod/mongodb.conf
  fi
end script
port=27017
fork=true
dbpath=/data/mongodb
logpath=/data/mongodb/mongodb.log
logappend=true
description "Keeps mongos running between boots"

limit nofile 20000 20000
kill timeout 300         # wait 300s between SIGTERM and SIGKILL.

start on started mongodb-configsvr
stop on stopping mongodb-configsvr

script
  ENABLE_MONGODB="yes"
  if [ -f /etc/default/mongodb ]; then . /etc/default/mongodb; fi
  if [ "x$ENABLE_MONGODB" = "xyes" ]; then
    exec start-stop-daemon --start --quiet --chuid mongodb \
        --exec /usr/bin/mongod -- --config /data/mongod/mongodb.conf
  fi
end script
A sharding router has no dbpath. It needs to know how to contact the configuration server(s).
port=27017
fork=true
configdb=16.86.192.80:37017,16.86.192.81:37018,16.86.192.82:37019
logpath=/data/mongodb/mongodb.log
logappend=true
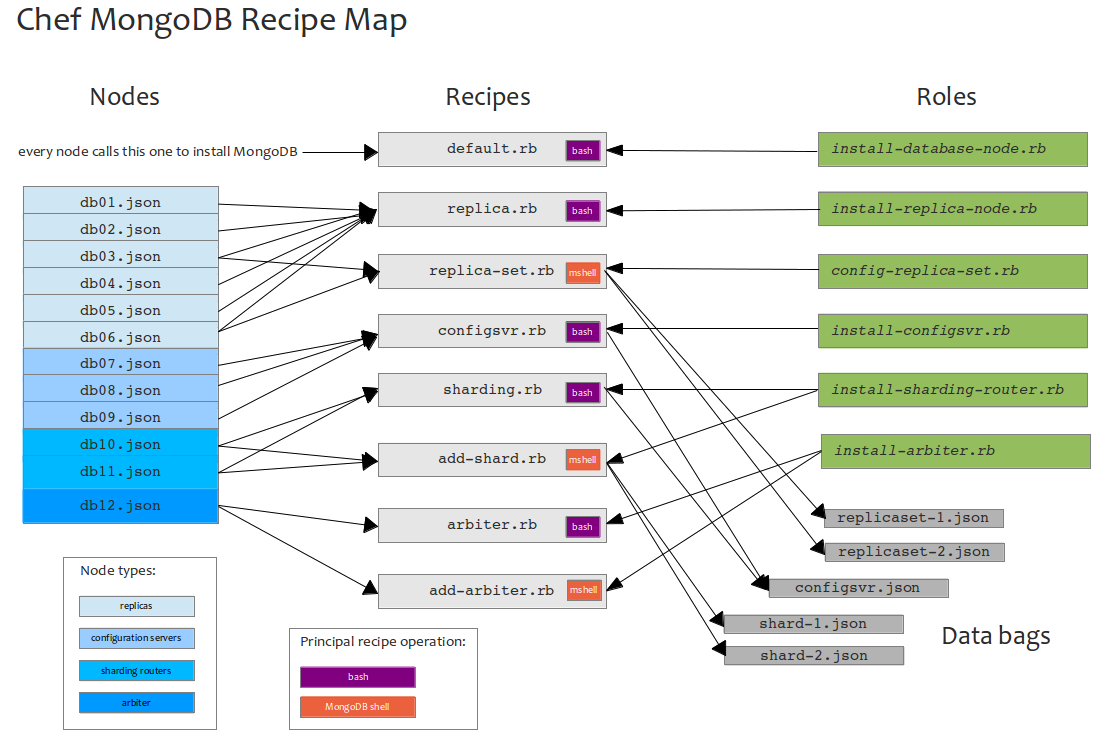
Integration of these concepts into Chef recipes, nodes and roles was the principal motivation behind this document. Here is an illustration more or less (arbiters are ignored) of the above. Click to see full size.