Conquering Sun VirtualBox
for Dummies like Me
Russell Bateman
4 March 2010
last update:
|
|
Conquering Sun VirtualBox
|
This article explains how to set up and use Sun VirtualBox. The working example is Ubuntu Karmic Koala as guest operating system hosted under Windows 7. I also tackle Red Hat Enterprise Linux 32- and 64-bit and, disasterously for now, SuSE Linux Enterprise Server. The full, theoretical list of supported platforms in give by http://www.virtualbox.org/wiki/Guest_OSes.
Sun VirtualBox is many orders of magnitude easier to set up and use than VMware Server ever was and, as far as I can tell, it does everything that product ever did for the individual consumer. (It does not, I don't think, provide equivalent functionality to VMware ESX.)
This installation was so easy that I did it all without doc or help (until I got to the shared folders bit which took some Googling and experimentation), but someone else requested some easy doc on how to do it.
Support for Windows, OS X, Linuces and Solaris (duh) are available, both 32- and 64-bit. Documentation can be found at User manual, but there is a great deal of other sorts of doc too elsewhere on the site (whose URL is noted above).
Linux: Go to the download page, click VirtualBox 4.1.6 for Linux hosts, select your platform, then scroll down and follow the instructions for Debian- or RPM-style installations. (See Ubuntu Maverick Meerkat Log, from an installation I did.)
Start Menu->All Programs->Sun
			VirtualBox->VirtualBox
.
Ubuntu GNOME: Launch Applications->System
Tools->Oracle VM VirtualBox

Note: If you're planning on running several VMs simultaneously, you'll want to make their memory footprint as small as possible because each will consume what you give it. This adds up quickly when your development host has only a few gigabytes of memory on it: running a couple of VMs using 1024Mb of memory when only, say, 3.2 are available, will quickly kill your ability to do anything.
It's easy to "get into" the guest console: just click inside it and your mouse and keyboard are "captured" by it. This can be disconcerting if you don't know how to get back out. Basically, the following commands apply:
Note: with one of my Ubuntu, one of my Red Hat Enterprise Linux and one of my CentOS guest OS VMs, after successfully installing the guest additions, my mouse flows freely between—in and out of the VM window and my Windows host—without having to press Right-Ctrl.
If you are installing a 64-bit guest OS and you experience trouble, see here.
Just as for the recent informational summary, any information about 32-bit vs. 16-bit color can be ignored. It probably won't concern you.
You'll find that installation of a guest OS isn't as zippy as it would be when installed to a machine natively, but everything will proceed otherwise in identical fashion.
From this point on, your guest operating system is running just as if a separate computer. It is not the purpose of this document to detail the installation of Ubuntu Karmic.
There are, however, two majors differences or opportunities you'll want to concern yourself with. First, getting files to and from this "parallel universe." Second, networking. The next two sections deal with this.
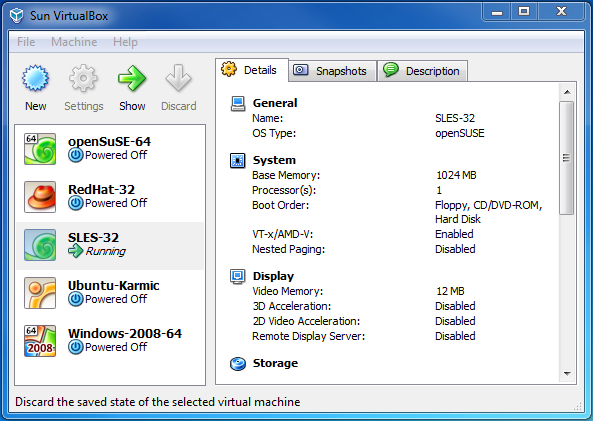
- It appears that Discard in the main interface discards a VM's saved state, having roughly the same effect as powering it off. It does not delete the guest VM. (More on this another time if it becomes important to me.)
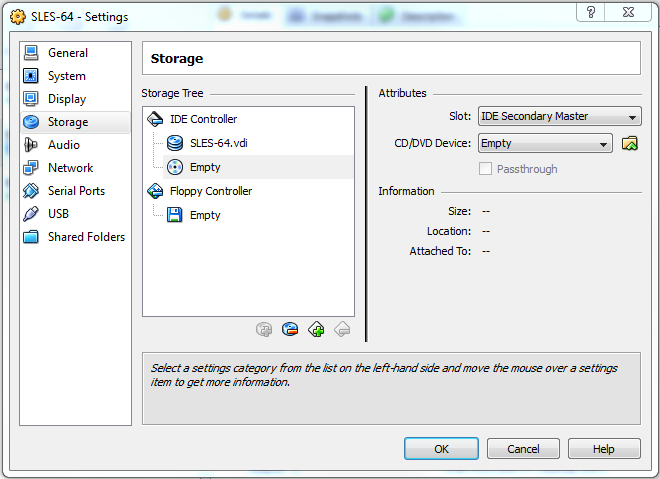
- If you find you botch the installation of a guest VM/OS and want to redo it, you will find you can right-click on it and then delete it, but that will not remove remove any virtual disk you created (on the path VirtualBox/HardDisks/guest-name.vid).
You must delete the disk by hand. From the main window, pull down File
-> Virtual Media Manager. You'll see hard disks (*.vdi).
Select the one you wish to delete and click on the Remove icon
above. Don't delete the .vdi files from the filesystem (or via Windows
File Explore) because that won't remove the memory of them from Sun
VirtualBox.
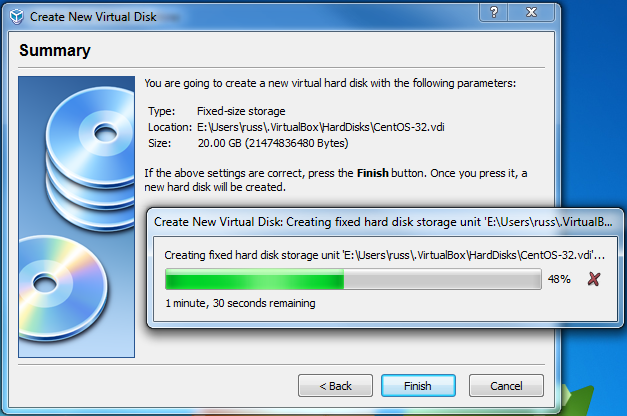
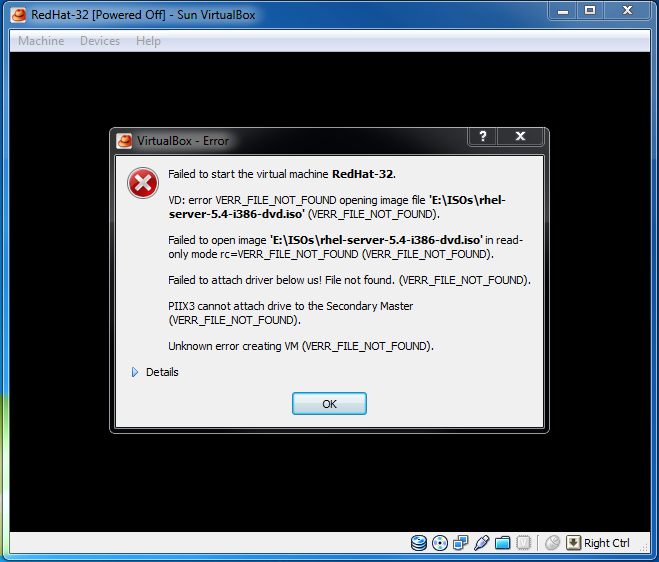
The instructions above told how to install using a CD or DVD containing the guest OS for the virtual machine. This short section elucidates installing from a downloaded OS ISO that hasn't been burned to a disc.
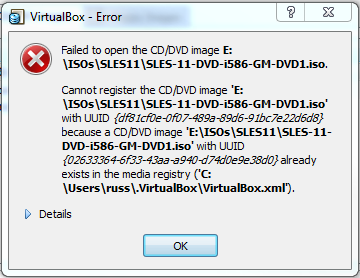
Note: you might get an error such as:
If the ISO is a dud in any way (a bad ISO, bad length, etc.) this may be the result.
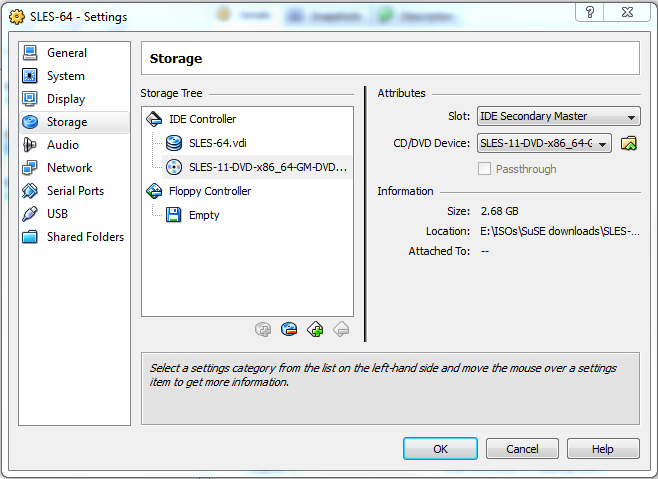
Supplementary note: There is probably a way to set up to consume a second ISO in reponse, for example, to Red Hat install's offer to use one. SuSE Linux Enterprise Server comes on two ISOs; there is an option at one point, "Include Add-ons from separate media?" However, I haven't attempted to do that yet.
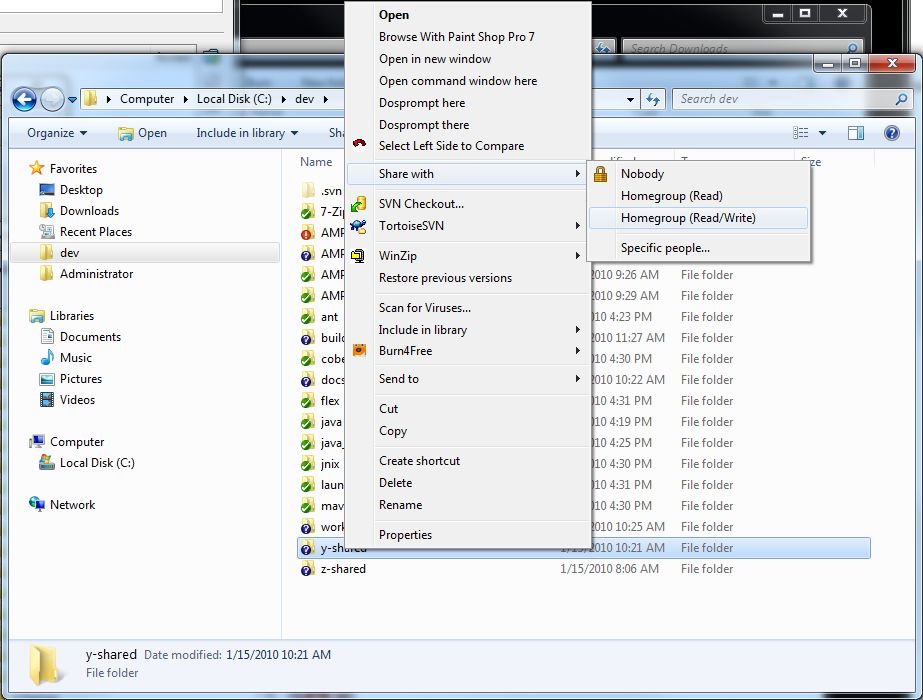
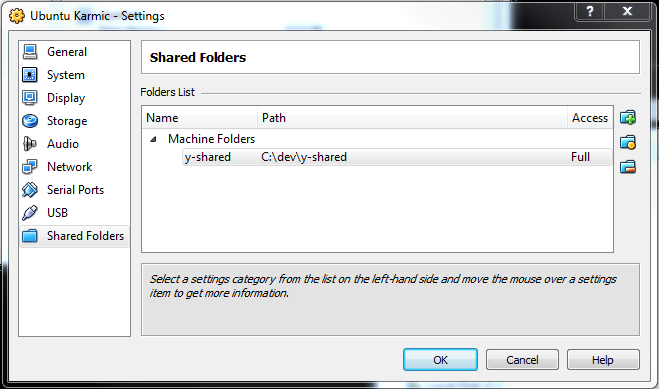
Setting up one or more shared folders between your host operating system, in this example Windows 7, and the guest VM can be confusing if all you have to go on is what you find in the user manual or by Googling. Sharing one or more folders is an easy way to accomplish a great number of interesting things including simple file transfer and sharing files between VMs.
To set up a shared folder between Windows 7 (the host) and Ubuntu Karmic (the guest VM):
It's not abundantly clear that you must "share" this folder. One explanation I found asserted it must be done and I haven't experimented to see if it's not actually required.
This is done with the VM up and running and by choosing
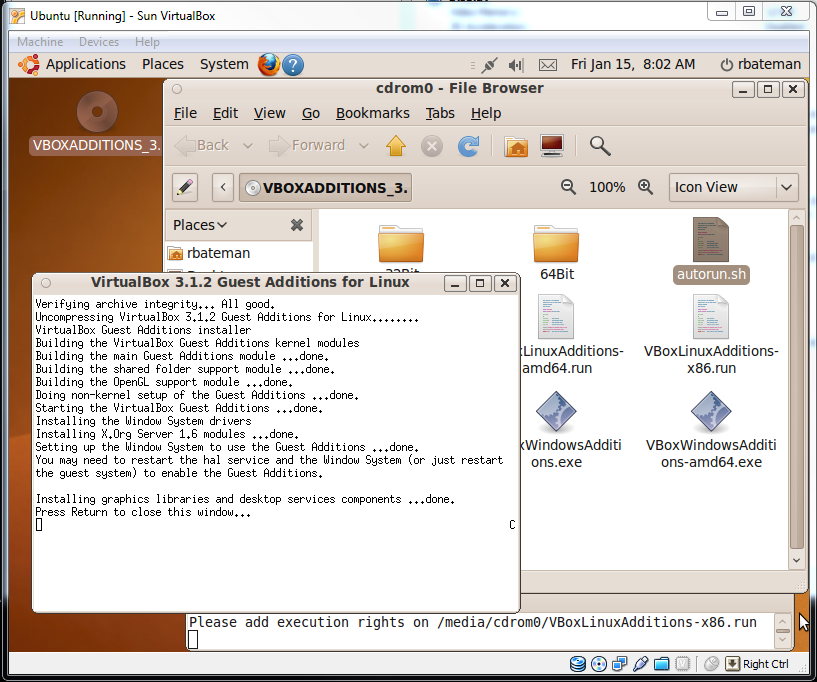
Devices->Installing Guest Additions.... What this does
basically is mount a pseudo CD on the desktop just as if it were one in
the CD drive. While it's there, you can use it to install the guest
OS-specific additions that give you greater functionality.
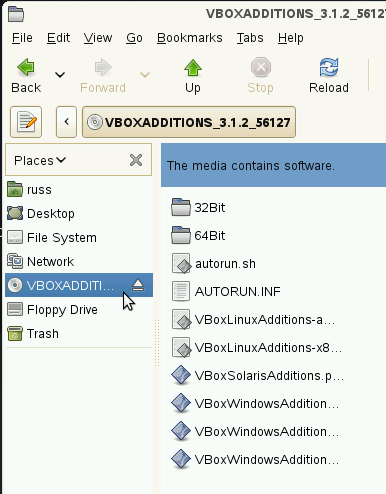
Open the CD.
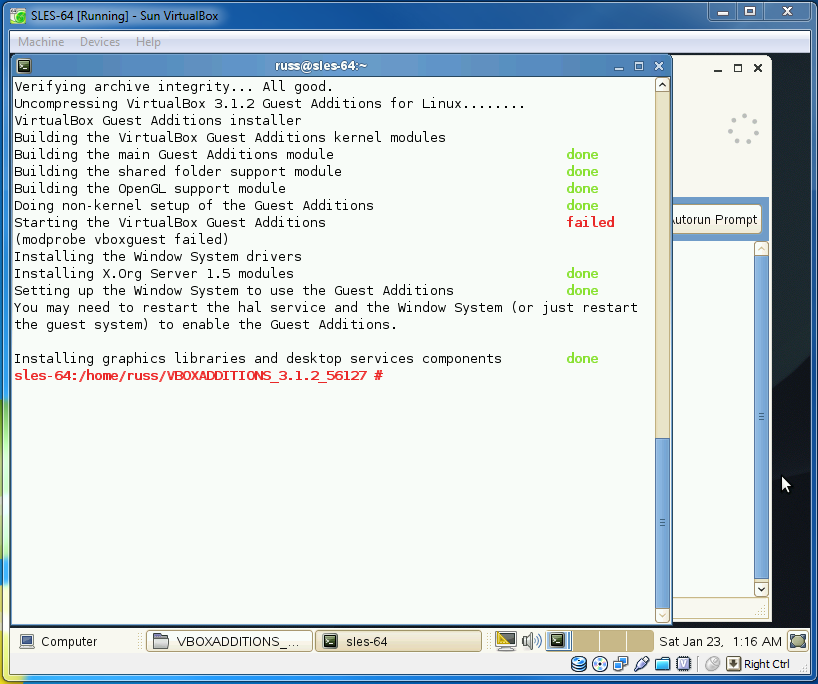
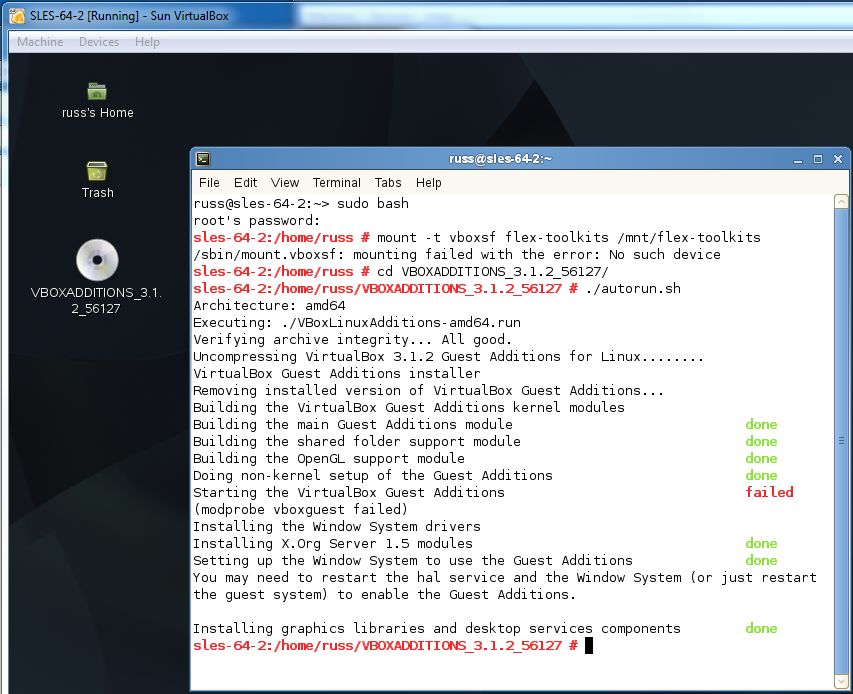
Double-click (to launch) autorun.sh. Some guest OSes are ill-treated by this script, Red Hat in particular. If the script doesn't run visibly in a shell window as shown below, then it probably failed. See Appendix: autorun.sh Peculiarities.
rbateman@slc-bateman-karmic:~/dev/flexera> sudo bash root@slc-bateman-karmic:~/dev/flexera> cd /mnt root@slc-bateman-karmic:/mnt> mkdir y-shared root@slc-bateman-karmic:/mnt> mount -t vboxsf y-shared /mnt/y-shared
If you get...
mount: unknown filesystem type 'vboxsf'
...this means that you failed to get and install the Sun VirturalBox Guest Additions on your new guest OS.
If you get...
/sbin/mount.vboxsf: mounting failed with the error: Protocol error
...this means that you failed to follow the instructions above for setting up the shared folder you created in the host operating system (under that operating system). This is done by choosing Devices->Shared Folders.... See above.
If you get...
/sbin/mount.vboxsf: mounting failed with the error: No such device
This means that your VM has lost its Guest Additions. (This was also
annoying about VMware Server: the VMware Server Tools kept having to
be reinstalled). You won't need to reinstall or otherwise change
Devices -> Shared Folders..., but you will need to
reinstall Sun VirtualBox Guest Additions by autorun.shing the
tools on the guest operating system as shown earlier in this
procedure.
You can expect this to be a potential solution any time you can't get the shared folder access to work between host and guest.
When the guest OS is created and launched, there's as if a CD mounted named VBOXADDITIONS_3.. On this CD are all the Guest Additions. For Linux, invoke autorun.sh (and it will choose the right configuring utility). As it is modifying what belongs to root, it will ask for the password, but it sets everything up including the solution to the mount problem above. The utility can take a while to run, so do not despair.
Important note: You will have to mount the shared volume by hand each time you launch the guest. In the case of Linux, you could add this to fstab, for example, add this line:
y-shared /mnt/y-shared vboxsf dev 0 0
This won't work when your guest OS comes up if, for some reason, your system no longer understands vboxsf, errors will occur—with no more damage than that your shared folder will fail to mount.
I don't have enough experience with Sun VirtualBox yet to understand all the reasons exactly why vboxsf (from the guest additions) might have been lost. You just re-do the guest additions and then mount it by hand.
This topic isn't quite as confusing as shared folders, but it took some looking around to get it working. At this writing, it's only working for me in "bridged" mode which is where the guest has the same IP address as the host computer.
Bridged networking nevertheless allows for upgrading the guest from the Internet, installing new software, browsing, etc., which is all I wanted. I don't know how to address it particularly from the host (via ping or using ssh) as I'm using shared folders to communicate essential files between host and guest.
Again, this exercise makes use of a machine running Windows 7 with Ubuntu Karmic as the Sun VirtualBox guest VM.
To set up a shared folder between Windows 7 (the host) and Ubuntu Karmic (the guest VM):
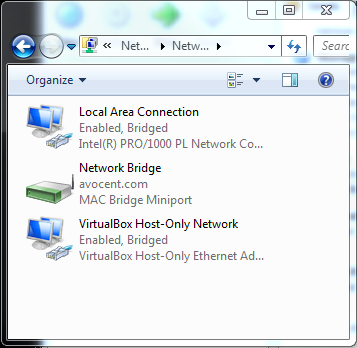
Start Menu->Control Panel->Network and Sharing
Center->Change Adapter Settings. Once there, select both
Local Area Connection and Virtual Host-only Network
using ctrl-click. Then choose Bridge Connections. A third (or
additional to what is there) connection will appear, Network
Bridge.
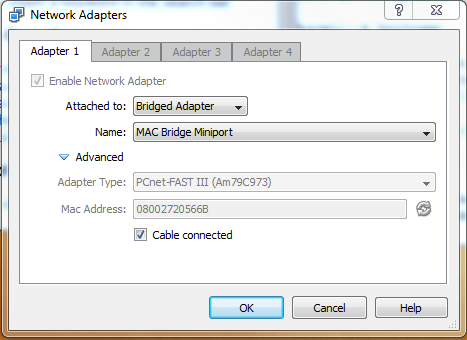
Notice the "MAC Bridge Miniport" name. This name will come up again.
Dismiss the control panel if you wish.
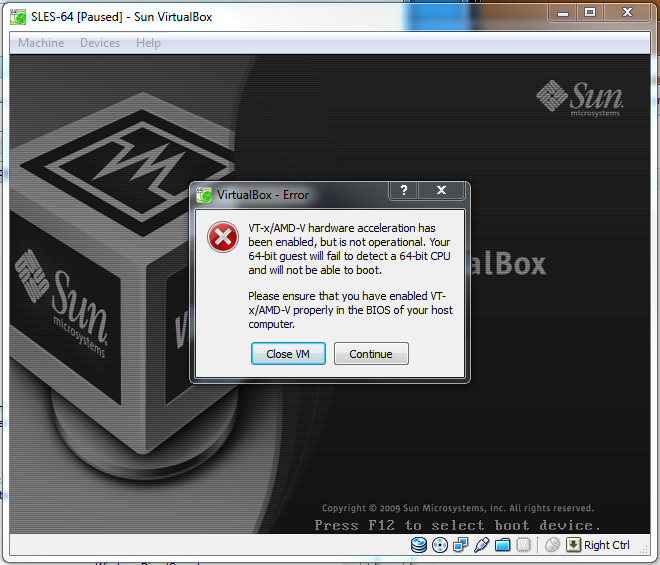
If you are installing a 64-bit guest OS such as SuSE Linux Enterprise Server, you may enounter trouble the first time. For example, there may be a warning that the OS won't boot because virtualization technology isn't enabled. Or that you're trying to install/run a 64-bit OS on a 32-bit computer. In the case of my Intel S3420GP-based development host, there were two BIOS processor settings to enable:
The trouble disappeared once I shut down, fixed these settings, booted back up, then ran Sun VirtualBox.
I found that, after installing Red Hat Enterprise (32-bit), install the Guest Additions would not work because the autorun.sh script will not work on that OS. Red Hat (and Fedora and CentOS) have never recognized gksu, so you must modify this script by recoding how one line works. I also found that SLES doesn't know what it is. Perhaps it's mostly the "enterprise server" editions that do (although I found much grumbling on the web about Red Hat OSes—all of them).
Note: Of course, you can analyse the top of autorun.sh and simply execute the appropriate VBox______Additions-xxxx.run file yourself.
You will have to copy the entire contents of VBOXADDTIONS_3.1.2_56127 to somewhere on the guest OS' disk so that you can change this script. Then find and change this section:
# execute the installer
if test "$ostype" = Linux"; then
if test -f "$path/VBoxLinuxAdditions-$arch.run"; then
exec gksu /bin/sh "$path/VBoxLinuxAdditions-$arch.run"
fi
...to:
# execute the installer
if test "$ostype" = Linux"; then
if test -f "$path/VBoxLinuxAdditions-$arch.run"; then
/bin/sh "$path/VBoxLinuxAdditions-$arch.run"
exit 0 # (script expected to exit cleanly here)
fi
Make certain you are running this as root.
Then execute the script thus and it succeeds:
[russ@RedHat-32 VBOXADDITIONS]$ sudo ./autorun.sh
(Click here to see the result on RHEL 64-bit.)
Even after fixing up autorun.sh, I still had trouble with SLES 11 x86_64, because VBoxLinuxAdditions-amd64.run yielded the message, "modprobe vboxguest failed":
While I fix this problem, here are some URLs I'm studying, found using mostly the search string, "modprobe vboxguest failed" and "modprobe vboxguest failed suse." I have a post into the VirtualBox Linux forum.
So far, I've tried installing SLES11 x86_64 using Sun's openSuSE (64-bit) and Linux 2.6 (64-bit) without success in adding guest additions.
Notes on mounting virtual CD VBOXADDTIONS_3.1.2_56127 on SLES11. This is how to do it:
Devices -> Install Guest Additions.... The virtual CD
will not appear on the desktop (it will on some other guest OSes).
Imagine you've modified the guest additions autorun.sh script and attempted to run it, but are getting one or more errors as shown below. Until this is fixed, you'll not be able to mount shared folders. I leave the following example, from a 64-bit CentOS session, to illustrate solving this.
This section goes beyond the initial trouble you have with most Linux guest OSes described in Appendix: autorun.sh Peculiarities. If you have not read that section, read it first before looking here.
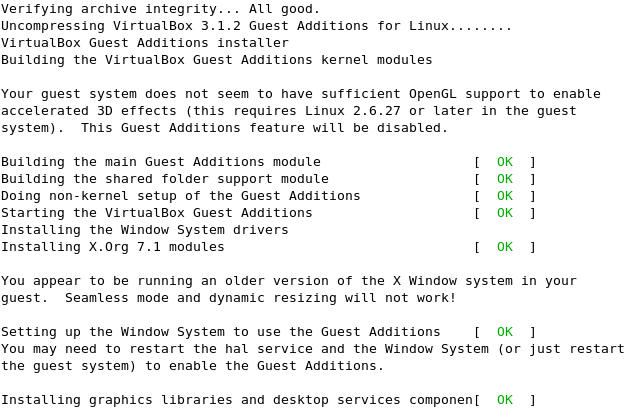
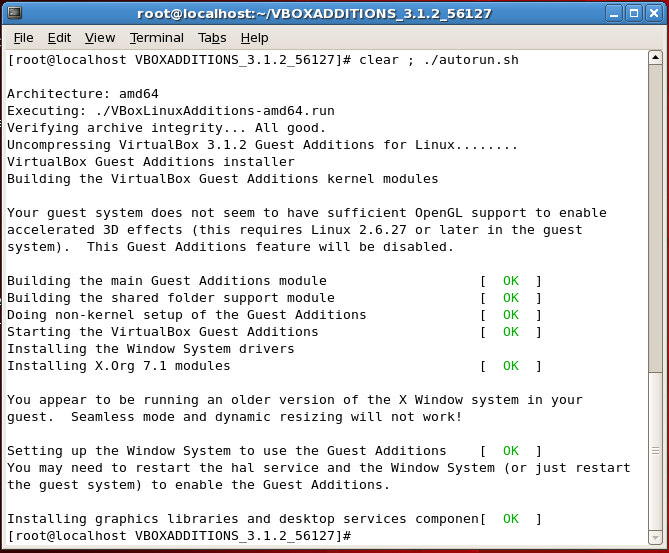
root@localhost VBOXADDITIONS_3.1.2_56127]# ./autorun.sh Architecture: amd64 Executing ./VBoxLinuxAdditions-amd64.run Verifying archive integrity... All good. Uncompressing VirtualBox 3.1.2 Guest Additions for Linux........ VirtualBox Guest Additions installer Removing installed version of VirtualBox Guest Additions... Building the VirtualBox Guest Additions kernel modules [FAILED] (Your system does not seem to be set up to build kernel modules. Look at /var/log/vboxadd-install.log to find out what went wrong) Installing the Window System drivers Installing X.Org 7.1 modules [ OK ] You appear to be running an older version of the X Window system in your guest. Seamless mode and dynamic resizing will not work! Setting up the Window System to use the Guest Additions [ OK ] You may need to restart the hal service and the Window System (or just restart the guest system) to enable the Guest Additions. Installing graphics libraries and desktop services componen[ OK ] [root@localhost VBOXADDITIONS_3.1.2_56127]# cat /var/log/vboxadd-install.log Makefile:23: *** Error: unable to find the sources of your current Linux kernel. Specify KERN_DIR=and run Make again.. Stop. [root@localhost VBOXADDITIONS_3.1.2_56127]# export KERN_DIR=/usr/src/kernels/2.6.18-164.11.1.el5-x86_64 [root@localhost VBOXADDITIONS_3.1.2_56127]# ./autorun.sh Architecture: amd64 Executing ./VBoxLinuxAdditions-amd64.run Verifying archive integrity... All good. Uncompressing VirtualBox 3.1.2 Guest Additions for Linux........ VirtualBox Guest Additions installer Removing installed version of VirtualBox Guest Additions... Building the VirtualBox Guest Additions kernel modules Your guest system does not seem to have sufficient OpenGL support to enable accelerated 3D effects (this requires Linux 2.6.27 or later in the guest system). This Guest Additions feature will be disabled. Building the main Guest Additions module [ OK ] Building the shared folder support module [ OK ] Doing non-kernel setup of the Guest Additions [ OK ] Starting the VirtualBox Guest Additions [ OK ] Installing the Window System drivers Installing X.Org 7.1 modules [ OK ] You appear to be running an older version of the X Window system in your guest. Seamless mode and dynamic resizing will not work! Setting up the Window System to use the Guest Additions [ OK ] You may need to restart the hal service and the Window System (or just restart the guest system) to enable the Guest Additions. Installing graphics libraries and desktop services componen[ OK ] [root@localhost VBOXADDITIONS_3.1.2_56127]# pushd /mnt [root@localhost VBOXADDITIONS_3.1.2_56127]# mkdir cent-64 /mnt /home/russ/VBOXADDITIONS_3.1.2_56127 [root@localhost mnt]# mount -t vboxsf cent-64 /mnt/cent-64
Note that shared folder cent-64 had already been created on my Windows 7 host and established in the Sun VirtualBox Shared Folder settings.
Understand that, prior to the successful conclusion of this solution, namely, signalling to the guest addition script/program the location of the CentOS kernel sources, I had to install those sources. There are different ways of doing this on different Linuces, however, CentOS has so far been the only one I've needed to worry about this because I always try to get the kernel source installed when I set up the guest OS VM.
[root@localhost mnt]# yum install dkms gcc [root@localhost mnt]# yum install kernel-devel [root@localhost mnt]# yum install kernel-headers
I found I had to bounce CentOS in order to get what fails above no longer to fail even after installation of the packages. However, I did not have to do that for CentOS 32-bit.
Note: Despite the warning to the effect that "mode and dynamic resizing will not work," my guest VM window had already resized itself to the fullest possible dimensions after my initial trial runs of autorun.sh and before even I got the main guest additions problem fixed above.
Each guest OS set up can have up to four different adapters enabled, each with its own setting or option.
Networking options consist of:
This makes your guest OS totally dependent on your hardware host. It becomes as if it were that host in the sense that practically you can only browse the network to which the physical host is connected. Just as if a computer behind a router issuing addresses, it is protected behind your host. Your virtualized computer (guest) will obtain an IP address of 10.0.1.x; the host will also assume a second such IP address on this same private network.
This is a good mode if you think of your guest VM as just another computer on the network. For example, your only purpose is to try out building a project (compiling, linking, etc.) on several different Linux distros and providing services isn't an objective.
This makes your guest OS an independent node on whatever network your hardware host is connected to. If configured to get its address via DHCP, it will get one when it comes up. If instead configured with its own, static IP address, it will be using that.
This is the setting to use if you wish your guest VM to provide useful services to the world outside the physical host.
I know nothing about this option. I've read that it allows virtualized computers (guest OSes) to talk to one another without access to the physical host's external LAN connection.
This option was added quite late to Sun VirtualBox, in version 2.2. It's a hybrid between bridged and internal networking.
I've heard that this option is more akin to a mode sometimes used in VMware Server that makes the guest VM live in a world where the physical host is its entire, known universe. It cannot communicate with the external world.
As for "internal network," don't be satisfied with what I say here because I really don't know and do not use this setting.
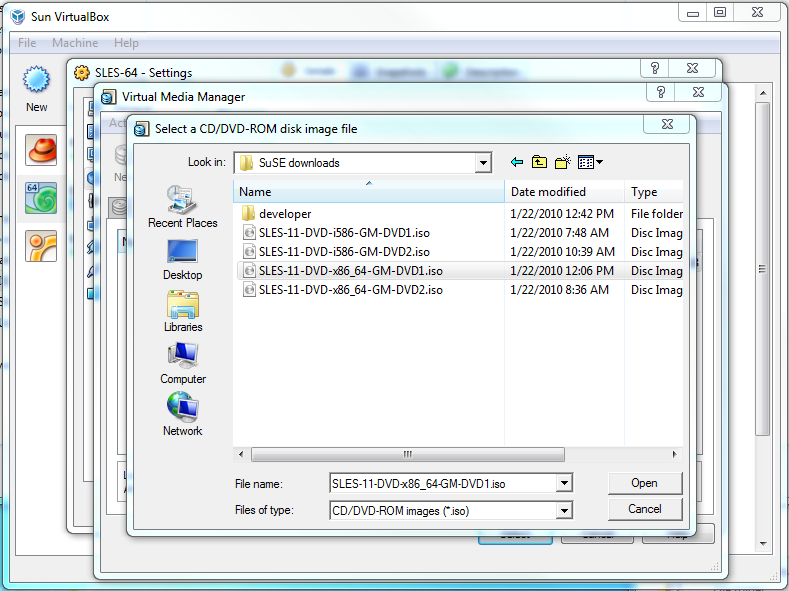
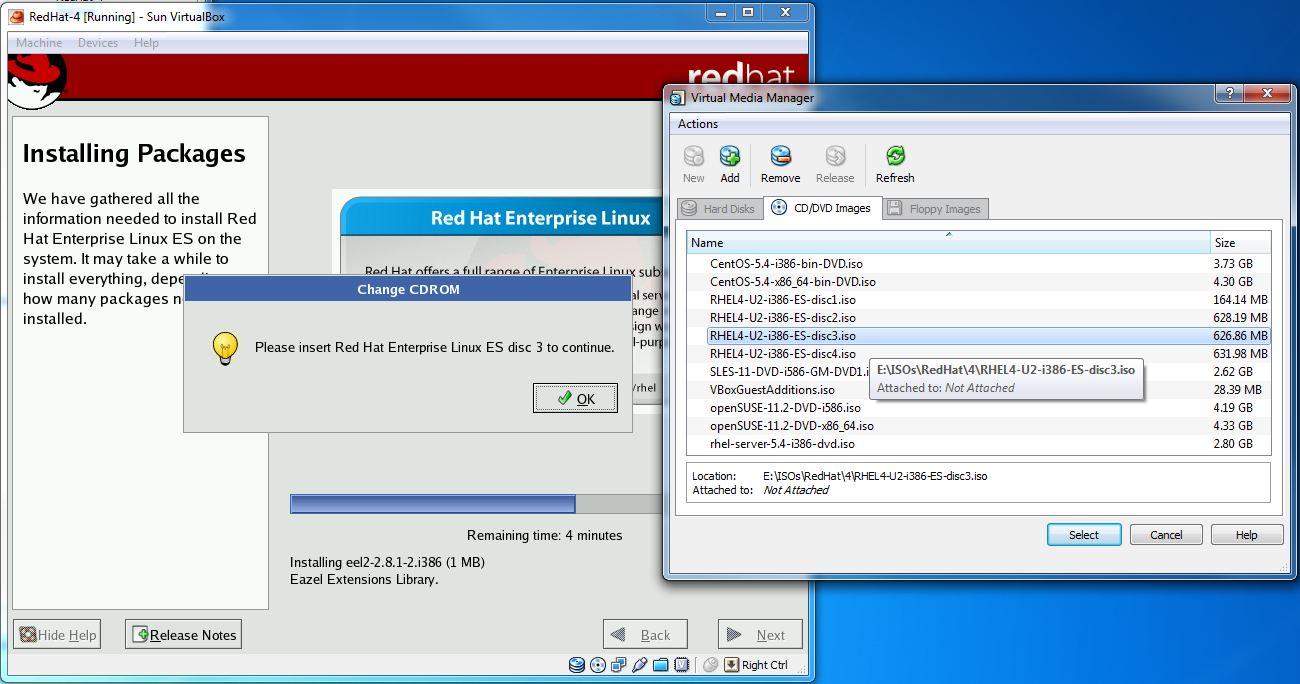
Paying attention over countless guest OS installations, what's actually going on in Sun VirtualBox' Virtual Media Manager starts to dawn. It is possible and even easy to install a multiple-CD image, whether real CDs or from ISOs stored on the host operating system's hard disk.
If you installed using multiple CDs from plastic- and meatspace, the procedure was no different from installing the OS in a non-virtual environment.
Installing from ISO images copied (or downloaded) to your hard disk is not a great deal hard, but it might not at first seem obvious what to do.
You begin the installation as any other—from disk 1, but beforehand, it's best to make all images known to the Virtual Media Manager's settings (list of CD/DVD images).
File -> Virtual Media Manager..., then click on
the CD/DVD Images tab.
Now you're ready to begin the OS installation. Once you reach the point where the installation asks for subsequent CDs, ...
...just click OK and then click OK again as if there were no problem. It should get it right anyway. You might have to repeat the selection of the appropriate disk again in intransigent cases (where it says there's still an error).
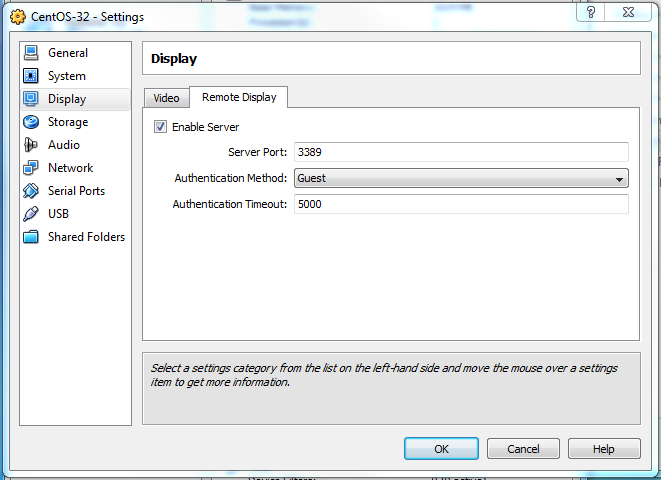
It is possible to set up a guest VM to run "headless," with management via
remote display. Below you see a setting reached (get there by Settings
-> Display) when the VM is not running that configures this
capability.
It makes use of a remote desktop protocol on both Windows and Linux. (And probably Macintosh, but I try to ignore that platform religiously as I was an ardent Macintosh bigot from 1984 until 1998 at which time I lost my faith and no one can be so intemperately opposed to a faith than someone who's lost his.)
As suggested below, it's possible to determine the port over which this is done plus the authentication to be carried out (null, external or guest).
The problems I've had with Sun VirtualBox are:

