
Companion Notes
on RESTful Web Services
with Java and Jersey
Russell Bateman
8 July 2010
last update:
|
|
Companion Notes
|
Table of Contents
|
IntroductionI decided to follow a tutorial on REST by Lars Vogel. As in others he's written, there is much that he has left unsaid. This is my attempt to help out the dummies among whom I am the foremost. Where I recognize there is need and where I can, I answer questions about it. Besides, it proves to me that I understand what Lars is teaching. Use the section numbers to keep pace with the tutorial. Don't just read what I say here. I'm not rewriting Lars' tutorial. You must read what he has to say in order to learn something. I hope my additional notes a) help you get more easily through the tutorial and b) learn just a bit more. Remember, accomplishing the tutorial exercises and getting them working isn't going to teach you much. You must read and assimilate what Lars is saying. As his expression is succinct and lacking in much explanation, you may be reading and re-reading it, plus examining and perhaps stepping through the code before you begin to seize fully what he's saying. I suggest you do the exercises in an Eclipse workspace with a special name—separate from your usual work. That way, you don't encumber anything serious you're using Eclipse for and can refer back to them and to the source code therein. First, some notes on HTTP, our RESTful protocol... |
HTTP includes several operations (or methods) and it's important to structure one's server and application to supply or request data based on careful compartmentalization per operation and data. See excellent book (this is a shameless plug):
Allamaraju, Subbu, RESTful Web Services Cookbook: Solutions for Improving Scalability and Simplicity, 320 pages, O'Reilly/Yahoo Press, March, 2010.
| HEAD | Request response identical to what corresponds to a GET request, but without the body. Used for retrieving metadata associated with a resource without having to transport the entire resource. | ||
| GET | Request representation of resource; must be idempotent, i.e.: without side effect. | ||
| POST | Submit data to be processed, i.e.: into a new (see PUT) resource or modification of an existing resource. Idempotency is a complex problem that must be resolved in order to remain RESTful. See Allamaraju. | ||
| PUT | Create new resource; resource; must be idempotent, i.e.: without side effect. | ||
| DELETE | Delete resource; must be idempotent, i.e.: without side effect. | ||
| TRACE | Echoes back request in order that client may see what (if any) changes or additions have been made by server (including "intermediate" servers). | ||
| OPTIONS | Return list of HTTP methods (the operations listed above) supported by the server. This is useful for examining the functionality of a server before performing a (real) operation. |
The point is that when you code up your service, you must carefully respect this tight definition of HTTP operations in order to be truly RESTful.
There are other books to be sure. These two are available from Google for free perusal. RESTful Java with JAX-RS is recent (2010). RESTful Web Services dates to 2007.

Here's a comparison table about HTTP-based protocols: RESTful addendum.
And now, on with my review of and notes on the tutorial...
Go to the link Lars gives for the Jersey homepage, click the big, green down-arrow, then scroll down to find a sentence like:
"A zip of Jersey containing the Jersey jars, core dependencies (it does not provide dependencies for third party jars beyond the those for JSON support) and JavaDoc."
I have reproduced both links above so you don't have to go to Lars' page.
Use this zip file. Also, I linked up the JARs to the apidocs subdirectories extracted from the zip (but this doesn't seem to work).
(Javadoc for Jersey APIs can be found both in the Jersey download and on-line at jersey-bundle 1.3 API.)
You can, of course, create an Eclipse User Library to hold these JARs. It's a neat solution and very self documenting. However, Lars is right. You should copy the JARs to this subdirectory for several reasons, not the least of which is that if you are collaborating with others, you'll want these libraries to be easily available to them. This cannot be done using the User Library since that involves full paths in the project .classpath that are not compatible with the other development hosts, usernames, etc. when code is checked out.
One way you can ensure the "documentary convenience" of the User Library, however, is to place these JARs down under the lib subdirectory underneath a deeper subdirectory named, for example, Jersey. I works well and retains a division between what's Jersey, what's Hibernate, what's Apache Commons, etc.—all the libraries that you may add to your project.
Of course, if you're building with Maven, that's a different matter altogether, but we're not discussing that in this tutorial.
However you add these libraries to your project, you will need to pay attention to the discussion of the Java EE module dependencies (also called Deployment Assembly beginning with Eclipse Helios).
For my tutorial exercises, I copied the following JARs:
...which I added (only to the Dynamic Web Projects) using Build Path each time I created a new project. Also, when I add the library to a project, before dismissing the Properties dialog (that comes up when modifying Java Build Path), I add the library to the Java EE Module Dependencies list.
Experimenting with these libraries, I reach the following conclusion that may be of interest once you've completed Lars' tutorial and feel comfortable about moving on in REST. My experimentation used much later versions than those I used to perform this tutorial originally. Often, packages come with a great deal more in them than is really necessary and the final tally also depends on what functionality you really consume.
The following JARs are sufficient to do the server examples:
If interested in getting Javadoc, simply link jersey-core-1.6.jar up with apidocs/jersey under the download. This will introduce, however, full paths into .classpath rendering it non-transportable to other computers.
Client examples:
Run through the tutorial performing all the steps as outlined. Come back here as you feel you need to.
At first, I had got the wrong set of libraries due to the confusion in the Jersey web site. I resorted to the general Java questions forum at Java Ranch. Getting the correct download got rid of all my compilation errors up to the point of this first source file.
I redid the source code slightly to comment it and to demonstrate that the browser response is the HTML one by saying so. I also added some unused code here showing how to obtain the ServletContext we'd be dealing with if we were doing this the old-fashioned way without Jersey. There's a special annotation to get it.
package de.vogella.jersey.first;

import javax.ws.rs.GET;
import javax.ws.rs.Path;
import javax.ws.rs.Produces;
import javax.ws.rs.core.MediaType;

// POJO, no interface no extends

/**
 * This is Lars' REST server application described at http://www.vogella.de/articles/REST/article.html
 * 3.2. Java class
 *
 * The class registers itself using @GET. using the @Produces, it defines that it delivers two MIME types,
 * text and HTML. The browser always requests the HTML MIME type. Also shown is how to get a hold of
 * the HTTP ServletContext you'd have if you weren't using Jersey and all of this nice annotation.
 *
 */
// Sets the path to base URL + /hello
@Path( "/hello" )
public class Hello
{
	@Context ServletContext context;

	// This method is called if request is TEXT_PLAIN
	@GET
	@Produces( MediaType.TEXT_PLAIN )
	public String sayPlainTextHello()
	{
		// (we don't really want to use ServletContext, just show that we could:)
		ServletContext ctx = context;

		return "Hello Jersey in plain text";
	}

	// This method is called if request is HTML
	@GET
	@Produces( MediaType.TEXT_HTML )
	public String sayHtmlHello()
	{
		return "<html> "
			+ "<title>" + "Hello Jersey" + "</title>"
			+ "<body><h1>"
			+ "Hello Jersey in HTML"
			+ "</body></h1>"
			+ "</html> ";
	}

	// This method is called if request is XML
	@GET
	@Produces( MediaType.TEXT_XML )
	public String sayXMLHello()
	{
		return "<?xml version=\"1.0\"?>" + "<hello> Hello Jersey in XML" + "</hello>";
	}
}
As noted, JAX-RS uses annotations to guide the behavior of code, something that might have been done using XML configuration files prior to Java 5. You should get used to seeing the following:
| @Path | Specifies what is added to the base path plus the servlet mapping to obtain the methods (operations) of the class thus annotated. The base path is given by <display-name>, the servlet mapping by <servlet-mapping>'s <url-pattern>, both from the project's web.xml configuration file. See @Path Annotation and URI Path Templates. | ||
| @Produces( type [, more-types ] ) |
Specifies the MIME media types an object can produce and send back to the client, for example, "text/plain" and "application/xml". | ||
| @Consumes( type [, more-types ] ) |
Specifies the MIME media types an object can consume from the client, for example, "application/x-www-form-urlencoded". | ||
| @XmlRootElement [( element-name )] |
Belongs to Java Architecture for XML Binding (JAXB) which maps Java
classes to XML representation. This mapping has two features, the ability
to "marshall" Java objects to XML and the converse ability. This annotation
maps the class to an XML element, using the class name as the element name
or, if an attribute is present, that name as the element name.
The sense in which anything actually occurs is in the passing back of a Todo from a method in the resource part of the application: it comes back in XML with the appropriate values. See output from second project. |
||
| @Context | Used to inject information into a class field, bean property or method
parameter.
The following classes are available using @Context: ServletConfig, ServletContext, HttpServletRequest and HttpServletResponse. |
||
| @PathParam | Used to inject the value of a URI named in (the previous
@Path()). For example,
    @Path( "/todo" )
    public class TodosResource
    {
      .
      .
      .
      @Path( "{id}" )
      public TodoResource getTodo( @PathParam( "id" ) int id )
      {
        .
        .
        .
results in any reference to id in the Java code being for the base
path plus the infix (such as "/rest") from web.xml plus whatever
id is (a number) as if "/todo/rest/2". See
@PathParam in RESTful Java, chapter 5, "JAX-RS Injection".
|
||
| @FormParam | Used to access "application/x-www-form-urlencoded" request bodies, posted by an HTML form. See @FormParam in RESTful Java, chapter 5, "JAX-RS Injection". | ||
| @GET | A request method designator that corresponds, obviously, to the HTTP GET method. With this annotation, you designate which method(s) will process HTTP GET requests (regardless of any name you give the method). | ||
| @PUT | Ibid for HTTP PUT. | ||
| @DELETE | Ibid for HTTP DELETE. | ||
| @POST | Ibid for HTTP POST. |
But, how does this annotation stuff work? It's black magic, right? Yes, sort of, but it's easier to understand than you might think.
The secret lies in the fact that your coded method isn't called directly. That's the sleight of hand. What's called is a "hidden" Jersey controller method that uses reflection to examine which of your coded methods are appropriate for the (GET, PUT, POST, DELETE, etc.) call, then chooses which one based on the expected MIME type and performs other work on context, path, etc. Then it calls your method which magically just works.
(Think of all the explicit coding you did back in the days of C to make something like this work.)
The super important bit in this exercise is, as is often the case, what's going on in web.xml. In particular, a server init parameter must be defined named com.sun.jersey.config.property.package with a value corresponding to the path to the resource classes in a specific package. Note that we're talking about a package and not merely one class from that package (even if, in this first project, there is only one class).
This phenomenon reoccurs in every Jersey REST project in this tutorial.
Also, the URL pattern (in green) is important and corresponds to an element in the path you used to run this service.
Please look for these two settings in the remainder of this tutorial.
<?xml version="1.0" encoding="UTF-8"?>
<web-app xmlns:xsi="http://www.w3.org/2001/XMLSchema-instance"
            xmlns="http://java.sun.com/xml/ns/javaee"
            xmlns:web="http://java.sun.com/xml/ns/javaee/web-app_2_5.xsd"
            xsi:schemaLocation="http://java.sun.com/xml/ns/javaee
                                http://java.sun.com/xml/ns/javaee/web-app_2_5.xsd"
            id="WebApp_ID"
            version="2.5">
  <display-name>de.vogella.jersey.first</display-name>
  <servlet>
    <servlet-name>Jersey REST Service</servlet-name>
    <servlet-class>com.sun.jersey.spi.container.servlet.ServletContainer</servlet-class>
    <init-param>
      <param-name>com.sun.jersey.config.property.packages</param-name>
      <param-value>de.vogella.jersey.first</param-value>
    </init-param>
    <load-on-startup>1</load-on-startup>
  </servlet>
  <servlet-mapping>
    <servlet-name>Jersey REST Service</servlet-name>
    <url-pattern>/rest/*</url-pattern>
  </servlet-mapping>
</web-app>
See more on web.xml if you're confused here.
To tell you to look at a sibling tutorial, Servlet and JSP Development with Eclipse WTP, is a bit misleading. What the author is really trying to is to say that you need some experience with Eclipse Dynamic Web Projects and Tomcat before feeling at home with running JAX-RS applications. I'm going to boil this down to the following steps for you. Assuming you've made no mistakes in the previous steps (Java and web.xml sources), ...
The tutorial doesn't make abundantly clear why this is the path. It is derived from web.xml's displayname, augmented with what is suggested by the servlet-mapping url-pattern and, from Hello.java, the @Path annotation ("hello").
Also, the tutorial arbitrarily chooses to name the project and the package by the same name. This is confusing and must be sorted out: Note that, in the URL to type, it is the display name and not the package name that is the first bit (in blue).
http://domain-name:port-number/display-name/url-pattern/path
http://localhost:8080/de.vogella.jersey.first/rest/hello
This is the most frustrating thing about getting a Dynamic Web Project tutorial to work because you're not only up against the possibility that the tutorial has a mistake (least likely), but that you've made a mistake duplicating the project (possible) or that there's something amiss with the server you're using (fairly likely), or with your web.xml file (highly likely). Let's start by fixing the server. Do one, more or all of these steps just before launching the project in the browser as noted above.
Next, study the appendix on web.xml for greater enlightement by comparison. web.xml is a tricky thing.
Last note: Lars' project names are sometimes surprising. I've more than once helped someone overcome a 404 error when the only thing that was wrong was that he named his project with a "usual" name (no dots) and yet kept Lars' "package name"-looking project name in web.xml.
Indeed, web.xml's display-name and the Eclipse project name must match or the result will be 404 every time.
Be sure to create a brand-new Dynamic Web Project here. Piece it together just as you did the one for the server.
The tutorial abandons this client project without running or discussing it further. The purpose of this client is to demonstrate creating a real-life client application that talks to the Hello service just developed (in 3.4.). It tries all three MIME types as the output demonstrates.
GET http://localhost:8080/de.vogella.jersey.first/rest/hello returned a response status of 200
Hello Jersey in plain text
<?xml version="1.0"?><hello> Hello Jersey in XML</hello>
<html> <title>Hello Jersey</title><body><h1>Hello Jersey in
HTML</body></h1></html>
At this point, I did the Java and XML tutorial as the RESTful web services tutorial suggests, just to avoid missing anything. I found it a nice introduction to XML work in Java. I found nothing critically relevant to the present tutorial, so if you skip it you may do just fine.
In the tutorial, you'll see some division between Java sources. This is by design.
The application consists of a data or domain class that defines the representation of the application data. For example, it might be a customer with name, address and consumer predilections, or it might be, as here, a todo with a description, its priority, etc.
Next, the application must have a resource definition by which (remote) clients can interact with the application data via HTTP requests. For historical reasons, JAX-RS is able to integrate with Enterprise Java Beans (EJBs). It can also be used with JBoss Seam and Spring. However, it does define its own, lightweight model.
JAX-RS services deal often in singletons, only one of which is ever created, or per-request objects, meaning the object is created as the result of a request, processed, then discarded as soon as the request has been completed. In section 5 of this tutorial, you'll see a singleton implementation.
The remaining two sample projects are coded in conformance to this prescribed JAX-RS organization.
You know the drill by now: create and prepare a new Dynamic Web Project. This is a nascent "todo" service that services either XML or HTML requests to create one todo.
Run the web application (server) via http://localhost:8080/de.vogella.jersey.jaxb/rest/todo or see here.
Did you get an HTTP Status 404?
Did you stop, clean and use Add and Remove to take away the firest service (from Lars' tutorial section 3 work) and add this new server application? Then, see above.
The output I see when I run this:
This XML file does not appear to have any style information associated with
it. The document tree is shown below.

- <todo>
      <description>This is my first todo</description>
      <summary>This is my first todo</summary>
  </todo>
While not obvious from the output, this response is from TodoResource.getXML() (rather than from its companion method). Why is this when the request is from a browser? (I'll come back to comment when I figure it out.) Note, however, the demonstration of the effect of the @XmlRootElement JAXB mapping annotation: what is sent back to the browser is XML. If you remove this annotation from Todo.java, you get an HTTP Status 500 error.
Just as for the first project pair, the tutorial abandons this project without running it. But, this is no different than that first service/client pair. Here's the output obtained when you right-click on Test.java and choose Run As -> Java Application:
<?xml version="1.0" encoding="UTF-8" standalone="yes"?><todo><description>This is my first todo</description><summary>This is my first todo</summary></todo>
{"description":"This is my first todo","summary":"This is my first todo"}
<?xml version="1.0" encoding="UTF-8" standalone="yes"?><todo><description>This is my first todo</description><summary>This is my first todo</summary></todo>
HTTP methods PUT, GET, POST and DELETE correspond to a more neutral parlance often used in REST discussions, create, read, update and delete (CRUD). There is some debate against using this term (CRUD) since HTTP methods are more document- than database-oriented. Architecturally, however, CRUD and often does imply state change or dependence which is inappropriate in a REST setting. REST seeks to make the state of the protocol operationg explicit and addressable by URI. Arcs lead from state through operation to state.
Despite this debate, and without comment or judgment, this section covers what it calls CRUD RESTful web services.
This is the crowning project for this tutorial, a functioning todo manager that will manage more than one todo. It more or less fully implements the PUT, GET and DELETE operations (methods). It does not demonstrate a POST (modfiy) method since that would be rather more complex to design and implement. Support inside the service straddles both browser and application clients.
Note on TodoDao: this code may appear strange at first to someone who's not used the Singleton pattern per se, or is used to rolling his own and hasn't seen Joshua Bloch's method described in More Effective Java, pages 29-31, "The Right Way to Implement a Serializable Singleton".
instance isn't a new keyword to Java, it's just the (only) enumerated item (or field) in an enumeration which is otherwise used to instantiate one and only one TodoDao, consisting of two Todos in a single entry Map.
Everywhere an instance is needed, the expression TodoDao.instance is used along with getModel().
At the end of this section there is a note that the "TodoResource uses @PathParam annotation to use the parameter id to forward the request to the class TodoResource".
Run using http://localhost:8080/de.vogella.jersey.todo/rest/todos. Be sure to start the server with the project first.
The output appeared for me thus:
This XML file does not appear to have any style information associated with
it. The document tree is shown below.

- <todoes>
    - <todo>
          <description>Read complete http://www.vogella.de</description>
          <id>2</id>
          <summary>Do something</summary>
      </todo>
    - <todo>
      - <description>
            Read http://www.vogella.de/articles/REST/article.html
        </description>
        <id>1</id>
        <summary>Learn REST</summary>
      </todo>
</todoes>
Also, try http://localhost:8080/de.vogella.jersey.todo/rest/todos/count. You'll see a 2 corresponding to the number of todos (see output above to confirm that there are two todos.
Finally, try also http://localhost:8080/de.vogella.jersey.todo/rest/todos/1 to see this output:
This XML file does not appear to have any style information associated
with it. The document tree is shown below.

- <todo>
    - <description>
          Read http://www.vogella.de/articles/REST/article.html
      </description>
      <id>1</id>
      <summary>Learn REST</summary>
  </todo>
If you typed a 0 or a 3 instead of 1, you'd get an HTTP Status 500 error. Typing a 2 gets you the other todo.
I thought the tutorial was serious about the client project being a simple Java Project (and not a Dynamic Web Project) until the very end when it offered an HTML form.
The (new) challenge here is to consume class, Todo from project de.vogella.jersey.todo. These instructions were created first assuming that this was to be a Java Project. When it became a Dynamic Web Project, I simply refactored to move the library down under the new project's Web Content/WEB-INF/lib subdirectory.
To create a JAR of the latter, do this:
A better idea is to destinate it to land in the directory where you want it. To do this, Browse to de.vogella.jersey.todo.dlient, create a lib directory at the root (as suggested by the tutorial) and drop it there.
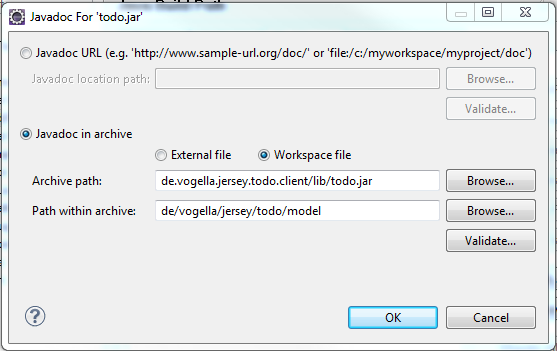
Now you've got a new JAR inside the client project. You must set it up. In project de.vogella.jersey.todo.client...
When I ran the Tester class, I got this output on the console:
201

<?xml version="1.0" encoding="UTF-8" standalone="yes"?>
<todoes>
  <todo>
    <id>3</id><summary>Blabla</summary>
  </todo>
  <todo>
    <description>Read complete http://www.vogella.de</description>
    <id>2</id><summary>Do something</summary>
  </todo>
  <todo>
    <description>Read http://www.vogella.de/articles/REST/article.html</description>
    <id>1</id>
    <summary>Learn REST</summary>
  </todo>
</todoes>

{"todo":[{"id":"3","summary":"Blabla"},{"description":"Read complete http://www.vogella.de","id":"2","summary":"Do something"},
{"description":"Read http://www.vogella.de/articles/REST/article.html","id":"1","summary":"Learn REST"}]}

<?xml version="1.0" encoding="UTF-8" standalone="yes"?>
<todoes>
  <todo>
    <id>3</id>
    <summary>Blabla</summary>
  </todo>
  <todo>
    <description>Read complete http://www.vogella.de</description>
    <id>2</id>
    <summary>Do something</summary>
  </todo>
  <todo>
    <description>Read http://www.vogella.de/articles/REST/article.html</description>
    <id>1</id>
    <summary>Learn REST</summary>
  </todo>
</todoes>

<?xml version="1.0" encoding="UTF-8" standalone="yes"?>
<todo>
  <description>Read http://www.vogella.de/articles/REST/article.html</description>
  <id>1</id>
  <summary>Learn REST</summary>
</todo>

<?xml version="1.0" encoding="UTF-8" standalone="yes"?>
<todoes>
  <todo>
    <description>Read complete http://www.vogella.de</description>
    <id>2</id>
    <summary>Do something</summary>
  </todo>
  <todo>
    <description>Read http://www.vogella.de/articles/REST/article.html</description>
    <id>1</id>
    <summary>Learn REST</summary>
  </todo>
</todoes>

Form response <html><head><title>Apache Tomcat/6.0.26 - Error report</title>
<style>
<!--
  H1 {font-family:Tahoma,Arial,sans-serif;color:white;background-color:#525D76;font-size:22px;}
  H2 {font-family:Tahoma,Arial,sans-serif;color:white;background-color:#525D76;font-size:16px;}
  H3 {font-family:Tahoma,Arial,sans-serif;color:white;background-color:#525D76;font-size:14px;}
  BODY {font-family:Tahoma,Arial,sans-serif;color:black;background-color:white;}
  B {font-family:Tahoma,Arial,sans-serif;color:white;background-color:#525D76;}
  P {font-family:Tahoma,Arial,sans-serif;background:white;color:black;font-size:12px;}
  A {color : black;}
  A.name {color : black;}
  HR {color : #525D76;}
 -->
</style>
</head>
<body>
<h1>HTTP Status 404 - /de.vogella.jersey.todo/rest/../create_todo.html</h1>
<HR size="1" noshade="noshade">
<p><b>type</b> Status report</p>
<p><b>message</b> <u>/de.vogella.jersey.todo/rest/../create_todo.html</u></p>
<p><b>description</b> <u>The requested resource (/de.vogella.jersey.todo/rest/../create_todo.html) is not available.</u></p>
<HR size="1" noshade="noshade">
<h3>Apache Tomcat/6.0.26</h3>
</body>
</html>

<?xml version="1.0" encoding="UTF-8" standalone="yes"?>
<todoes>
  <todo>
    <description>Read complete http://www.vogella.de</description><id>2</id><summary>Do something</summary>
  </todo>
  <todo>
    <description>Read http://www.vogella.de/articles/REST/article.html</description><id>1</id><summary>Learn REST</summary>
  </todo>
  <todo>
    <id>4</id><summary>Demonstration of the client lib for forms</summary>
  </todo>
</todoes>
On studying the form response which, among other lines, I've re-wrapped here for clarity, it's clear that this test isn't working correctly. The problem appears to be a missing create_todo.html file. This will be resolved in the next section.
The HTML source is given, but no name for the file is advised. However, this is the missing create_todo.html; the tutorial just doesn't call it that nor does it say where to create it. Here's what the Tester class looks like when run after this file is created and located in the appropriate place. I've added (to Tester.java) some comments and vertical spacing to reach and clean up the console output.
Experimentation resulted in learning that the HTML file, create_todo.html, should be placed on the path de.vogella.jersey.todo/WebContent.
With this done, here's the new output from Tester, wrapped to fit on this page:
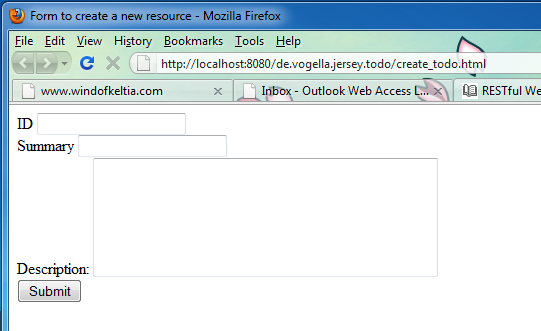
201

Get the Todos...
<?xml version="1.0" encoding="UTF-8" standalone="yes"?>
<todoes>
  <todo>
    <id>3</id>
    <summary>Blabla</summary>
  </todo>
  <todo>
    <description>Read complete http://www.vogella.de</description>
    <id>2</id>
    <summary>Do something</summary>
  </todo>
  <todo>
    <description>Read http://www.vogella.de/articles/REST/article.html</description>
    <id>1</id>
    <summary>Learn REST</summary>
  </todo>
</todoes>

Get XML for application...
{"todo":[{"id":"3","summary":"Blabla"},{"description":"Read complete http://www.vogella.de","id":"2","summary":"Do something"},
{"description":"Read http://www.vogella.de/articles/REST/article.html","id":"1","summary":"Learn REST"}]}

Get JSON for application...
<?xml version="1.0" encoding="UTF-8" standalone="yes"?>
<todoes>
  <todo>
    <id>3</id>
    <summary>Blabla</summary>
  </todo>
  <todo>
    <description>Read complete http://www.vogella.de</description>
    <id>2</id>
    <summary>Do something</summary>
  </todo>
  <todo>
    <description>Read http://www.vogella.de/articles/REST/article.html</description>
    <id>1</id>
    <summary>Learn REST</summary>
  </todo>
</todoes>

Get the Todo with id 1...
<?xml version="1.0" encoding="UTF-8" standalone="yes"?>
<todo>
  <description>Read http://www.vogella.de/articles/REST/article.html</description>
  <id>1</id>
  <summary>Learn REST</summary>
</todo>

Get Todo with id 1...

Get the all todos, id 1 should be deleted...
<?xml version="1.0" encoding="UTF-8" standalone="yes"?>
<todoes>
  <todo>
    <description>Read complete http://www.vogella.de</description>
    <id>2</id>
    <summary>Do something</summary>
  </todo>
  <todo>
    <description>Read http://www.vogella.de/articles/REST/article.html</description>
    <id>1</id>
    <summary>Learn REST</summary>
  </todo>
</todoes>

Create a Todo...
Form response <!DOCTYPE html>
<html>
<head>
  <title>Form to create a new resource</title>
</head>
<body>
  <form action="../de.vogella.jersey.todo/rest/todos" method="POST">
    <label for="id">ID</label>
    <input name="id" />
    <br/>
    <label for="summary">Summary</label>
    <input name="summary" />
    <br/>
    Description:
    <TEXTAREA NAME="description" COLS=40 ROWS=6></TEXTAREA>
    <br/>
    <input type="submit" value="Submit" />
  </form>
</body>
</html>


Get the all todos; id 4 should be deleted...
<?xml version="1.0" encoding="UTF-8" standalone="yes"?>
<todoes>
  <todo>
    <description>Read complete http://www.vogella.de</description>
    <id>2</id>
    <summary>Do something</summary>
  </todo>
  <todo>
    <description>Read http://www.vogella.de/articles/REST/article.html</description>
    <id>1</id>
    <summary>Learn REST</summary>
  </todo>
  <todo>
    <id>4</id>
    <summary>Demonstration of the client lib for forms</summary>
  </todo>
</todoes>
To run the Todo application, click http://localhost:8080/de.vogella.jersey.todo/create_todo.html. You'll see:
web.xml has in fact been my bane for many years. I'm forever screwing it up and having to pull my hair out over it before it starts working. It is almost always the source of HTTP Status 404 when first you begin running and debugging your application.
For this reason, I think it's useful to give a second example of a project's web.xml. Always, always show the reader the entrance to the rabbit hole from two separate angles so that he can find it later on his own.
(Note: you might also find my article, That web.xml Mess, useful.)
What was confusing about this tutorial's web.xml? Especially the use of package names for project names and for the web.xml display-name. This made it hard to figure out what was going on in that file. This appendix seeks to clarify this.
This web.xml incorporates a servlet definition (and its mapping) so that you can run the tutorial's de.vogella.jersey.first example. It also contains a second definition for my own hello world example. By giving two, even trivial examples in the same server, a great number of questions are answered about just how web.xml works.
Fun is my project name (not important, but shows you where I got my display-name).
The crucial bits of information that must be accurately specified are the following. Please refer to web.xml as you take note of these.
<?xml version="1.0" encoding="UTF-8"?>
<web-app xmlns:xsi="http://www.w3.org/2001/XMLSchema-instance"
    xmlns="http://java.sun.com/xml/ns/javaee" xmlns:web="http://java.sun.com/xml/ns/javaee/web-app_2_5.xsd"
    xsi:schemaLocation="http://java.sun.com/xml/ns/javaee http://java.sun.com/xml/ns/javaee/web-app_2_5.xsd"
    id="WebApp_ID" version="2.5">
    <display-name>Fun</display-name>

	<!-- First servlet -->
    <servlet>
        <servlet-name>Jersey REST Service</servlet-name>
        <servlet-class>com.sun.jersey.spi.container.servlet.ServletContainer</servlet-class>
        <init-param>
            <param-name>com.sun.jersey.config.property.packages</param-name>
            <param-value>de.vogella.jersey.first</param-value>
        </init-param>
        <load-on-startup>1</load-on-startup>
    </servlet>

	<!-- Second servlet -->
    <servlet>
        <servlet-name>Fun with REST</servlet-name>
        <servlet-class>com.sun.jersey.spi.container.servlet.ServletContainer</servlet-class>
        <init-param>
            <param-name>com.sun.jersey.config.property.packages</param-name>
            <param-value>com.etretatlogiciels.fun</param-value>
        </init-param>
        <load-on-startup>1</load-on-startup>
    </servlet>

	<!-- Mappings -->
    <servlet-mapping>
        <servlet-name>Jersey REST Service</servlet-name>
        <url-pattern>/rest/*</url-pattern>
    </servlet-mapping>

    <servlet-mapping>
        <servlet-name>Fun with REST</servlet-name>
        <url-pattern>/fun/*</url-pattern>
    </servlet-mapping>
</web-app>
This is more or less from the very first project in the tutorial. Once running, reach this servlet from a browser with the URL http://localhost:8080/Fun/rest/hello.
package de.vogella.jersey.first;

import javax.ws.rs.GET;
import javax.ws.rs.Path;
import javax.ws.rs.Produces;
import javax.ws.rs.core.MediaType;

@Path( "/hello" )
public class Hello
{
	@GET
	@Produces( MediaType.TEXT_PLAIN )
	public String sayPlainTextHello()
	{
		return "Hello, Jersey--in plain text";
	}

	@GET
	@Produces( MediaType.TEXT_HTML )
	public String sayHtmlHello()
	{
		return "<html>\n"
				+ "<head>\n"
					+ "<title> " + "Hello, Jersey" + " </title>\n"
				+ "</head>\n"
			+ "<body>\n"
				+ "<h2> " + "Hello, Jersey—HTML" + " </h2>\n"
			+ "</body>\n"
			+ "</html> ";
	}
}
This is little more than a copy of that first Java file with names including package names changed: you can only field ONE REST servlet from any one package. This servlet is reached via http://localhost:8080/Fun/fun/havefun. It would be possible to keep rest as the URL pattern (so that both servlets use the same url-pattern).
package com.etretatlogiciels.fun;

import javax.ws.rs.GET;
import javax.ws.rs.Path;
import javax.ws.rs.Produces;
import javax.ws.rs.core.MediaType;

@Path( "/havefun" )
public class Fun
{
	@GET
	@Produces( MediaType.TEXT_PLAIN )
	public String sayPlainTextHello()
	{
		return "Fun with REST--in plain text";
	}

	@GET
	@Produces( MediaType.TEXT_HTML )
	public String sayHtmlHello()
	{
		return "<html>\n"
				+ "<head>\n"
					+ "<title> " + "Fun with REST" + " </title>\n"
				+ "</head>\n"
			+ "<body>\n"
				+ "<h2> " + "Fun with REST—HTML" + " </h2>\n"
			+ "</body>\n"
			+ "</html> ";
	}
}
(Return to RESTful Web Services with Java and Jersey.)
In fact, I don't think <! COMMENT> is valid in XML. Instead,
it's <!-- ...comment... -->.
Lars recommends not using the W2C Standard API. He probably knows what he's talking about.
Lars recommends not using SAX either.
Lars recommends not using this unless you must control the XML flow.
Lars recommends using JAXB.
Here are the projects. You're not told exactly how to set up the Eclipse projects to do this. Here's how I did it.
When you run the project, by right-clicking the TestRead.java file and choosing Run As -> Java application, you will see:
Item [current=1, date=January 2009, interactive=1, mode=1, unit=900]
Item [current=2, date=February 2009, interactive=5, mode=2, unit=400]
Item [current=100, date=December 2009, interactive=3, mode=9, unit=5]
When you run the test, TestWrite.java, a new file, config2.xml is created alongside the config.xml used in the Read XML test. You will see no output on the console.
Create yet a new Java Project, de.vogella.xml.jaxb.
Run BookMain.java to see the following in the console:
<?xml version="1.0" encoding="UTF-8" standalone="yes"?>
<ns2:bookstore xmlns:ns2="de.vogella.xml.jaxb.model">
    <bookList>
        <book>
            <author>Neil Strauss</author>
            <bookName>The Game</bookName>
            <publisher>Harpercollins</publisher>
            <isbn>978-0060554736</isbn>
        </book>
        <book>
            <author>Charlotte Roche</author>
            <bookName>Feuchtgebiete</bookName>
            <publisher>Dumont Buchverlag</publisher>
            <isbn>978-3832180577</isbn>
        </book>
    </bookList>
    <location>Frankfurt Airport</location>
    <name>Fraport Bookstore</name>
</ns2:bookstore>

Output from our XML File:
Book 1: The Game from Neil Strauss
Book 2: Feuchtgebiete from Charlotte Roche
...as well as an XML file at the root of the project named, bookstore-jaxb.xml, containing the XML part that came out in the console.
Create yet a new Java Project, UsingXPath.
Run the lone Java file as an application. You'll see:
Vogel
Strangelastname
Tim
Number of objects 3.0
true
There's a wealth of web services behind all these Java API for XML (JAX) technologies. There are Java API for XML...
Not covered in this document, JAX-WS creates a traditional WSDL-based SOAP service. SOAP, Simple Object Access Protocol, is a specification for exchanging structured information relying on XML. The Web Service Description Language (WSDL) specifies an XML format that describes a service as a set of endpoints that operates on messages. The conveyance is SOAP (in HTTP).
Two good references to JAX-WS are:
In a RESTful service setting, web.xml and the URI to use in the browser or client application appear to work thus:
This is how Eclipse does things with Tomcat in the absence of any META-INF/context.xml. In the copy of web.xml below, compare what's bold-faced with the explanations given here.
<?xml version="1.0" encoding="UTF-8"?>
<web-app xmlns:xsi="http://www.w3.org/2001/XMLSchema-instance"
        xmlns="http://java.sun.com/xml/ns/javaee"
        xmlns:web="http://java.sun.com/xml/ns/javaee/web-app_2_5.xsd"
        xsi:schemaLocation="http://java.sun.com/xml/ns/javaee
                            http://java.sun.com/xml/ns/javaee/web-app_2_5.xsd"
        id="WebApp_ID"
        version="2.5">

    <display-name>rest-server</display-name>

    <servlet>
        <servlet-name>Jersey REST Service</servlet-name>
        <servlet-class>com.sun.jersey.spi.container.servlet.ServletContainer</servlet-class>
        <init-param>
            <param-name>com.sun.jersey.config.property.packages</param-name>
            <param-value>com.hp.webplatform.restful.server</param-value>
        </init-param>
        <load-on-startup>1</load-on-startup>
    </servlet>

    <servlet-mapping>
        <servlet-name>Jersey REST Service</servlet-name>
        <url-pattern>/rest/*</url-pattern>
    </servlet-mapping>
</web-app>
This section is only for your interest if, like me, you entertain a morbid fascination with the inner workings of Eclipse and Tomcat on Eclipse. It's easier for me to figure out how to make something work (or fix it) if I grok the guts than if I trust to Eclipse and blindly follow what are very weakly defined practices in the first place. (Eclipse's lack of best practice is what makes MyEclipse something its owners can actually sell for money.)
The following is admittedly a bit random and follows from problems I've had re-casting our server project in Git for the second time. Working on a project by committee results in the former being wired up using different practices such that, alone in this exercise, I had to transcend all of them to get back to a working state.
So, what to do when Tomcat won't start because ServletContainer has gone missing?
The problem might arise by how you do library JARs. If you're using a lib subdirectory at the project root and adding them with Build Path -> Configure Build Path -> Libraries -> Add JARs versus the usual Eclipse practice of putting the JARs on the path WebContent/WEB-INF/lib and creating a User Library. (There's absolutely nothing wrong with this; it's just not what's "taught" in the Eclipse forums by those who answer questions there, one of which is me, but I just parrot what I've already heard.)
In the Web Deployment Assembly dialog (right-click the project, choose Properties, then look for this down the left side of the Properties dialog), use Add -> Java Build Path Entries to find and add all the libraries and not Folder (/lib). You should end up with a deployment assembly list that's rather long—consisting of every single JAR you expect—no convenient "groups" like User Libraries.
When Tomcat is started with
<servlet>
    <servlet-name>Jersey REST Service</servlet-name>
    <servlet-class>com.sun.jersey.spi.container.servlet.ServletContainer</servlet-class>
    <init-param>
        <param-name>com.sun.jersey.config.property.packages</param-name>
        <param-value>com.acme.webplatform.ws</param-value>
    </init-param>
    <load-on-startup>1</load-on-startup>
</servlet>
in web.xml, Jersey scans for classes in the package noted as the value of com.sun.jersey.config.property.packages. These classes are the ones with annotations in them like @Path, @GET, @PUT, etc. and @Produces. You see the following during Tomcat start:
INFO: Scanning for root resource and provider classes in the packages:
  com.hp.webplatform.ws
Aug 4, 2011 4:20:37 PM com.sun.jersey.api.core.ScanningResourceConfig logClasses
INFO: Root resource classes found:
  class com.acme.webplatform.ws.UserWS
  class com.acme.webplatform.ws.PingWS
  class com.acme.webplatform.ws.PartnerWS
This is a list of those classes, in this case, the ping service, the user management service and the partner management service. If your intended one isn't on the list, chances are web.xml is at fault in specifying the right package, or your class isn't in the right package.
These do not have to be fixed. Starting Tomcat, you get this:
WARNING: [SetPropertiesRule]{Server/Service/Engine/Host/Context} Setting
property 'source' to 'org.eclipse.jst.jee.server: (project name)' did not find
a matching property.
This was added sometime early in Tomcat 6.x. It's eliminated by opening the server (Server tab -> double-click your Tomcat server -> Server Options -> check Publish module contexts to separate XML files (whatever that means—sometimes I think interface designers use random word-sequence generators).
Or this:
INFO: The APR based Apache Tomcat Native library which allows optimal
performance in production environments was not found on the java.library.path:
/home/russ/dev/jdk1.6.0_24/jre/lib/amd64/server:
/home/russ/dev/jdk1.6.0_24/jre/lib/amd64:
/home/russ/dev/jdk1.6.0_24/jre/../lib/amd64:
/usr/java/packages/lib/amd64:/usr/lib64:/lib64:/lib:/usr/lib
The answer here is that an optional library is missing. This involves:
Presumably, for doing this, you get:
as explained here: http://mattfleming.com/node/247
This is mostly for your gee-whiz collection. I've never done it, I just looked into it once in case I wanted to rid myself of every last warning during Tomcat start-up.