Russell Bateman
September 2013
last update:
Table of Contents

|
Russell Bateman |
Table of Contents |
|
This is a log of events setting up a new host on which I'll run the Plex Media server. I'm choosing the recent Linux Mint 19 LTS Tara desktop based on Ubuntu Bionic Beaver. This is a departure from normal: I usually set up a headless, Ubuntu Server. This time, however, the box will remain in my den where I can keep an eye on it and I'll want to enjoy the GUI options of Cinnamon desktop.
I name my servers after elf kingdoms. Nargothrond was Finrod Felagund's realm in western Beleriand, but, after his death at the hands of Sauron, it was destroyed about year 495 First Age by Glaurung, the urulókë or fire-drake, with the direct contribution of the arrogance of Túrin Turambar who refused to allow Felagund's brother Orodreth, heir and ruler, to break down the "stones of [their] pride," that is, the bridge he had built over the river Narog by which the worm and orcs easily passed in their sack.
Hardly, or not at all, was this arrogance redeemed by the Mormegil later when, as Glaurung crawled over the Narog, Turambar slew the dragon. Orodreth and his kingdom were all lost or enslaved in Thangorodrim. His daugher, Finduilas, was slain on the borders of Brethil by orcs—not the least of the expatriates of Aman.
Hardware being used, the system was purchased in September, 2018, the WD Red drives in June and July 2019:
HP EliteDesk 800 G1 Desktop PC Mid-Tower
Intel Core i7-4770 3.4GHz CPU
16Gb memory
2Tb hard drive (Hitachi, system)
2 × Western Digital Red 8Tb hard drives
|
|
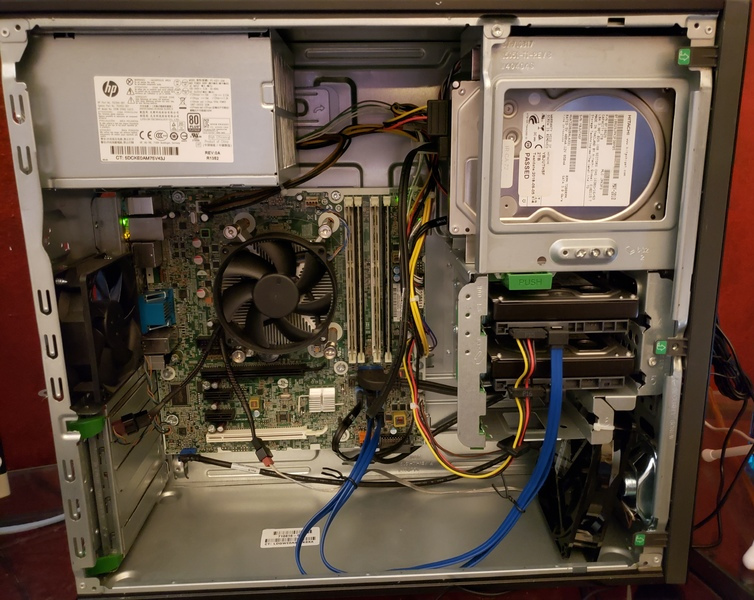
In the cabinet, the Hitachi drive is at top in front of the optical spindle. Below are the two Western Digital drives along with an extra fan to stir the air or load down the power supply—I don't know which. In fact, it's the Hitachi drive that gets hot, not the other two.
SATA connectors on-board. We have 5 of them. At present, one is taken by the optical spindle, the second is taken by the Hitachi 2Tb drive on which root, swap and boot are configured. I'm adding two brand-new Western Digital 8Tb. I'll be using the two on-board SATA connectors shown that stand together (leaving one of the other three empty).
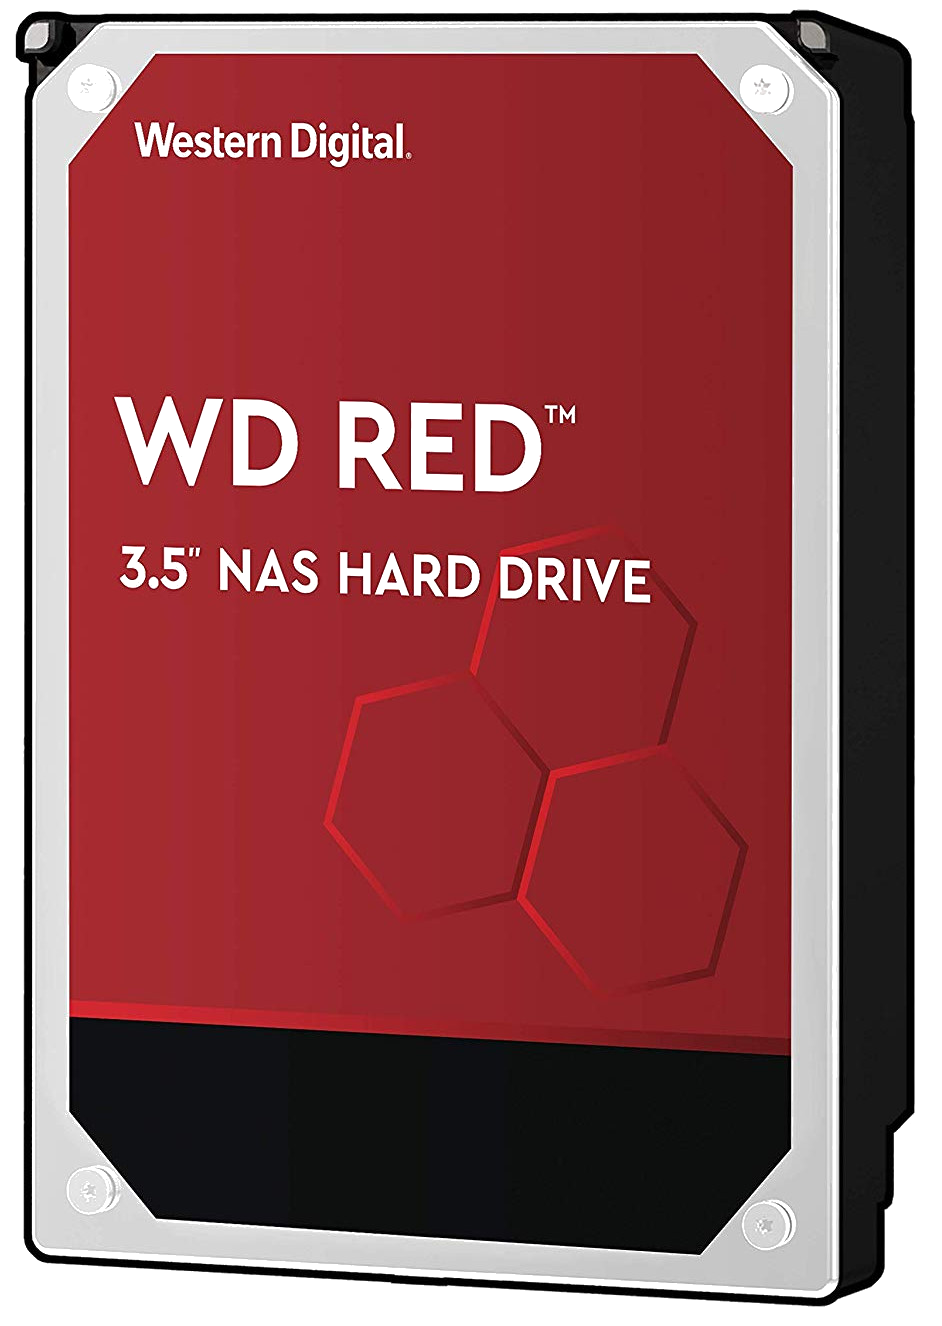
The Western Digital Red drives are specially built to accommodate occasional writes (laying down the video media files), intense reading (consumers streaming the video media) and to spin for years before breaking down.
I set up my first Plex Media server in September 2013, I think. I used a machine that I had set up a year earlier to simulate a data center. It was hardware I built around an Intel i5. I did not use special NAS drives when I added 2 × ( 4Tb + 2Tb disks), but this hardware has run 27×7 since then and is still running today (2019). I've only had to replace a crashed system disk.
I discarded the Windows 10 software that came installed as it's useless crap and instead installed Linux Mint 19 Tara.
Later the next spring, in June of 2019, I obtained a Western Digital Red 8Tb drive. My objective is to clone the existing Plex Media server already described for redundancy's sake. The original hardware, running since 2013, is pretty old. I installed this drive and set up zfs on it in preparation for later when I purchase the same drive in order to mirror it. Here's what I did. I bought two of these disks from Amazon at around $225 each.
WD 8Tb Red/NAS SATA 6 Gb/s 256Mb cache WD80EFAX
Let's get started. The steps are:
russ@nargothrond:~$ sudo bash
root@nargothrond:~# cd /etc/apt
root@nargothrond:/etc/apt# ll
total 60
drwxr-xr-x   7 root root  4096 Jul  6 07:28 .
drwxr-xr-x 150 root root 12288 Jul  5 23:56 ..
drwxr-xr-x   2 root root  4096 Jul  5 23:56 apt.conf.d
drwxr-xr-x   2 root root  4096 Mar 11 03:34 auth.conf.d
drwxr-xr-x   2 root root  4096 Feb 11 11:54 preferences.d
-rw-r--r--   1 root root    89 Oct  7  2018 sources.list
drwxr-xr-x   2 root root  4096 Jul  5 23:51 sources.list.d
-rw-r--r--   1 root root 10599 Jul  1 18:54 trusted.gpg
-rw-r--r--   1 root root  4969 May 20 20:57 trusted.gpg~
drwxr-xr-x   2 root root  4096 Jul  1 18:54 trusted.gpg.d
root@nargothrond:/etc/apt# ll sources.list.d/
total 24
drwxr-xr-x 2 root root 4096 Jul  5 23:51 .
drwxr-xr-x 7 root root 4096 Jul  6 07:28 ..
-rw-r--r-- 1 root root  190 Nov  6  2018 google-chrome.list
-rw-r--r-- 1 root root  110 Jul  5 23:49 mkvtoolnix.list
-rw-r--r-- 1 root root  485 Oct  7  2018 official-package-repositories.list
-rw-r--r-- 1 root root  156 May 20 21:00 stebbins-handbrake-releases-bionic.list
root@nargothrond:/etc/apt# apt edit-sources

Select an editor.  To change later, run 'select-editor'.
  1. /usr/bin/vim.gtk3
  2. /bin/nano        <---- easiest
  3. /usr/bin/vim.tiny
  4. /bin/ed

Choose 1-4 [2]: 1
root@nargothrond:/etc/apt# apt-add-repository main
root@nargothrond:/etc/apt# apt-add-repository restricted
root@nargothrond:/etc/apt# apt-add-repository universe
root@nargothrond:/etc/apt# apt-add-repository multiverse
root@nargothrond:/etc/apt# apt-get update
Hit:1 http://archive.canonical.com/ubuntu bionic InRelease
Ign:2 http://mirrors.xmission.com/linuxmint tara InRelease
Hit:3 http://mirrors.xmission.com/linuxmint tara Release
Hit:4 http://ubuntu.cs.utah.edu/ubuntu bionic InRelease
Get:6 http://ubuntu.cs.utah.edu/ubuntu bionic-updates InRelease [88.7 kB]
Get:7 http://security.ubuntu.com/ubuntu bionic-security InRelease [88.7 kB]
Hit:8 http://ppa.launchpad.net/stebbins/handbrake-releases/ubuntu bionic InRelease
Get:9 http://ubuntu.cs.utah.edu/ubuntu bionic-backports InRelease [74.6 kB]
Get:10 http://ubuntu.cs.utah.edu/ubuntu bionic-updates/main amd64 Packages [678 kB]
Get:11 http://security.ubuntu.com/ubuntu bionic-security/main amd64 DEP-11 Metadata [24.1 kB]
Get:12 http://ubuntu.cs.utah.edu/ubuntu bionic-updates/main i386 Packages [555 kB]
Get:13 http://security.ubuntu.com/ubuntu bionic-security/universe amd64 DEP-11 Metadata [41.3 kB]
Get:14 http://security.ubuntu.com/ubuntu bionic-security/multiverse amd64 DEP-11 Metadata [2,464 B]
Get:15 http://ubuntu.cs.utah.edu/ubuntu bionic-updates/main amd64 DEP-11 Metadata [283 kB]
Get:16 http://ubuntu.cs.utah.edu/ubuntu bionic-updates/universe i386 Packages [953 kB]
Get:17 http://ubuntu.cs.utah.edu/ubuntu bionic-updates/universe amd64 Packages [969 kB]
Get:18 http://ubuntu.cs.utah.edu/ubuntu bionic-updates/universe amd64 DEP-11 Metadata [249 kB]
Get:19 http://ubuntu.cs.utah.edu/ubuntu bionic-updates/multiverse amd64 DEP-11 Metadata [2,468 B]
Get:20 http://ubuntu.cs.utah.edu/ubuntu bionic-backports/universe amd64 DEP-11 Metadata [7,224 B]
Fetched 4,018 kB in 4s (955 kB/s)
Reading package lists... Done
root@nargothrond:/etc/apt# apt edit-sources
root@nargothrond:/etc/apt# apt-get install zfsutils-linux
Reading package lists... Done
Building dependency tree
Reading state information... Done
The following package was automatically installed and is no longer required:
  libllvm7
Use 'apt autoremove' to remove it.
The following additional packages will be installed:
  libnvpair1linux libuutil1linux libzfs2linux libzpool2linux
Suggested packages:
  nfs-kernel-server zfs-initramfs | zfs-dracut
Recommended packages:
  zfs-zed
The following NEW packages will be installed:
  libnvpair1linux libuutil1linux libzfs2linux libzpool2linux zfsutils-linux
0 upgraded, 5 newly installed, 0 to remove and 0 not upgraded.
Need to get 1,110 kB of archives.
After this operation, 4,015 kB of additional disk space will be used.
Do you want to continue? [Y/n] y
Get:1 http://ubuntu.cs.utah.edu/ubuntu bionic-updates/main amd64 libnvpair1linux amd64 0.7.5-1ubuntu16.4 [45.3 kB]
Get:2 http://ubuntu.cs.utah.edu/ubuntu bionic-updates/main amd64 libuutil1linux amd64 0.7.5-1ubuntu16.4 [48.1 kB]
Get:3 http://ubuntu.cs.utah.edu/ubuntu bionic-updates/main amd64 libzpool2linux amd64 0.7.5-1ubuntu16.4 [548 kB]
Get:4 http://ubuntu.cs.utah.edu/ubuntu bionic-updates/main amd64 libzfs2linux amd64 0.7.5-1ubuntu16.4 [128 kB]
Get:5 http://ubuntu.cs.utah.edu/ubuntu bionic-updates/main amd64 zfsutils-linux amd64 0.7.5-1ubuntu16.4 [341 kB]
Fetched 1,110 kB in 1s (847 kB/s)
Selecting previously unselected package libnvpair1linux.
(Reading database ... 372809 files and directories currently installed.)
Preparing to unpack .../libnvpair1linux_0.7.5-1ubuntu16.4_amd64.deb ...
Unpacking libnvpair1linux (0.7.5-1ubuntu16.4) ...
Selecting previously unselected package libuutil1linux.
Preparing to unpack .../libuutil1linux_0.7.5-1ubuntu16.4_amd64.deb ...
Unpacking libuutil1linux (0.7.5-1ubuntu16.4) ...
Selecting previously unselected package libzpool2linux.
Preparing to unpack .../libzpool2linux_0.7.5-1ubuntu16.4_amd64.deb ...
Unpacking libzpool2linux (0.7.5-1ubuntu16.4) ...
Selecting previously unselected package libzfs2linux.
Preparing to unpack .../libzfs2linux_0.7.5-1ubuntu16.4_amd64.deb ...
Unpacking libzfs2linux (0.7.5-1ubuntu16.4) ...
Selecting previously unselected package zfsutils-linux.
Preparing to unpack .../zfsutils-linux_0.7.5-1ubuntu16.4_amd64.deb ...
Unpacking zfsutils-linux (0.7.5-1ubuntu16.4) ...
Setting up libuutil1linux (0.7.5-1ubuntu16.4) ...
Setting up libnvpair1linux (0.7.5-1ubuntu16.4) ...
Processing triggers for libc-bin (2.27-3ubuntu1) ...
Processing triggers for man-db (2.8.3-2ubuntu0.1) ...
Setting up libzpool2linux (0.7.5-1ubuntu16.4) ...
Setting up libzfs2linux (0.7.5-1ubuntu16.4) ...
Setting up zfsutils-linux (0.7.5-1ubuntu16.4) ...
Created symlink /etc/systemd/system/zfs-import.target.wants/zfs-import-cache.service → /lib/systemd/system/zfs-import-cache.service.
Created symlink /etc/systemd/system/zfs-mount.service.wants/zfs-import.target → /lib/systemd/system/zfs-import.target.
Created symlink /etc/systemd/system/zfs.target.wants/zfs-import.target → /lib/systemd/system/zfs-import.target.
Created symlink /etc/systemd/system/zfs-mount.service.wants/zfs-load-module.service → /lib/systemd/system/zfs-load-module.service.
Created symlink /etc/systemd/system/zfs.target.wants/zfs-load-module.service → /lib/systemd/system/zfs-load-module.service.
Created symlink /etc/systemd/system/zfs-share.service.wants/zfs-mount.service → /lib/systemd/system/zfs-mount.service.
Created symlink /etc/systemd/system/zfs.target.wants/zfs-mount.service → /lib/systemd/system/zfs-mount.service.
Created symlink /etc/systemd/system/zfs.target.wants/zfs-share.service → /lib/systemd/system/zfs-share.service.
Created symlink /etc/systemd/system/multi-user.target.wants/zfs.target → /lib/systemd/system/zfs.target.
zfs-import-scan.service is a disabled or a static unit, not starting it.
Processing triggers for libc-bin (2.27-3ubuntu1) ...
root@nargothrond:/etc/apt# zpool status
no pools available
root@nargothrond:/etc/apt# ls -l /dev/disk/by-id
total 0
lrwxrwxrwx 1 root root  9 Jul  9 18:45 ata-Hitachi_HUA722020ALA331_YBJUTHSF -> ../../sda
lrwxrwxrwx 1 root root 10 Jul  9 18:45 ata-Hitachi_HUA722020ALA331_YBJUTHSF-part1 -> ../../sda1
lrwxrwxrwx 1 root root  9 Jul  9 18:45 ata-PLDS_DVD+_-RW_DS-8ABSH_23HW67363953862LQA03 -> ../../sr0
lrwxrwxrwx 1 root root  9 Jul  9 18:45 wwn-0x5000cca099d91c9d -> ../../sdb
lrwxrwxrwx 1 root root  9 Jul  9 18:45 wwn-0x5000cca099d98321 -> ../../sdc
lrwxrwxrwx 1 root root  9 Jul  9 18:45 wwn-0x5000cca221e7e849 -> ../../sda
lrwxrwxrwx 1 root root 10 Jul  9 18:45 wwn-0x5000cca221e7e849-part1 -> ../../sda1
lrwxrwxrwx 1 root root  9 Jul  9 18:45 ata-WDC_WD80EFAX-68KNBN0_VAHT7HXL -> ../../sdb
lrwxrwxrwx 1 root root  9 Jul  9 18:45 ata-WDC_WD80EFAX-68KNBN0_VAHU3UHL -> ../../sdc
    +--------------------------+----------+---------+
    | Disk                     | Device   | Size    |
    +--------------------------+----------+---------+
    | Western Digital Red 8Tb  | /dev/sdb | 7.1 Tb  |
    +--------------------------+----------+---------+
    | Western Digital Red 8Tb  | /dev/sdc | 7.1 Tb  |
    +--------------------------+----------+---------+
root@nargothrond:~# zpool create plex-media mirror /dev/sdb /dev/sdc
root@nargothrond:~# zpool status
  pool: plex-media
 state: ONLINE
  scan: none requested
config:

	NAME        STATE     READ WRITE CKSUM
	plex-media  ONLINE       0     0     0
	  mirror-0  ONLINE       0     0     0
	    sdb     ONLINE       0     0     0
	    sdc     ONLINE       0     0     0

errors: No known data errors
root@nargothrond:~# zpool export plex-media
root@nargothrond:~# zpool import -d /dev/disk/by-id plex-media
root@nargothrond:~# zpool status

  pool: plex-media
 state: ONLINE
  scan: none requested
config:

	NAME                        STATE     READ WRITE CKSUM
	plex-media                  ONLINE       0     0     0
	  mirror-0                  ONLINE       0     0     0
	    wwn-0x5000cca099d91c9d  ONLINE       0     0     0
	    wwn-0x5000cca099d98321  ONLINE       0     0     0

errors: No known data errors
root@nargothrond:~# zfs set mountpoint=/plex-media plex-media
root@nargothrond:~# ll /plex-media
total 5
drwxr-xr-x  2 root root    2 Jul  9 19:56 .
drwxr-xr-x 25 root root 4096 Jul  9 20:02 ..
root@nargothrond:~# df -h
Filesystem      Size  Used Avail Use% Mounted on
udev            7.8G     0  7.8G   0% /dev
tmpfs           1.6G  1.4M  1.6G   1% /run
/dev/sda1       1.8T  100G  1.7T   6% /                 (this is my Linux system disk—the Hitachi drive)
tmpfs           7.8G   12M  7.8G   1% /dev/shm
tmpfs           5.0M  4.0K  5.0M   1% /run/lock
tmpfs           7.8G     0  7.8G   0% /sys/fs/cgroup
tmpfs           1.6G   32K  1.6G   1% /run/user/1000
plex-media      7.1T  128K  7.1T   1% /plex-media       (this is the disk for use by my Plex Media server)