Russell Bateman
April/May 2015
last update:

|
Russell Bateman
|
Table of Contents |
This is a log of events setting up my first new desktop in almost 5 years. I'm choosing to run Mint 17 LTS, which is based on Ubuntu 14.04 Trusty Tahr.
Some few years after the Noldor returned to Middle Earth from their expatriation in Valimar, Turgon ruled the kingdom of Nevrast and Vinyamar. Ulmo, the sea Vala, spoke to Turgon in a dream telling him he would guide him to a hidden place where he could build a kingdom and a city rivalling the splendor of Elven Tirion upon Túna.
In 53 First Age (or year of the sun), this was done. Sortly thereafter, Turgon began building his new city upon Amon Gwareth in the valley of Tumladen within the Encircling Mountains. Named Ondolindë or "the rock of the music of water" in the speech of the Noldor; in Sindarin it was pronounced Gondolin.
Gondolin stood inviolate and indeed all but unknown for 400 years. Turgon forbade his people to leave it with few exceptions. However, in 471 and the Nírnaeth Arnoediad, Turgon opened his leaguer to come to the aid of his brother, Fingon, and the sons of Fëanor in the most tragic of the battles of the First Age, the "battle of unnumbered tears." Only at the insistance of Húrin and Húor, and the ultimate sacrifice of their house, did Turgon regain Gondolin with what was left of his army. Húor was slain and Húrin famously captured and imprisoned in Angband.
From that time on, Morgoth's will was bent on discovering Gondolin and its destruction, achieved finally in 510, after Húrin inadvertantly revealed its location and Maeglin, Turgon's nephew, betrayed it. Blessedly, Turgon's daughter, Idril Celebrindal, and her husband, Túor son of Húor, escaped with Eärendil, their son, to the Falas. Turgon's grandson then, as a messenger to the Valar, would finally bring down Morgoth.
gondolin replaces tuonela, named after Tuonela, the famed underworld of the Finnish Kalevala, as my primary development host.
Hardware specifications:
Description                           Vendor         Price       Order number
------------------------------------------------------------------------------------
Intel i7 4790 processor               TigerDirect    $282.27     J9898496
Asus Z87 Pro LGA 1150 motherboard     Amazon         $139.99     002-2076296-0817010
Kingston Fury Black 8Gb DDR3-1866 x 2 Outlet PC      $123.91     399335
WD Green 2Tb, SATA 6Gb/s              Amazon         $ 79.99     002-2076296-0817010
LG GH24NSC0B DVD R/W                  Amazon         $ 16.04     002-4269978-6875408
Ultra Gladiator ATX case              TigerDirect    $ 61.22     J9945403
EVGA 400W power supply                NewEgg         $ 29.99     233003143
Cooler Master 120mm fan               NewEgg         $  9.48     233003143
Monoprice 18" SATA cable              Amazon         $  2.31     002-2076296-0817010
------------------------------------------------------------------------------------
Total                                                $745.20
I already had a 240 Gb SSD sitting around for the last year awaiting a project like this one. I paid something like $100 for it. I already have several multi-Tb external drives and, especially, an external USB Blu-ray.
It slices, it dices, it washes up afterward...

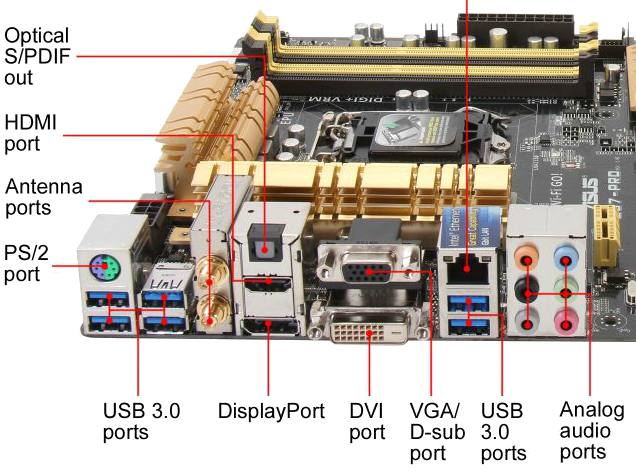
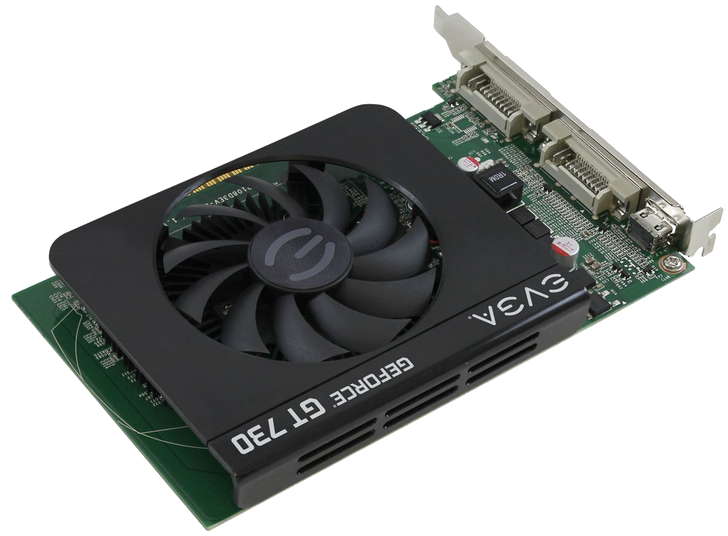
The USB port at the bottom underneath the Ethernet RJ-45 connector offers additional power for use by recharging applications.
Top to bottom, left to right:
| HDMI | 4096×2160 @ 24Hz or 2560×1600 @ 60Hz |
| DisplayPort | 4096×2160 @ 24Hz or 3840×2160 @ 60Hz |
| VGA | 1920×1200 @ 60Hz |
| DVI-D | 1920×1200 @ 60Hz |
| —up to 3 displays simultaneously, 1024Mb memory | |
The Sony/Philips digital interface format (S/PDIF) is a type of interconnect used in consumer audio equipment to out-put audio over short distances, as in home theatre applications. I don't see why I'd use this port.
RealTec ALC1150 audio, from left to right, top to bottom:
| Orange | center/subwoofer | Blue | line-in from sound system |
| Black | rear speaker | Lime | line-out (still speaker/front speaker) |
| Grey | side speaker | Pink | line-in (still the microphone) |
I gathered up and mailed off a $35 rebate for the motherboard and a $20 rebate for the case. I hope I'll get them back.
I loaded on the software I use to rip (transcode) DVDs and Blu-rays, HandBrake in particular. One of the reasons I built this new computer is because my old ones are so slow at ripping movies to simple files I can put on my Plex Media server.
The first time I went to transcode a movie using HandBrake, I set it all up, then launched it off. Thinking I would go away for a few hours while it did its thing, I got up to leave, but all the fans in my computer case were running at hurricane speeds.
So I sat down and looked at the temperatures. I saw the CPU had heated up to 100° (Celsius—that's 212° Fahrenheit). That's not supposed to happen. The great, big, maximum temperature of an Intel i7 4790 is 80°. Tops. No more. At $300 for a postage-stamp sized computer chip, I wasn't going to let that happen, so I killed HandBrake and watched the temperature fall back into the 20° range.
Off and on over the next few weeks I agonized about what to do. I've never experienced this problem before. I read a lot, I watched lots of YouTube videos of people frying eggs on their CPU before the chip turned into a charcoal briquette. It can happen.
Meanwhile, I had ordered another fan for the remaining hole in my case which showed up and I installed it. I tried HandBrake again and that helped lower the temperature down into the high 80°s. Not enough by far.
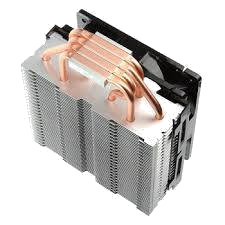
So I ordered a special CPU cooling fan that's supposed to work better than the factory fan that Intel sent. I had to wait a bit more than a week. In the picture here, see the new cooler (upside-down). The four copper tubes and the massive aluminum heatsink are pressed and held tightly against the CPU. They suck the heat away circulating it up into the fins above where a fan blows it to the fan on the back of the computer case.
Tonight, I installed the fan—not too easy to do, but manageable though a few words of bitterness escaped my lips. Then I closed up the case, hooked everything up, and booted. The first thing I did was to launch a script I wrote that samples the temperatures of all cores every 5 seconds (my CPU has 4 separate cores—that's like having 4 computers running at the same time and some programs are written to take advantage of that; HandBrake is one of them). I launch this script passing 1000 as argument and just let it run.
#!/bin/sh
# Issue the sensors command to see how hot the CUP is getting, sleep 5 seconds and try
# again--over and over 10 or however many times the caller posted as the argument.
SLEEP=5
END=${1:-}

if [ -z "$END" ]; then
  END=100
fi

for i in $(seq 1 1 $END); do
  sensors
  if [ $i -lt $END ]; then
    echo -n "$i of $END times: "
    for j in $(seq 1 1 $SLEEP); do
      echo -n "$j"
      sleep 1
    done
    echo
  fi
done
The temperatures were down in the 20° range predictably.
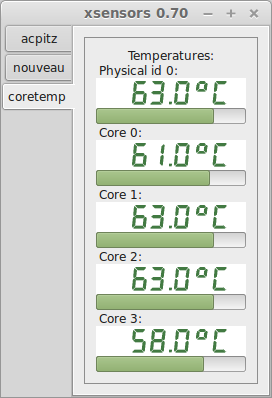
I launched HandBrake and rigged it to rip a movie watching the temperatures. Sure enough, the temperatures rose up into the 50° range. In the first 400 temperature samplings (about 30 minutes), I saw it hit 60° twice. That's good enough for me.
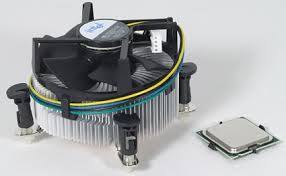
In this picture is the Intel stock cooling device I replaced and the CPU sitting next to it. It's the cooling device I replaced. Next to it is the $300 Intel i7-4790 CPU that runs like greased lightning.
Steps to installing the cooler. Why am I restating these? Because they are over-simple in the manual and there's no help for how to attach the heatsink and engage the knob and clips.
Install xsensors if it's not already there. Run from command line (xsensors &). You'll see this (the first one is what it looks like when I'm using HandBrake to transcode a Matroska file and the second one is my host sitting more or less idle):

The nastiest thing to deal with has been monitor support. Though the Asus z87-PRO is a superb motherboard with theoretically superb monitor support and options (see above), this is only really true when running Windows. Linux hasn't got the drivers for this. I found...
What have I learned? If you run Linux, pray at the altar of NVIDIA: it's the only game in Linuxville. Now I have to get NewEgg to take back the Sunix DisplayPort hub.
The only trouble remaining to sort out is that the EATX12V 8-pin ATX power cable is now stretched tightly across the video card because it's too short by about ½". I will have to look for an extender if possible.
Immediately after gondolin was up, my father asked me to do a similar build for him as he's not had a proper, new PC since 2008 (he's had a less than thrilling experience with HP and Macintosh notebooks). Here are his details:
Description                                 Vendor     Price
--------------------------------------------------------------
Intel Core i7-4790 processor                 Amazon    $302.99  ✓
Asus z87 Pro motherboard                     Amazon    $124.99  ✓
Kingston HyperX Fury 8Gb DDR-1866 memory x 2 Amazon    $124.99  ✓
PNY 480Gb Solid-state Drive (SSD)            Amazon    $159.99  ✓
Sabrent 2.5" - 3.5" drive adaptor kit        Amazon    $ 15.08  ✓
LG DVD/DC 24x RW drive                       Amazon    $ 19.99  ✓
Blu-ray external USB drive                   Amazon    $ 45.99  ✓
Seagate 3Tb hard drive                       Amazon    $ 76.65  ✓
Ultra Gladiator ATX case                     Amazon    $ 53.49  ✓
Corsair 750-Watt power supply                Amazon    $ 69.99  ✓
Corsair 120mm fans x 2                       Amazon    $ 20.99  ✓
--------------------------------------------------------------
Total                                                 $1015.14
He runs Windows 7 Professional 64-bit, a copy of which he already owned. We installed the CoolerMaster Hyper T4. His (older) monitors are attached via the DVI and VGA ports.