Russell Bateman
December 2018
last update:
This is about how to use vacuum sealing machines like the FoodSaver® 5480.
First, ignore the instructions posted on the machine by means of stickers. They are confusing, misleading and wrong. I left the stickers on my machine (they're supposed to be removed) thinking they'd be helpful. They are pretty, very encouraging, but not the least bit helpful.
Likely, your 5000-series food-sucker doesn't have these labels any more, so I've augmented the instructions below accordingly. If you'd like to see the labels on a new machine, watch this video. Note that the step 1 label is inside the right end of the machine to tell you where to put the roll of bag material.
I'm likely an idiot, but every time I get the machine out, which isn't often, I have to relearn how to use it. Hence these instructions. Here are the steps to sucking food:
Assuming plastic roll installed, pull a little bit, maybe 1/2", and make the initial seal by twisting back the Seal ←→ Unlock knob at the end of the bottom bar (that's labeled, 2 Seal and cut bag here, but, if the label's gone, then it's just the bar with the sliding knife in it). This becomes the sealed "bottom" of the bag.
When you twist this knob back to "Seal," you will see the red "Seal" light wink at you. Wait until it finishes and turns off: This indicates that the seal is made.
Pull enough plastic bag to contain what you want to seal. If the food is bulky, like a big prime rib roast, leave yourself plenty of extra so that the bag will reach far enough into the machine to be sealable.
Cut the bag using the slider/knife across the bar labeled, "2 Seal and cut bag here." If your label is missing, then it's the bar with the sliding knife.
Fill the resulting plastic bag with the food you want to seal.
It is important not to distort or get food or moisture on the lip, inside or out, of the bag. Any of this will endanger the bag's second seal.
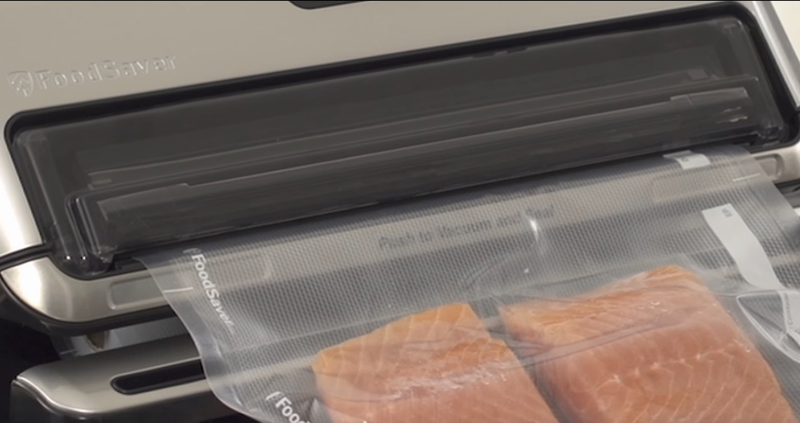
Lift up the long flap-bar on the machine just above where it's labeled, 3 Push here—Vacuum and seal bar. If the label is missings, this is the part of the machine proper that probably says, Push to Vacuum and Seal. You will see the vacuum's orifice: a lighter, grey plastic. You don't have to insert the unsealed end of the bag into this orifice, only ensure that it's a good inch inside, underneath this flap-bar. Close the flap-bar on it.
If the food is bulky, turn a bowl or pan upside down underneath the bag to raise it up enough to introduce it into the sealer.
Holding the food and bag steady, but not the machine, ensure the green power light is lit, then press and release both ends of the 3 Push here bar. If you're missing this label, this is part of the machine proper that says, Push to Vacuum and Seal. Wait patiently for the macine to do its work: you do not have to hold anything down (like a button, bar or level).
Remove the food and bag, inspect the seal. If the seal isn't complete, try again.
If storing the food, you must have all possible air sucked from the bag in order not to create an environment for frost, freezer-burn or other damage. It is the same if you indent to cook sous-vide: any air left inside will compromise that process (sous-vide means "under vacuum") and thwart that cooking process.