Setting Up MySQL on Linux
Russell Bateman
2 Feburary 2011
last update:
|
|
Setting Up MySQL on Linux
Russell Bateman |
Table of Contents |
IntroductionThis is a very short tutorial I got around to writing after many installations of this software. I wanted to cover a number of problems that I had to keep solving each time I set it up because I sometimes forgot how between times. I've written a lot about consuming a database, MySQL in particular, from Java, and I've shown how to install MySQL on Linux and even Windows. What I've never shown is how, once set up on Linux, you get it going and use it. And, while my favorite "quick" way of using it is via the command line, I use SQuirreL for serious work. I'll show a short session at the beginning of my using MySQL for the first time on Maverick Meercat. It shows how to get into MySQL, look around a bit, and add my local user. |
You can find useful command references all over the web, but here's one I thought was quick, useful and not self-involved: Short List of MySQL Commands. You'll find this useful here and occasionally useful down the road.
When you installed MySQL, there should have come a moment when you had to type in a root user password. I'm thinking you haven't forgotten that; I always use "test123" and, so far, haven't had the joy of having to recover from a forgotten root password. So, I'm not going to show how to do that since I don't yet know.
Here's how to test to see if MySQL is alive and well. I'm root when I start this up.
root@russ-elite-book:~> mysqladmin -u root -ptest123 version
mysqladmin  Ver 8.42 Distrib 5.1.49, for debian-linux-gnu on x86_64
Copyright 2000-2008 MySQL AB, 2008 Sun Microsystems, Inc.
This software comes with ABSOLUTELY NO WARRANTY. This is free software,
and you are welcome to modify and redistribute it under the GPL license

Server version		5.1.49-1ubuntu8.1
Protocol version	10
Connection		Localhost via UNIX socket
UNIX socket		/var/run/mysqld/mysqld.sock
Uptime:			6 days 2 hours 42 min 26 sec

Threads: 1  Questions: 114  Slow queries: 0  Opens: 99  Flush tables: 1  Open tables: 23  Queries per second avg: 0.0
Here's how to get into MySQL, look around and set up a user account. In my case, I want to be able to consume MySQL from my simple Linux user, russ. First, I log in and look around at databases, tables and look at the schema for the user table in the administrative database. I "USE" this database so that my subsequent commands are focused there.
root@russ-elite-book:~> mysql -u root -ptest123

Welcome to the MySQL monitor.  Commands end with ; or \g.
Your MySQL connection id is 53
Server version: 5.1.49-1ubuntu8.1 (Ubuntu)

Copyright (c) 2000, 2010, Oracle and/or its affiliates. All rights reserved.
This software comes with ABSOLUTELY NO WARRANTY. This is free software,
and you are welcome to modify and redistribute it under the GPL v2 license

Type 'help;' or '\h' for help. Type '\c' to clear the current input statement.

mysql> SHOW DATABASES;
+--------------------+
| Database           |
+--------------------+
| information_schema |
| mysql              |
+--------------------+
2 rows in set (0.00 sec)

mysql> USE mysql;
Reading table information for completion of table and column names
You can turn off this feature to get a quicker startup with -A

Database changed
mysql> SHOW TABLES;
+---------------------------+
| Tables_in_mysql           |
+---------------------------+
| columns_priv              |
| db                        |
| event                     |
| func                      |
| general_log               |
| help_category             |
| help_keyword              |
| help_relation             |
| help_topic                |
| host                      |
| ndb_binlog_index          |
| plugin                    |
| proc                      |
| procs_priv                |
| servers                   |
| slow_log                  |
| tables_priv               |
| time_zone                 |
| time_zone_leap_second     |
| time_zone_name            |
| time_zone_transition      |
| time_zone_transition_type |
| user                      |
+---------------------------+
23 rows in set (0.00 sec)

mysql> DESCRIBE user;
+-----------------------+-----------------------------------+------+-----+---------+-------+
| Field                 | Type                              | Null | Key | Default | Extra |
+-----------------------+-----------------------------------+------+-----+---------+-------+
| Host                  | char(60)                          | NO   | PRI |         |       |
| User                  | char(16)                          | NO   | PRI |         |       |
| Password              | char(41)                          | NO   |     |         |       |
| Select_priv           | enum('N','Y')                     | NO   |     | N       |       |
| Insert_priv           | enum('N','Y')                     | NO   |     | N       |       |
| Update_priv           | enum('N','Y')                     | NO   |     | N       |       |
| Delete_priv           | enum('N','Y')                     | NO   |     | N       |       |
| Create_priv           | enum('N','Y')                     | NO   |     | N       |       |
| Drop_priv             | enum('N','Y')                     | NO   |     | N       |       |
| Reload_priv           | enum('N','Y')                     | NO   |     | N       |       |
| Shutdown_priv         | enum('N','Y')                     | NO   |     | N       |       |
| Process_priv          | enum('N','Y')                     | NO   |     | N       |       |
| File_priv             | enum('N','Y')                     | NO   |     | N       |       |
| Grant_priv            | enum('N','Y')                     | NO   |     | N       |       |
| References_priv       | enum('N','Y')                     | NO   |     | N       |       |
| Index_priv            | enum('N','Y')                     | NO   |     | N       |       |
| Alter_priv            | enum('N','Y')                     | NO   |     | N       |       |
| Show_db_priv          | enum('N','Y')                     | NO   |     | N       |       |
| Super_priv            | enum('N','Y')                     | NO   |     | N       |       |
| Create_tmp_table_priv | enum('N','Y')                     | NO   |     | N       |       |
| Lock_tables_priv      | enum('N','Y')                     | NO   |     | N       |       |
| Execute_priv          | enum('N','Y')                     | NO   |     | N       |       |
| Repl_slave_priv       | enum('N','Y')                     | NO   |     | N       |       |
| Repl_client_priv      | enum('N','Y')                     | NO   |     | N       |       |
| Create_view_priv      | enum('N','Y')                     | NO   |     | N       |       |
| Show_view_priv        | enum('N','Y')                     | NO   |     | N       |       |
| Create_routine_priv   | enum('N','Y')                     | NO   |     | N       |       |
| Alter_routine_priv    | enum('N','Y')                     | NO   |     | N       |       |
| Create_user_priv      | enum('N','Y')                     | NO   |     | N       |       |
| Event_priv            | enum('N','Y')                     | NO   |     | N       |       |
| Trigger_priv          | enum('N','Y')                     | NO   |     | N       |       |
| ssl_type              | enum('','ANY','X509','SPECIFIED') | NO   |     |         |       |
| ssl_cipher            | blob                              | NO   |     | NULL    |       |
| x509_issuer           | blob                              | NO   |     | NULL    |       |
| x509_subject          | blob                              | NO   |     | NULL    |       |
| max_questions         | int(11) unsigned                  | NO   |     | 0       |       |
| max_updates           | int(11) unsigned                  | NO   |     | 0       |       |
| max_connections       | int(11) unsigned                  | NO   |     | 0       |       |
| max_user_connections  | int(11) unsigned                  | NO   |     | 0       |       |
+-----------------------+-----------------------------------+------+-----+---------+-------+
39 rows in set (0.00 sec)
First, I'm going to get a list of existing users. Then, seeing that I'm not in that list, I'll create myself. Then, I'm done doing root stuff (although I could set up a remote-capable user for use in hitting any database here from off my machine).
mysql> SELECT User FROM user;
+------------------+
| User             |
+------------------+
| root             |
| debian-sys-maint |
| root             |
| root             |
+------------------+
5 rows in set (0.00 sec)

mysql> CREATE USER 'russ'@'localhost' IDENTIFIED BY 'test123';
Query OK, 0 rows affected (0.00 sec)

mysql> SELECT User FROM user;
+------------------+
| User             |
+------------------+
| root             |
| debian-sys-maint |
| root             |
| russ             |
| root             |
+------------------+
5 rows in set (0.00 sec)

mysql> exit
Bye
If you have trouble with the user you created, resist the temptation merely to delete it and start over. MySQL users aren't handled as if simply rows in the mysql.user table; there's much more to them. In other words don't do this:
mysql> DELETE FROM user WHERE user = 'russ';
Query OK, 1 row affected (0.00 sec)
If you did happen to do this, you then found you could not re-create the user:
mysql> CREATE USER 'russ'@'localhost' IDENTIFIED BY 'test123';
ERROR 1396 (HY000): Operation CREATE USER failed for 'russ'@'localhost'
If you did it, you must clean things up. Now do this:
mysql> DELETE FROM mysql.db WHERE user = 'jack';
Query OK, 0 rows affected (0.00 sec)
mysql> FLUSH PRIVILEGES;
Query OK, 0 rows affected (0.00 sec)
The right way to do this follows. You should investigate this more thoroughly in the formal documentation (or for revoking only certain privileges like the privilege to INSERT or DELETE, etc.).
REVOKE ALL PRIVILEGES, GRANT OPTION FROM 'russ'@'localhost'; // remove certain privileges
DROP USER 'russ'@'localhost';                                // completely delete the account
Now I quit being root and go try just being me. (Passing note: Linux/Unix root user and MySQL admin/root user are unrelated.)
russ@russ-elite-book:~> mysql -u russ -p
Enter password: test123
Welcome to the MySQL monitor.  Commands end with ; or \g.
Your MySQL connection id is 56
Server version: 5.1.49-1ubuntu8.1 (Ubuntu)

Copyright (c) 2000, 2010, Oracle and/or its affiliates. All rights reserved.
This software comes with ABSOLUTELY NO WARRANTY. This is free software,
and you are welcome to modify and redistribute it under the GPL v2 license

Type 'help;' or '\h' for help. Type '\c' to clear the current input statement.

mysql> SHOW DATABASES;
+--------------------+
| Database           |
+--------------------+
| information_schema |
+--------------------+
1 row in set (0.00 sec)

mysql> ...
Here's how I set up MySQL on the server to allow remote access from another computer host. First, edit /etc/mysql/my.cnf, find the mysqld section and modify the address. The changes are in bold:
[mysqld]
.
.
.
#
# Instead of skip-networking the default is now to listen only on
# localhost which is more compatible and is not less secure.
# bind-address            = 127.0.0.1
bind-address              = <your server's address>
Then, restart MySQL:
# /etc/init.d/mysql restart
Turn to MySQL via its own shell for granting remote access rights to a user. The key here is not to specify the IP address or hostname of the client, but just to use the wildcard '%' that means "I can get in from any host".
GRANT ALL ON acme.* TO 'russ'@'%' IDENTIFIED BY 'test123';
FLUSH PRIVILEGES;
Finally, from the client I (user russ) do:
$ mysql -u russ -h <MySQL server's address or hostname> -p
Password: ******
...and I'm in. I can do it all (as much as I can do when I'm on that hardware). Note that, when I come in as remote user russ, this isn't the same user as the local one by that same name.
For more complete coverage of this, see How Do I Enable Remote Access To MySQL Database Server? There's a great deal more Linux work covered in that article than I even had to do (like specially opening port 3306). Caution: this article dates back to 2006 and is out of date in a number of respects.
If you log in as noted above (as a mere user rather than root), but cannot access a database, you may see one of these problems:
mysql> USE russ_test;
ERROR 1044 (42000): Access denied for user 'russ'@'localhost' to database 'russ_test'

mysql> CREATE DATABASE fun;
ERROR 1044 (42000): Access denied for user 'russ'@'localhost' to database 'fun'
The answer to the first problem is to log in as root and do this:
mysql> GRANT ALL PRIVILEGES ON russ_test.* TO 'russ'@'localhost' IDENTIFIED BY 'test123';
Query OK, 0 rows affected (0.00 sec)
mysql> FLUSH PRIVILEGES;
Query OK, 0 rows affected (0.00 sec)
Even though idiotic (since the database doesn't even exist yet), the solution to the second problem is identical: you just decide what the name of the database you're going to create will be. Then, as the user, you'll be free to add it.
mysql> GRANT ALL PRIVILEGES ON fun.* TO 'russ'@'localhost' IDENTIFIED BY 'test123';
Query OK, 0 rows affected (0.00 sec)
Then, return to being a simple user:
mysql> CREATE DATABASE fun;
Query OK, 1 row affected (0.00 sec)
...whereupon, you can begin to create tables in the new database.
There is no way for an administrator to grant a user privileges to create any database he or she wants. Arguably, this is the right thing to do since you don't want separate users in contention through attempting to create databases by the same names. If you're tempted to grant such privileges, it's probably only because you're alone on your own workstation.
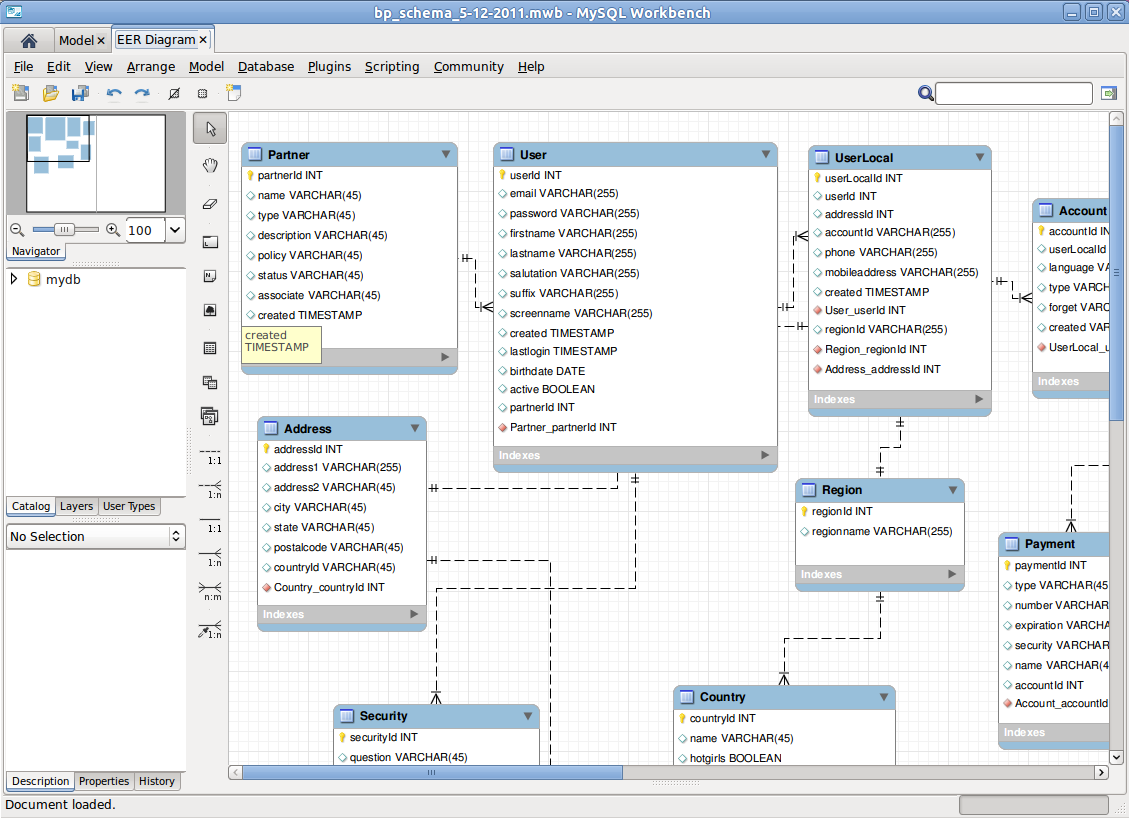
If you like GUI tools, MySQL Workbench is a really nice way to interact with your MySQL databases. In fact, it's really good for planning their schema. It shows you a nice graphical layout of table with foreign-key links between them, etc. (see illustration below).
To install, go to Welcome to MySQL Workbench and find a button/link/etc. for downloading. You do have to sign up with MySQL, but it's mere formality and costs nothing. You'll be asked to select a mirror, then choose a download. On Ubuntu, you'll choose both the width of your implentation (32- or 64-bit) and you can install the Debian package you download best by going to the Places menu, opening an Nautilus file browser window, navigating to your download, right-clicking it and choosing Open with GDebi Package Installer.
Once the installer has installed the package, you'll see a curious status message to the effect that "Same version is already installed". Ignore this and close the window. You'll find the workbench accessible from menu Applications -> Programming. At launch, you'll see a very busy splash screen with information; take a while to read it and get oriented.
The purpose of this page was merely to prime the pump. What was shown here for Linux was already shown for Windows, I think, in my article, Eclipse and JDBC in the section on "Creating a database by hand", a little easier, perhaps, because Windows isn't a strict multiuser operating system.
See my tutorial, Eclipse and JDBC, to move ahead setting up a database to test your web application from Eclipse.