|
JAR Libraries TutorialRussell Bateman |
|
Table of Contents
|
IntroductionThis simple tutorial will demonstrate setting up a Java project with one class that is JAR'd and used as a library to another project which consumes it via the Eclipse Build Path mechanism. The concept of User Libraries, in the Eclipse sense, is covered. Also, there is a note on creating "runnable" JARs. The purpose of this tutorial is to show this relationship of shared-code project and JAR to another project which is important in terms of understanding Eclipse's Build Path -> Libraries functionality. However, for your own use, it is probably simpler to use the Projects tab in Java Build Path from the consuming project to create a dependency on the shared-code (library) project (in the same workspace). By this, any changes to the shared code are seen immediately without the need to build, copy and refresh a JAR including hot-swapping during Run As/Debug As. I may add a more elaborate illustration of this as an appendix someday. There is a separate, but parallel discussion of Eclipse's Java Build Path in Eclipse Build Path that may be worth your while reading. It compliments this article. |
This tutorial assumes you already have Eclipse set up. If this is not the case for you, see this link. The tutorial examples are given as done on Eclipse Galileo; with slight modification, they may apply to other versions of Eclipse as well.
Create a new Java project, JarDemo, in Eclipse. There are no special settings to fuss over in the Java Project wizard, so you can click Finish as soon as you've named the project. Once the poject is there, create a new package...
New -> Package.
New ->
			Class
.
Run As -> Java Application.
You should get something like the following error output in your console
window:
X is 99
...which proves that this (very minimal) class works. It's what we'll use to represent a real set of classes and methods we'd like to consume from a real project.
JAR this project's contents (there could have been more than one class) by following the steps Eclipse gives. (This step gives you instruction in exploiting Eclipse's help.) Start with the workbench's Help menu:
Follow the steps. For step 4, the resources are just one: the single package. For step 5, add the source and javadoc files.
|
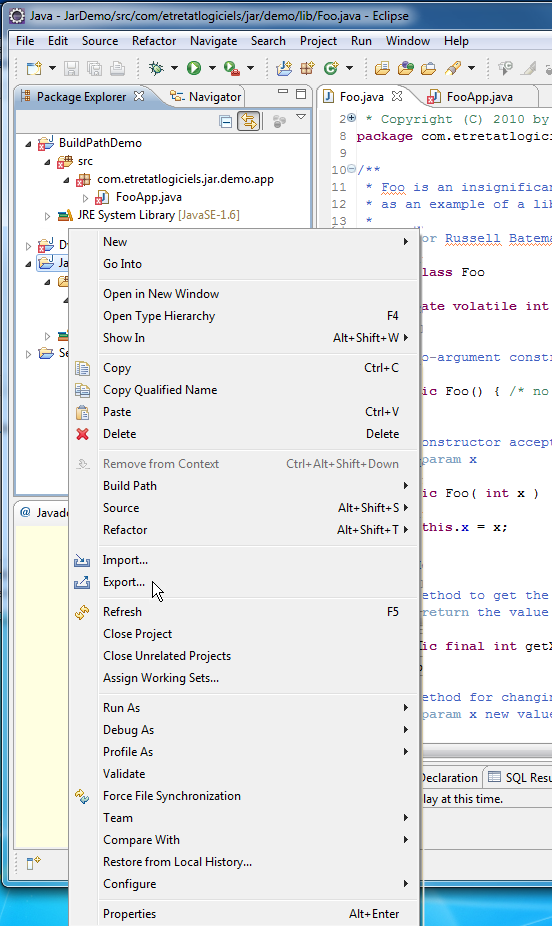
Right-click on the library project. Choose Export.
|
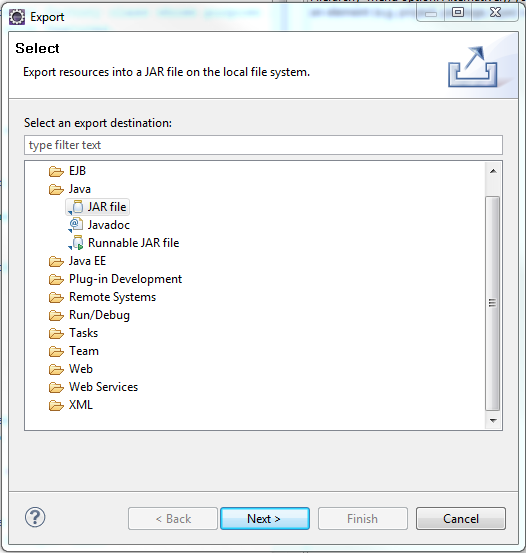
Then choose JAR File and click Next.
|
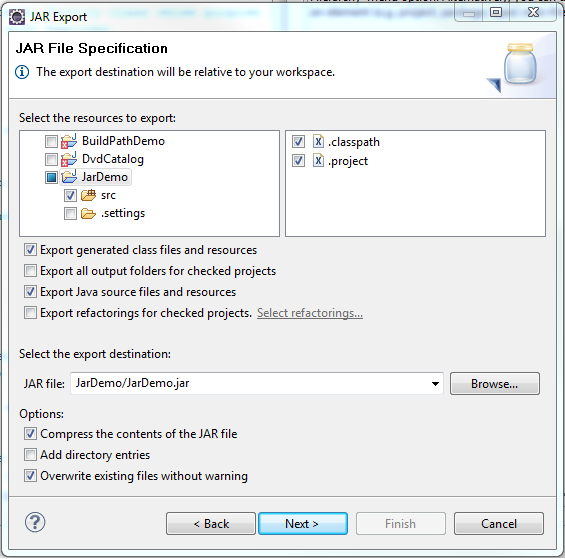
Because we right-clicked the project, JarDemo should already be "partially" selected. This is what we want. If we click the hierarchical triangle next to the checkbox, we'll see that the source code will come along, but not any Eclipse settings. This is what we want.
Obviously we want to Export generated class files and resources which are the essence of the library; this is already clicked. As we want access, for debugging purposes, to the Java source (and Javadoc), we click Export Java source files and resources.
Click Next.
We want to call the JAR file JarDemo.jar and we want to put it at the project's root.
Note here that we don't have any JUnit tests (no Eclipse Source Folder named test), but if we did, we would uncheck that folder in this dialog. (For this reason at least, it is "best practice" to separate your JUnit tests into a separate source folder.)
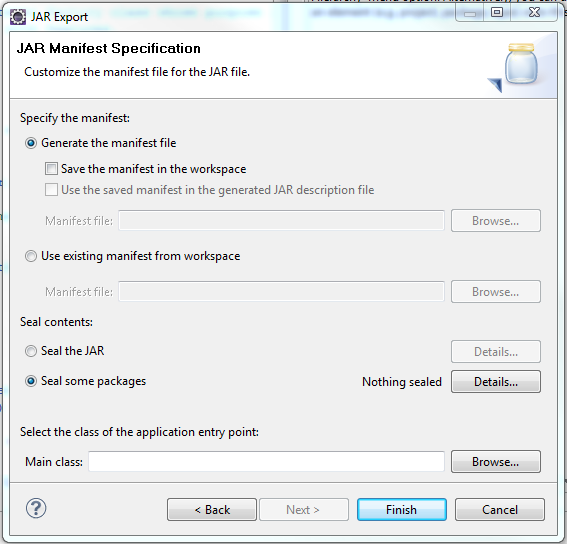
Click Next again to reach the JAR Manifest Specification. As this is a simple, library JAR without complications (such as a real main entry point we even care about), we click the Generate the manifest file radio button and we won't even save it since, if we need to regenerate it later, we'll just skip past this again anyway.
At this point, you'll see JarDemo.jar at the end of your JarDemo project in the Package Explorer view. When we create our consuming application project, we'll use this JAR.
You can close the Help view on the workbench if you opened it since we've finished with it.
Just as we did for the library project, create a Java Project. This time we'll name it BuildPathDemo; it's an application into which we'll incorporate the JAR we just created.
Type the class code in. You can copy it from here if you wish.
As you may have noticed in some of the illustrations, I had already created my application project and class code which has given arise to errors—namely that Foo cannot be resolved to a type. This step rectifies that situation.
The second main point of our tutorial is to set up our JAR for the new application project's consumption.
Right-click the new BuildPathDemo project in the Package Explorer and choose Build Path, then Configure Build Path and click the Libraries tab:
Note: I no longer suggest the use of the Eclipse User Library though it is a superb concept and it certainly works. You can set up an Eclipse User Library following the method exposed in Setting up a User Library in Eclipse Build Path. Instead, I recommend the approach detailed in Eclipse Build Path Set-up and Libraries.
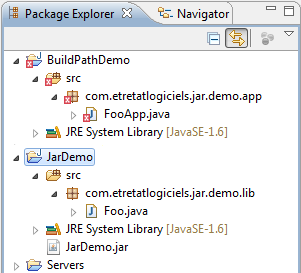
At this point, however you accomplished it, you should find a new library in your project (in the Package Explorer view), named JarDemo and the error in FooApp.java should dissipate as well as the demonstration should run.
Here's the source code to our tutorial.
package com.etretatlogiciels.jar.demo.lib;

/**
 * Foo is an insignificant integer factory class whose purpose is merely to serve
 * as an example of a library with features.
 *
 * @author Russell Bateman
 */
public class Foo
{
    private volatile int  x = 0;

    /**
     * No-argument constructor.
     */
    public Foo() { /* no argument constructor */ }

    /**
     * Constructor accepting the initial value of the integer to fabricate.
     * @param x
     */
    public Foo( int x )
    {
        this.x = x;
    }

    /**
     * Method to get the current integer value.
     * @return the value (int)
     */
    public final int getX()  { return this.x; }

    /**
     * Method for changing the current integer value;
     * @param x new value for integer (int)
     */
    public final void setX( int x )  { this.x = x; }

    /**
     * Render the current integer value as a string.
     * @return the integer as a string (String)
     */
    public final String toString()  { return x + ""; }

    /**
     * Test this lightly.
     * @param args (none are ever processed)
     */
    public static void main( String[] args )
    {
        Foo  x = new Foo( 99 );

        System.out.println( "X is " + x.toString() );
    }
}
package com.etretatlogiciels.jar.demo.app;

public class FooApp
{
    public static void main( String[] args )
    {
        Foo  x = new Foo( 99 );

        System.out.println( "X is " + x.toString() );
    }
}
This is a quick method to follow. It's more or less what you learned to do above in Setting up the library in Build Path.
Build Path -> Configure Build Path.
...and/or...
Practically speaking, you're going to do this when in debugging or running you find you're missing a class:
Caused by: java.lang.ClassNotFoundException: org.slf4j.impl.StaticLoggerBinder
	at java.net.URLClassLoader$1.run(URLClassLoader.java:202)
	at java.security.AccessController.doPrivileged(Native Method)
	at java.net.URLClassLoader.findClass(URLClassLoader.java:190)
	at java.lang.ClassLoader.loadClass(ClassLoader.java:307)
	at sun.misc.Launcher$AppClassLoader.loadClass(Launcher.java:301)
	at java.lang.ClassLoader.loadClass(ClassLoader.java:248)
	... 11 more
that you identify as coming from a third-party library such as log4j, slf4j, JSF (Apache MyFaces), Hibernate, JSTL, etc., all stuff that is commonly consumed, but not actually part of Java.
For our example here, we're debugging some new Hibernate code. Hibernate happens to use slf4j for its logging and so I have to provide a suitable slf4j JAR.
After adding the library and its JARs, if the class you're looking for is still missing, you must do more research to determine where it comes from. For example, if you are missing org.slf4j.impl.StaticLoggerBinder and though you were going to get it from a library you created called Slf4j and a JAR slf4j-api-1.5.11.jar, you might Google and stumble upon http://www.slf4j.org/codes.html where you learn that this class comes from one of a list of other JARs from among which you must choose one. You remove the API JAR and add slf4j-simple-1.5.11.jar, and try again.
Suddenly, you get further in your debugging and slf4j begins to work putting out logging messages detailing what's not working (and no more java.lang.ClassNotFoundException).
For trouble with Dynamic Web Projects missing symbols, please read Java EE Module Dependencies.
If building your own library JAR, there are several ways for you to distribute it and link it up in other projects so that you have access to Javadoc or source code. Here's some ant code to help you do that.
First, when you create your JAR, be sure to generate the Javadoc too. Here I put it into a subdirectory, doc, off the project root.
    <property name="src.dir" value="${build.dir}/src" />
    <property name="doc.dir" value="${build.dir}/doc" />

    <!-- generate Javadoc from the Java source code -->
    <target name="javadoc">
        <mkdir dir="${doc.dir}" />
        <javadoc destdir="${doc.dir}" author="true" version="true">
            <fileset dir="${src.dir}" />
        </javadoc>
    </target>
Distribute the Javadoc along side your JAR in whatever way you wish. This can be an ant command to copy both the JAR and the Javadoc to another project's lib subdirectory, or a neutral place from which to pick it up. Here, my script is in the consuming project and is copying both the JAR and the Javadoc locally for use.
For lack of a better place, it's putting the Javadoc down under a subdirectory, doc, under where the consumed JAR(s) are kept. (There might be a better place.)
    <property name="library.home" value="elsewhere" />

    <!-- copy the library to here before building -->
    <target name="copy">
        <copy file="${library.home}/jar/library.jar"
                todir="${build.dir}/lib" />
        <copy todir="${build.dir}/lib/doc">
            <fileset dir="${library.home}/doc" />
        </copy>
    </target>
Then, using Build Path -> Configure Build Path -> Add JARs...,
add the library to your project and attach the Javadoc by specifying the path
to Javadoc location. (See above,
Setting up a third-party library.)
There may be a way to build Javadoc into a JAR; I have so far not found how to do that. If someone knows how to do this, I'd be grateful to learn it.
Second, you can build the JAR to contain source code. I believe if you do, you won't need to do anything to hook it up.
Otherwise (third), you can explicitly hook up source code to a JAR just as you do Javadoc by specifying the path to Source attachment. (I think this is also covered in that article.) Javadoc location. (See above, Example of attaching source.)
Fourth, of course, you sometimes don't want Javadoc or source code in the JAR you distribute for size if not for privacy reasons. You'll need to accommodate that in your ant script.
On lines 7-9 above, I've copied Javadoc to the project so that it can be easily linked up for viewing when using interfaces from the JAR. In fact, this is not a good idea because that Javadoc will thenceforth be part of your Eclipse project. Eclipse will attempt to validate the HTML that is the Javadoc. Javadoc-generated HTML is crap and will fill your projects with a bazillion warnings. So, the best procedure is to leave the Javadoc sitting remote to your project and make your link to it there.
Elsewhere in this article it's discussed how to create a set of User Libraries. I also discuss how this might not be the best practice anymore. Nevertheless, it's my objective to explain this thoroughly.
These hold only for the workspace in which they were created. When a new workspace is created as often happens, it's empty and you have to reconstitute all those libraries as well as their source-code and Javadoc links. You can help this situation out a bit by exporting your set of User Libraries once created for importing into another workspace. When you are editing the content of your User Libraries set, you'll see buttons for importing and exporting.
When you export a set of User Libraries, what's exported is an XML file containing paths on the host system to those libraries, their source and Javadoc as established. Very useful, but not system-independent. So, this is a good thing to do on your development host, but unless the host you attempt to share this XML file with sports identical paths (the username, the path to the downloaded JARs, etc.), it will not be useful there.
However, as an XML file, it's completely editable. If you're clever enough to change username paths and library versions where applicable, you can still cut down the time to constitute a set of User Libraries on another development host.
Here's a very short example to give you a taste for what you're up against.
<?xml version="1.0" encoding="UTF-8" standalone="no"?>
<eclipse-userlibraries version="2">
  <library name="Apache Commons" systemlibrary="false">
    <archive javadoc="jar:file:/home/russ/dev/downloads/apache-commons/commons-beanutils-1.8.3/commons-beanutils-1.8.3-javadoc.jar!/"
           path="/home/russ/dev/downloads/apache-commons/commons-beanutils-1.8.3/commons-beanutils-1.8.3.jar"
           source="/home/russ/dev/downloads/apache-commons/commons-beanutils-1.8.3/commons-beanutils-1.8.3-sources.jar"/>
    <archive javadoc="jar:file:/home/russ/dev/downloads/apache-commons/commons-codec-1.4/commons-codec-1.4-javadoc.jar!/"
           path="/home/russ/dev/downloads/apache-commons/commons-codec-1.4/commons-codec-1.4.jar"
           source="/home/russ/dev/downloads/apache-commons/commons-codec-1.4/commons-codec-1.4-sources.jar"/>
    <archive javadoc="jar:file:/home/russ/dev/downloads/apache-commons/commons-collections-3.2.1/commons-collections-3.2.1-javadoc.jar!/"
           path="/home/russ/dev/downloads/apache-commons/commons-collections-3.2.1/commons-collections-3.2.1.jar"
           source="/home/russ/dev/downloads/apache-commons/commons-collections-3.2.1/commons-collections-3.2.1-sources.jar"/>
    <archive javadoc="file:/home/russ/dev/downloads/apache-commons/commons-digester-2.1/apidocs/"
           path="/home/russ/dev/downloads/apache-commons/commons-digester-2.1/commons-digester-2.1.jar"
           source="/home/russ/dev/downloads/apache-commons/commons-digester-2.1/commons-digester-2.1-sources.jar"/>
    <archive javadoc="file:/home/russ/dev/downloads/apache-commons/commons-discovery-0.4/docs/apidocs/"
           path="/home/russ/dev/downloads/apache-commons/commons-discovery-0.4/commons-discovery-0.4.jar"/>
    <archive javadoc="jar:file:/home/russ/dev/downloads/apache-commons/commons-logging-1.1.1/commons-logging-1.1.1-javadoc.jar!/"
           path="/home/russ/dev/downloads/apache-commons/commons-logging-1.1.1/commons-logging-1.1.1.jar"
           source="/home/russ/dev/downloads/apache-commons/commons-logging-1.1.1/commons-logging-1.1.1-sources.jar"/>
  </library>
  <library name="Hibernate 3.6" systemlibrary="false">
    <archive path="/home/russ/dev/downloads/hibernate-3.6.0/lib/required/antlr-2.7.6.jar"/>
    <archive path="/home/russ/dev/downloads/hibernate-3.6.0/lib/required/dom4j-1.6.1.jar"/>
    <archive path="/home/russ/dev/downloads/hibernate-3.6.0/lib/required/javassist-3.12.0.GA.jar"/>
    <archive path="/home/russ/dev/downloads/hibernate-3.6.0/lib/required/jta-1.1.jar"/>
    <archive javadoc="file:/home/russ/dev/downloads/hibernate-3.6.0/documentation/javadocs/"
           path="/home/russ/dev/downloads/hibernate-3.6.0/hibernate3.jar"/>
  </library>
  <library name="JSTL 1.2" systemlibrary="false">
    <archive path="/home/russ/dev/downloads/jstl-1.2/jstl-api-1.2.jar"/>
    <archive path="/home/russ/dev/downloads/jstl-1.2/jstl-impl-1.2.jar"/>
  </library>
  <library name="Log4j" systemlibrary="false">
    <archive path="/home/russ/dev/downloads/apache-log4j-1.2.16/log4j-1.2.16.jar"
           source="/home/russ/dev/downloads/apache-log4j-1.2.16/src"/>
  </library>
  <library name="MyFaces 1.2" systemlibrary="false">
    <archive javadoc="file:/home/russ/dev/downloads/myfaces-core-1.2.8-bin/javadoc/"
           path="/home/russ/dev/downloads/myfaces-core-1.2.8-bin/lib/myfaces-api-1.2.8.jar"/>
    <archive javadoc="file:/home/russ/dev/downloads/myfaces-core-1.2.8-bin/javadoc/"
           path="/home/russ/dev/downloads/myfaces-core-1.2.8-bin/lib/myfaces-impl-1.2.8.jar"/>
  </library>
  <library name="XStream" systemlibrary="false">
    <archive javadoc="file:/home/russ/dev/downloads/xstream-1.3.1/docs/javadoc/"
           path="/home/russ/dev/downloads/xstream-1.3.1/lib/xstream-1.3.1.jar"/>
  </library>
</eclipse-userlibraries>