| |
 
|
Companion Notes
for Android Development and Eclipse
Russell Bateman
22 July 2010
last update:
|
Companion Notes
|
Table of Contents
|
PrefaceThe purpose of this document is not to replace the best resource avalaible for developing using Android Development Tools (Eclipse ADT), Android Developers: The Developer's Guide. Instead it's a) a review of a good, third-party tutorial showing how to develop an Android application using Eclipse, and b) an exhibition of doing that including solving problems with Eclipse, with figuring out Android resources and other things coming up. UpdateLars' tutorial has moved on in many respects. Therefore, the comments I make prompted by the steps in the tutorial are much out of date. However, I answer many questions and make other notes in this article that are useful to me. After all, I'm not offering this as a formal tutorial; Lars' work is just too good to be over-looked or "competed with". But, many things I say you will not hear said in one place out there and they are the fruit of working through Android issues as a beginner, consulting other web sites, asking questions in forums, etc. You are welcome to these notes if you find them helpful. The purpose of this article then is to give a live, third point of view on how to get going with Android, as well as to be a map to resources. IntroductionI decided to follow a tutorial on Android development by Lars Vogel. As in others he's written, there are occasionally things left unsaid and things that are less than clear. I attempt to clarify any of that I find. Lars' tutorials are right on the mark, timely, appropriate and helpful, but he expects a little more of his audience than should be expected of a « grand débutant ». The tutorial is the nucleus of this article, but the article also serves (for me) the purpose of a reference site into Android resources and I come back to flesh it out each time I learn something I want to make certain I do not forget. This said, the first thing you should know is that going through the formal Android developer tutorials (notepad), at http://www.developer.android./com/resources/tutorials/notepad/ answers a lot of questions that Lars' does not. Use the section numbers to keep pace with the tutorial. Don't just read what I say here. I'm not rewriting Lars' tutorial. I usually only comment on steps when I have something to say. Remember, accomplishing the tutorial exercises and getting them working isn't going to teach you much. You must read and assimilate what Lars is saying. I suggest you do the exercises in an Eclipse workspace with a special name—separate from your usual work. That way, you don't encumber anything serious you're using Eclipse for and can refer back to them and to the source code therein. In fact, I took this opportunity myself to install Eclipse Helios (3.6) from eclipse.org. I later read everywhere on the Internet that Google doesn't advise Eclipse 3.6 (Helios) for use with the Android SDK. I installed Galileo; it seems to make little difference. Crash, bang, boom!I found that the Android development plug-ins are too heavy and cause Eclipse (both Helios and Galileo) to crash six ways from Sunday. After a week of frustration I reached the conclusion that you cannot install Android for use in Eclipse JEE, my usual mode. My definitive installation
Instead, use the plain Java Eclipse (click the icon to the right of this paragraph). My definitive installation became Eclipse IDE for Java Developers. I use both Galileo and Helios; both work. In addition, I added these lines to eclipse.ini, though I probably did not have to:
|
Sadly, even after a couple of months of developing Android applications, I find my workbench crashes a couple of times an hour on Windows 7. I usually head it off by bouncing it. The most likely activities to crash it or lead later to instability are editing XML files, and refactoring of any kind.) I've had more luck on Linux.
On Windows, in order to distinguish this version of Eclipse from my usual JEE development version on my task bar, I found an icon to graft onto it at Windows 7 download: Free Large Android Icons and selected one that looked most like the green Android icon. Download the icons, choose the one you want, drop a copy of it into your Eclipse folder, create a short-cut to eclipse.exe, right-click on the short-cut and click Change icon, navigate to the icon you just chose, and click OK. Don't delete the icon from your Eclipse folder.
Another suggestion out there has been to ensure that all XML files used in Android application development contain
xmlns:android="http://schemas.android.com/apk/res/android"
in their first tags. This is not by default the case for strings.xml, but it is for main.xml and AndroidManifest.xml. So far, I've had more trouble keeping Eclipse afloat even with the precautions I've taken than this XML suggestion can account for, but I do it anyway.
On Linux, I haven't done too much, but I've not experienced the instability, just the extreme slowness of the host I am running Linux on. This will be fixed very soon. So far, my set-up is:
My newest set-up is:
Both Galileo and Helios work at least as fast as they do on my Windows host (an identical home-built machine running Windows 7). I don't have the instability I was having on Windows that I learned to work around—not sure why.
As noted in the introduction, I installed a fresh Eclipse and a fresh workspace. I copied the latest JDK, jdk1.6.0_20 to eclipse/jre and left eclipse.ini as it came with Helios. (For more on the installation of Eclipse, please see Setting Up Eclipse—a Summary.)
Otherwise, I followed the Android installation instructions, putting the SDK in what is a more appropriate place in my filesystem, russ/dev/downloads/.
This goes pretty smoothly, however, if you install, then re-install at some point (as I did to stop trying to use Eclipse JEE), you'll probably find that when you go to select the "available packages and [...] version of the SDK", you don't need to because making this selection the first time affects the Android SDK folder and files and not Eclipse. So, you'll find the version 8 stuff missing from the list. This is because it was already selected. Just move on.
Similarly, if you've already set up the emulator device described in the next section, you'll find it's still there.
I found that after following these instructions, you can click to close the Android SDK and AVD Manager dialog. TestDevice will remain alive. I relocated it to my second monitor for convenience.
Be patient after clicking the Android Device Manager button
 ;
it's very sluggish.
;
it's very sluggish.
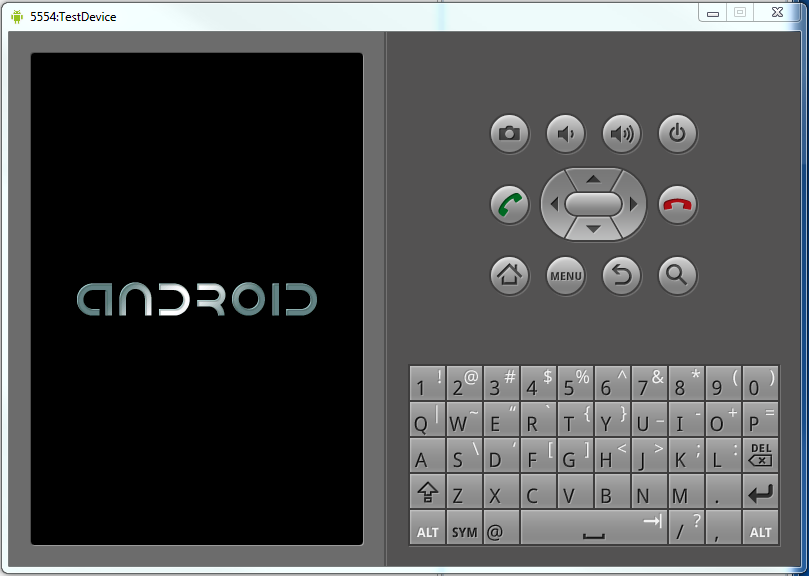
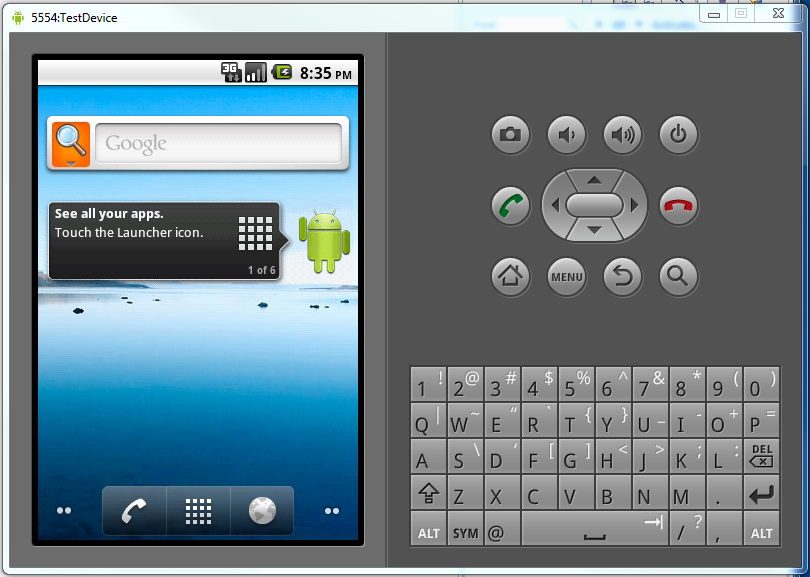
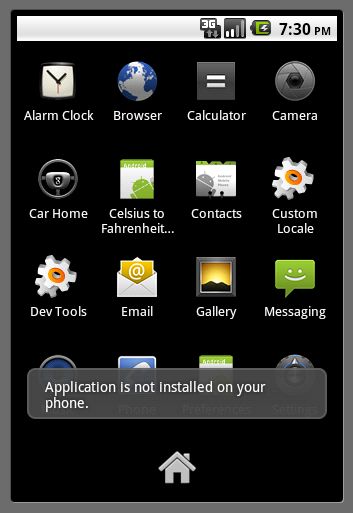
And yes, it truly does take a long time to start up. In fact, you must wait long after it appears to have started up (see below) before you reach the result illustrated. And, I found that the "See all your apps" screen illustrated wasn't totally identical to the one in the tutorial (see second image below).

Pursuant to the tutorial note, I set up my Android workspace development perspectives according to how I personally use Eclipse:
This warning is premature: it refers to something that happens just after you finish setting up your first Android project. The advice works to clear the initial errors, however, if you have Project -> Build Automatically checked, they will disappear automatically anyway if you wait a little while.
de.vogella.android.tempconvertor is misspelled ("converter"). Make certain you're careful to maintain this misspelling throughout the project where crucial—or just correct it. Elsewhere in the tutorial, it's spelled correctly which adds to the confusion.
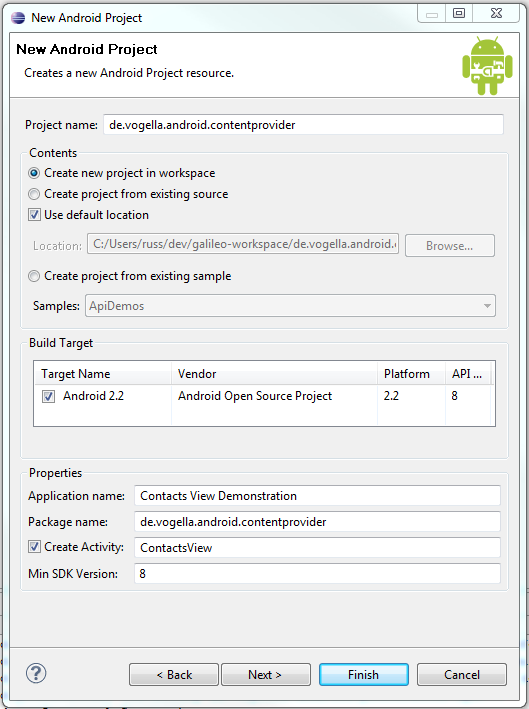
When filling out a new project's properties (assuming Eclipse and the Android SDK plug-in installed), there are four considerations. Most of this finds its way into the manifest file, AndroidManifest.xml in one way or another. (Incidentally, this one here is not from the tutorial I'm reviewing here.)
<?xml version="1.0" encoding="utf-8"?>
<manifest xmlns:android="http://schemas.android.com/apk/res/android"
        package="com.examples.tipcalc"
        android:versionCode="1"
        android:versionName="1.0">
    <uses-permission android:name="android.permission.INTERNET" />
    <application android:icon="@drawable/icon"
              android:label="@string/app_name">
        <activity android:name=".Tipster"
                android:label="@string/app_name">
            <intent-filter>
                <action android:name="android.intent.action.MAIN" />
                <category android:name="android.intent.category.LAUNCHER" />
            </intent-filter>
        </activity>
    </application>
    <uses-sdk android:minSdkVersion="8" />
</manifest>

This section is a little confusing at first. It becomes transparent once you move on with the tutorial. What you're doing here is to create attributes for resources, adding strings and colors to pre-existing attributes.
If you're not editing res/values/strings.xml with the rich editor, you may not see the Add... button.
I had to edit strings.xml by hand instead of using the rich editor. Between almost every keystroke, I had to dismiss a null-pointer alert, saving my work frequently. I suggest that if this is happening to you (I tried on two platforms and it did it both times), you just copy and paste from the tutorial—which will still be a process fraught with dismissing error alerts and saving the file. (This went away when I stopped using Eclipse JEE.)
I found things easier going here.
"Switch to main.xml and verify..."—it's not the immediately following image that this is supposed to look like, but the one of the text file after it that you're supposed to see.
Yup, using the graphic editor instructions, there was no way I could get the radio buttons inside the radio group. Better to create the group and the two buttons graphically, then use the text editor to suck up the button definitions and insert them between <Radio Group... and </RadioGroup>.
Delete the hello world text by right-clicking and choosing Remove.
"From the Views bar, ..." refers to a list down the left side of the rich editor. Sadly, the offered controls aren't listed in alphabetic order. Clicking on, for example, Layouts will shrink the list under it so that more elements of the Views list appear.
Save immediately to forstall later disaster when Eclipse hangs. Get into the habit of doing this.
Note that RadioGroup is under Layout while RadioButton and Button are back again under Views.
It's at this point that you should edit main.xml by hand (click on xmain.xml at the bottom of the editor) in order to ensure the correct, hypotactic relationship between the radio buttons and their parent group. I did the edits using vim and took the opportunity to indent elements and wrap the long ones for easier viewing. Afterward, I had (but it's not finished yet):
<?xml version="1.0" encoding="utf-8"?>
<LinearLayout xmlns:android="http://schemas.android.com/apk/res/android"
           android:orientation="vertical"
           android:layout_width="fill_parent"
           android:layout_height="fill_parent">

  <EditText android:text="@+id/EditText01"
          android:id="@+id/EditText01"
          android:layout_width="wrap_content"
          android:layout_height="wrap_content">
  </EditText>
  <RadioGroup android:id="@+id/RadioGroup01"
           android:layout_width="wrap_content"
           android:layout_height="wrap_content">
    <RadioButton android:text="@+id/RadioButton01"
              android:id="@+id/RadioButton01"
              android:layout_width="wrap_content"
              android:layout_height="wrap_content">
    </RadioButton>
    <RadioButton android:text="@+id/RadioButton02"
              android:id="@+id/RadioButton02"
              android:layout_width="wrap_content"
              android:layout_height="wrap_content">
    </RadioButton>
  </RadioGroup>
  <Button android:text="@+id/Button01"
        android:id="@+id/Button01"
        android:layout_width="wrap_content"
        android:layout_height="wrap_content">
  </Button>
</LinearLayout>
<!-- vim: set tabstop=2 shiftwidth=2 expandtab: -->
In the next steps, more of these attributes will be added and you'll have to edit again by hand to clean it all up. Of course, you don't have to be clean in the first place, but I'm trying to grok all of this and being clean makes it easier.
This really means, "set UI properties". When you select EditTest, you won't find a way to change its property(ies) until you open Eclipse's Properties view. Go to Window -> Show View -> Other... and open the General folder icon. Then select Properties and click OK. Relocate this view from the bottom workbench pane if you like; I prefer mine in the rightmost pane along with Outline, Javadoc, Search, Hierarchy and others.
Blessedly, the properties in the Properties view are sorted alphabetically. However, Layout width is in the Misc section at the bottom of the list. The default setting, wrap_content is actually a pop-up menu control containing fill_parent.
Then go through the other many properties changes the tutorial asks. Click on the named control in the graphic display, then go to the Properties view to make each change. Sometimes there is nothing on the right-hand side, but a pop-up menu will appear if you click as if there were. Sometimes the right-hand control will cause a small window to pop up with the value in the list. These values are the ones you created in strings.xml!
To delete the text property for the EditText control, simply click the right-hand side, then don't click for the pop-up menu, but instead click again as if to rename it and just delete using the Backspace key.
numberSigned and numberDecimal are two "checkable" values for the inputType property of EditText.
Select the "complete widget", means the rectangle that is your application view, black at the beginning of this step.
myColor is one of the things you added to strings.xml and is found by expanding out Color in a pop-up window reached when you go to perform the required step.
Save (as always) and then edit main.xml directly to wrap and otherwise clean up what's been added there. Spend a few moments convincing yourself you understand what's just been accomplished.
After starting, I found I had to click some buttons before reaching my application in the emulator.
This section was inserted and the following one (on preferences) renumbered after I wrote this review. I've tried to renumber things correctly hereafter, but I will not review the new section on lists (which works very well, by the way).
Application name:  Hello Preferences
Package name:      de.vogella.android.preferences
x Create Activity: HelloPreferences
Min SDK Version:   8
Where it says, "Click Add and select...", understand that you've already dismissed the new dialog by clicking Finish.
After adding the new item, it won't have the title "preferences" until you fill out (and save) the settings in the right-half of the dialog.
The type is Preference (not preferences).
You must click PreferenceScreen in order to see EditTextPreferences when you click Add.
After adding the two preferences (username and password), you may have to expand the Attributes from Preference in order to fill in the attributes.
Don't select AndroidManifest.xml, but double-click it. Incidentally, I lost Eclipse (Helios) here. I'm beginning to think that Helios isn't a good idea for running the Android SDK. I'll forebear a little while longer. Bouncing Eclipse a couple of times got me to the point where I could follow the instructions here.
To add the activity, "Preferences", ensure that the .HelloPreferences (Activity) in the list is NOT selected. Note: you might have to Ctrl-click .HelloPreferences (Activity) in order to deselect it. Also, ensure that none of the squares with S, P, A, R, M, U is selected.
If you don't do this right, you may never see the option Activity (with the little square and an A next to it) and be able to complete the instruction.
My main.xml already came with a button. It was in the XML code that defaulted when I created the project.
If your project's Java compiler Error/Warning preferences are set too high, i.e.:
Errors/Warnings
    Code style
        Unqualified access to instance field:     Error
Sadly, it must be set to "Ignore". Simply preposing this will not work since it leads to another error, "preferences cannot be resolved or is not a field", for two of the lines.
I found I could not get it to run in the emulator, getting the following error when clicking on the deployed application. In later work, bouncing, re-setting everything up, etc. the application simply disappeared altogether.
Bouncing the emulator results in the Preferences application not even showing up in the application list. Re-creating the Device per the original instructions (above, see 2.4. Device), yielded nothing different. I got the following output in the Eclipse Console window. (I trimmed off the date and time stamps.)
[de.vogella.android.preferences] ------------------------------
[de.vogella.android.preferences] Android Launch!
[de.vogella.android.preferences] adb is running normally.
[de.vogella.android.preferences] No Launcher activity found!
[de.vogella.android.preferences] The launch will only sync the application package on the device!
[de.vogella.android.preferences] Performing sync
[de.vogella.android.preferences] Automatic Target Mode: using existing emulator 'emulator-5554' running compatible AVD 'TestDevice'
[de.vogella.android.preferences] Uploading de.vogella.android.preferences.apk onto device 'emulator-5554'
[de.vogella.android.preferences] Installing de.vogella.android.preferences.apk...
[de.vogella.android.preferences] Success!
[de.vogella.android.preferences] \de.vogella.android.preferences\bin\de.vogella.android.preferences.apk installed on device
[de.vogella.android.preferences] Done!
The Preferences application was nowhere to be found. I bounced Eclipse and re-created TestDevice several times without success. Moreover, re-initializing also lost me the original tutorial Convert to Celsius application.
I was asking about this in the primary Android support forum, stackoverflow, and was told ever so vaguely that the answer might lie in AndroidManifest.xml. However, it's somewhat challenging to ask a question on stackoverflow that will be accepted. It was explained to me that it's not a forum per se, but a Q & A. Whatever. I found the going easier on a different, real forum, anddev.org (Android Development Community, a forum hosted by Brits) you might want to try in preference to stackoverflow.
<?xml version="1.0" encoding="utf-8"?>
<manifest xmlns:android="http://schemas.android.com/apk/res/android"
          package="de.vogella.android.preferences"
          android:versionCode="1"
          android:versionName="1.0">
  <application android:icon="@drawable/icon"
            android:label="@string/app_name">
    <activity android:name=".HelloPreferences"
            android:label="@string/app_name">
    </activity>
    <activity android:name="Preferences"
            android:label="Preferences">
    </activity>
  </application>
  <uses-sdk android:minSdkVersion="8" />
</manifest>
Here's the answer, which I had to find elsewhere. It seems that you must insert the following element...
      <intent-filter>
          <action android:name="android.intent.action.MAIN" />
          <category android:name="android.intent.category.LAUNCHER" />
      </intent-filter>
...inside an activity in your AndroidManifest.xml file. Once I added this, then right-clicked on the project name to launch the Android Application, the application then showed up in the menu panel.
<?xml version="1.0" encoding="utf-8"?>
<manifest xmlns:android="http://schemas.android.com/apk/res/android"
        package="de.vogella.android.preferences"
        android:versionCode="1"
        android:versionName="1.0">
  <application android:icon="@drawable/icon" android:label="@string/app_name">
    <activity android:name=".HelloPreferences"
            android:label="@string/app_name">
      <intent-filter>
        <action android:name="android.intent.action.MAIN" />
        <category android:name="android.intent.category.LAUNCHER" />
      </intent-filter>
    </activity>
    <activity android:name="Preferences"
            android:label="Preferences">
      <intent-filter>
        <action android:name="android.intent.action.MAIN" />
        <category android:name="android.intent.category.LAUNCHER" />
      </intent-filter>
    </activity>
  </application>
  <uses-sdk android:minSdkVersion="8" />
</manifest>
Eclipse had put this (intent-filter) element there for the first experimental application above (temperature converter), but it did not do the favor for the second one (preferences).
The next thing to sort out is why Eclipse created two application tags instead of only one. Again, just as for the previous answer, I resort to the first application created in this tutorial. I surmise that Eclipse should not have created two applications and that I must have done something wrong, probably in step 5.1., that created the problem.
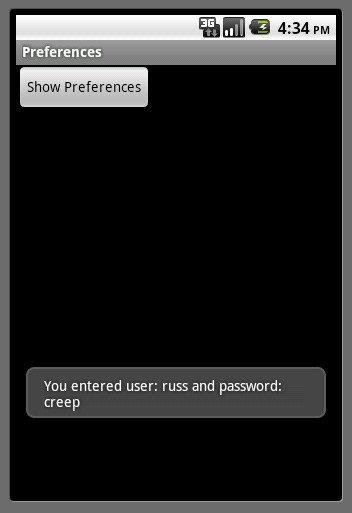
At this point, we are able to do what the tutorial shows (except that we've changed the "false" button to "Preferences" and corrected "maintained" to "entered".
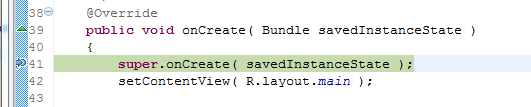
I have it on good authority that the "on the fly" call-back code is miswritten in HelloPreferences.java. This is because of using the member field preferences. Variables from outside call-back code should be marked final. See lines 14, 22, 23 below and compare to original code.
public class HelloPreferences extends Activity
{
	/** Called when the activity is first created.
	 */
	@Override
	public void onCreate( Bundle savedInstanceState )
	{
		super.onCreate( savedInstanceState );
		setContentView( R.layout.main );

		Button	button = ( Button ) findViewById( R.id.Button01 );

		// Initialize preferences
		final SharedPreferences	preferences = PreferenceManager.getDefaultSharedPreferences( this );

		button.setOnClickListener(
				new OnClickListener()
				{
					@Override
					public void onClick( View v )
					{
						String username = preferences.getString( "username", "n/a" );
						String password = preferences.getString( "password", "n/a" );

						Toast.makeText( HelloPreferences.this,
								"You entered user: " + username + " and password: " + password,
								Toast.LENGTH_LONG ).show();
					}
				}
		);
	}
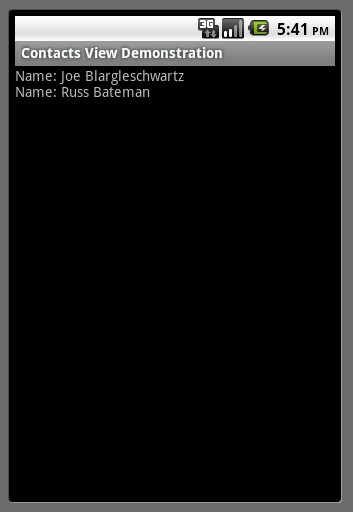
Let's create the third project more carefully to see if we can avoid some of the pitfalls of the second project. I'm going to use an application name of "Contacts View Demonstration" to set it well apart from the activity name.
I created the project, but then Eclipse became like molasses and a lot of normal things stopped working or took a long time. I hard-bounced Eclipse and it got over it.
The line to add to AndroidManifest.xml goes just after the end of the manifest element:
<uses-permission android:name="android.permission.READ_CONTACTS" />
As expected...
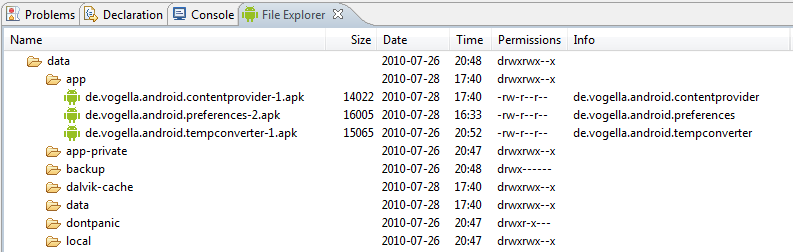
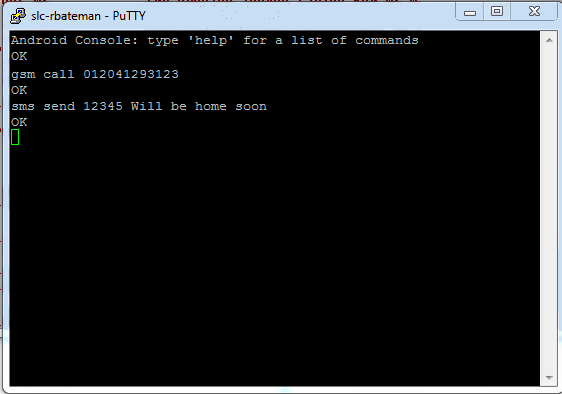
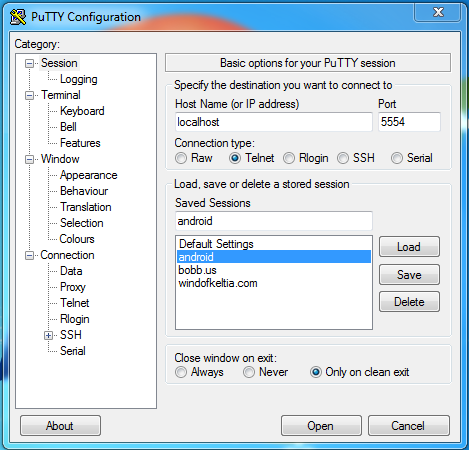
I found using the Windows command line I could launch the adb shell, but then I couldn't do much with it. I have more luck with putty; click to enlarge the illustrations.
Using a couple of the commands suggested (and as entered above in PuTTY), the emulator actually responded as you might guess.
Help -> Install New Software....
There are two ways to get the source code, which is very useful sometimes in figuring out how to solve problems that are your own.
The first and best way is to use the Eclipse plug-in you can read about at
adt-addons: Additional
Eclipse plugins for Android. You don't have to go there, just use the
following update site in the usual Eclipse mechanism:
Help -> Install New Software:
http://adt-addons.googlecode.com/svn/trunk/source/com.android.ide.eclipse.source.update/
The second way, if that does not work is described here below.
Look for details on Android XML including attributes and attribute values here. Here's how to use it:
Without having found the inheritance path that establishes that TableRow can take android:gravity, I tried just using it. In my example, I found the following accomplished what I needed (top-center location of three buttons respective to their layout region):
<TableRow android:layout_width="fill_parent"
          android:layout_height="fill_parent"
          android:gravity="top|center">
This information is not intended to supplant or supplement that given in the Android Developer's Guide.
Android applications are written (mostly) in Java which is compiled, not by a JVM, but by the Dalvik virtual machine, specifically designed for Android. They execute on the Android operating system, based on the Linux kernel, originated by Android, Inc., later purchased by Google. Devices running the Android OS are referred to as "smartphones".
Each application lives in its own world. By default, it has its own Linux process, virtual machine and Linux user id. If it's arranged for two or more applications to have the same user id, they can see the others' files. It's also possible for two applications to share the same process and VM.
As illustrated by the "Content-provider application" example here, an Android application can make use of elements of other applications. This is done by calling the piece of the other application that provides the functionality desired (provided that it does). For this to work, the system starts an application process when needed, instantiates Java objects for the part needed.
For this reason, Android applications don't have a single entry point for the whole application, essential components that can be instantiated and executed as needed. There are precisely four of these (as explained in the tutorial and here):
Applications are started by Android examining the manifest file which lists the application's components. This file is AndroidManifest.xml. The parts are configured explicitly as noted above. Here is an outline to help understand what's in the manifest file:
<?xml version="1.0" encoding="utf-8"?>
<manifest . . . >
    <application . . . >
        <activity android:name="com.example.project.myactivity"
                  android:icon="@drawable/myicon.png"
                  android:label="@string/mylabel"            <!-- from res/values/strings.xml -->
                  . . .  >
            <intent-filter>                                    <!-- want the app to show up? better have this -->
                <action android:name="android.intent.action.MAIN" />
                <category android:name="android.intent.category.LAUNCHER" />
            </intent-filter>
            <metadata> ... </metadata>
        </activity>
        <service . . . >
            <intent-filter> ... </intent-filter>
            <metadata> ... </metadata>
        </service>
        <receiver . . . >
            <intent-filter> ... </intent-filter>
            <metadata> ... </metadata>
        </receiver>
        <provider . . . >
            <grant-uri-permission> ... </grant-uri-permission>
            <metadata> ... </metadata>
        </provider>
    </application>
    <uses-sdk android:minSdkVersion="8" />                     <!-- locks app in to specific version (or later) -->
</manifest>
The most important thing to notice above is the separate sections per component (activity, service, receiver or provider). Next, notice the comments on important things not to go missing from a manifest (or mysterious things might happen). For the definitive structure of the manifest file, see here.
This is used to name a component and Android finds it based on that name. If it's missing, and it's not found by comparing to the intent filters of other, potential targets (application components), then nothing will work. For example, if the intent filter is missing, as noted above, from the application's activity, then it will not show up in the menu and the user won't see it—because here is the MAIN/LAUNCHER intent. There are other types of intent filters, see here.
There are four launch modes for the Android application:
For more, see here.
The activity has three states, active (or running) when in the foreground of the screen; it is the focus of user action.
When paused, it's lost focus, but is still visible to the user. Another activity may be on top of it, but it doesn't cover it completely (or is transparent). The activity is alive.
Stopped is when the activity is completely hidden. State and other information is retain, but it will be killed by the system after a while if memory is needed elsewhere.
As an activity transitions from state to state, the following methods are called. Obviously, you can do important, state change-related work at these points.
These (first) seven methods define the lifecycle of an activity, from creation to destruction. The "visible" lifetime of an activity is from onStart() to onStop(). The "foreground" lifetime is from onResume() to onPause().
The first of the last two methods is the entry point that tells you that the activity is at risk of being destroyed giving you notice to save state if you wish. The second is called just after onStart() so that (either the latter or) onRestoreInstanceState() may be called to to recreate the captured state.
See here.
A service can be used in two ways. It can be started and allowed to run until stopped by the user, the system or by itself, using Context.startService() and Context.stopService(). Or, it can be operated programmatically by using an interface it defines and exports.
There is an important concept of "binding" a service. Read more on that here.
There is a single call-back method, onReceive(), called when a message arrives for the receiver. The broadcast receiver is considered "active" only during the execution of this method. A process owning an active receiver is protected from being killed. See more here.
Android tries to maintain an application process for as long as possible. Eventually, however, old processes are removed when memory runs low. To determine which processes to kill first, each is placed in an "importance hierarchy" based on component state. There are five levels (from highest priority to lowest):
For more on this, see here.
Storage options include these listed below. See here for more information.
The advantage to declaring Android UI in XML is that it enables one better to separate the presentation of his application from the code that controls its behavior, thus contributing to maintaining separation between MVC components.
If you're trying to develop an Android client and a server for it simultaneously, you'll doubtless be doing this in Eclipse. Here are some notes on what to expect.
- Don't attempt a RESTful service using a nice framework like Jersey JAXB. There isn't de facto support for the client on Android. There is almost no prayer of doing that on BlackBerry (so, if you think you'll ever care). I'd love it if someone demonstrated to me the contrary on this.
However DO write a RESTful service by all means. REST rules! You just can't rely on good framework help.
- You'll run your servlet from Eclipse over, e.g.: Apache Tomcat on port 8080. Right-click in the Eclipse workbench's Server view on your server and choose Start or Debug, then return to your Eclipse for developing Android software (a separate Eclipse, right?!) and launch your client app. The URI to talk on starts not with http://localhost:8080/..., but with http://10.0.2.2:8080/.... This is because the Android emulator thinks localhost (or 127.0.0.1) refers to itself.
- Running a server in development on one Eclipse and your Android client on another rocks. You can debug either as you wish.
A few words on the XML files in Android...
Click here for the discussion about AndroidManifest.xml and Android project properties.
The following attribute should appear in the top-level component of an Android XML file in order that android: tags may be used throughout the rest of the file:
xmlns:android="http://schemas.android.com/apk/res/android"
Android works using XML files to configure and describe practically all the "magic" aspects of the application's behavior with the logic almost alone being described by Java code.
The greatest number of problems for the beginning seem to lie in what's in XML files. For example, the existence of Java construct R.id, as discussed below, hinges on this.
For another example, there are subtle yet crucial relationships between layout/main.xml and values/strings.xml. Much in the former must have representation in the latter. For example, this error associated with the TextView element in main.xml:
<TextView android:layout_width="fill_parent"
        android:layout_height="wrap_content"
        android:text="@string/hello"
    />
Error: No resource found that matches the given name (at 'text' with value '@string/hello').
occurs precisely because strings.xml is missing an element such as:
<string name="hello">Hello</string>
The @ symbol in the id strings of the ListView and TextView tags means that the XML parser should parse and expand the rest of the id string and use an ID resource.
XML is very strict about case sensitivity and structure; mistakes in these files are the usual cause of problems with layout, for instance.
I feel it's useful to point a couple of these things out so that your mind begins to see where all of this is going instead of erring on leaving you feeling hopeless and wondering.
The android.R class is a set of predefined resources provided for you by the platform, while your project's R class is the set of resources your project has defined. Resources found in the android.R resource class can be used in the XML files by using the android: name space prefix.
This file is, as you are cautioned everywhere, generated automatically and you must not edit it. I found that, when you're working on a new project, you tend to get errors in Java code from some missing R.id construct. Later, it might go away. Its magic disparition is on account of Eclipse's Project -> Build Automatically feature.
However, ...
The very first thing to suspect is that your code that consumes the R.id construct isn't importing the same R.java that's in your project. This afflicts beginners to Android who are using Android Developer SDK or other sample code that have bugs in them. If you're getting a compilation error, first check at the top of you code to verify you're indeed importing the R from your project's package and not something else very vanilla (like android.R).
Often, being helpful, Eclipse will create something like:
import com.android.developer.R;
...or worse still, you copy some code from another project and paste it in only to find that Eclipse brought along the R import. If you don't see that happen, you'll chase down phantom errors.
Remove this as the one you want, which is under the gen (or will be as
soon as you build your project), is in the same package as your source code,
doesn't need to be imported, and is different from this one. Remove the import,
then do Project -> Clean and one or more errors will probably
go away.
Assuming that this is (still) not your problem, read on...
It appears that project/res/layout/main.xml contains the constructs that lead to the generation of id in R.java. (I'm not limiting the source for these only to that XML file.)
Look specifically for android:id in various widgets (I think they're called) such as TableLayout, TextView, EditText, etc. There will be corresponding...
public static final class id
{
   public static final int x=0x7f050006;
   public static final int y=0x7f050000;
   public static final int z=0x7f05000c;
   .
   .
   .
}
where x, y, z correspond to the (TableLayout, TextView, EditText, etc.) identifier coded immediately after the @+id/ construct in the XML file (and the initialized value in R.java is magically generated--you don't have to worry about that).
The + after the @ in the id string indicates that the id should be automatically created as a resource if it does not already exist.
Somewhere, I read that "The Apache HTTP Client is included in the Android distribution, so there�s no need for you to download it and add it to your Android projects." You do have to tell Android you're going to use the Internet, however. See this topic elsewhere in this document.
There is a sample Eclipse project download at developerlife.com - tutorials that demonstrates this.
You must turn off some higher syntax checking because common Android code cannot endure it. Now, this might be a larger problem with Java call-backs where code is written "on the fly" in general.
I usually set compilation errors rather high, much higher than most if the compilation errors and warnings of tutorials, sample code, etc. I get from elsewhere is any indication.
   @Override
   protected void onCreate( Bundle savedInstanceState )
   {
      super.onCreate( savedInstanceState );
      setContentView( R.layout.note_edit );
      setTitle( R.string.edit_note );

      this.mTitleText = ( EditText ) findViewById( R.id.title );
      this.mBodyText  = ( EditText ) findViewById( R.id.body );

      Button	confirmButton = ( Button ) findViewById( R.id.confirm );
      Bundle	extras        = getIntent().getExtras();

      if( extras != null )
      {
         String	title = extras.getString( NotesDbAdapter.KEY_TITLE );
         String	body  = extras.getString( NotesDbAdapter.KEY_BODY );

         this.mRowId = extras.getLong( NotesDbAdapter.KEY_ROWID );

         if( title != null )
            this.mTitleText.setText( title );

         if( body != null )
            this.mBodyText.setText( body );
      }

      /* This is a pretty odd way of doing things: not really, but we DO
       * need to understand this better. Perhaps if we saw the code to
       * View.OnClickListener()?
       */
      confirmButton.setOnClickListener( new View.OnClickListener()
               {
                  public void onClick(View view)
                  {
                     Bundle bundle = new Bundle();

                     bundle.putString(NotesDbAdapter.KEY_TITLE, this.mTitleText.getText().toString());
                     bundle.putString(NotesDbAdapter.KEY_BODY, this.mBodyText.getText().toString());

                     if( this.mRowId != null )
                        bundle.putLong( NotesDbAdapter.KEY_ROWID, this.mRowId );

                     Intent mIntent = new Intent();
                     mIntent.putExtras(bundle);
                     setResult(RESULT_OK, mIntent);
                     finish();
                  }
               }
      );
   }
Now, the problem with this code is that the following syntax errors are generated:
line 38  mTitleText cannot be resolved or is not a field
line 39  mBodyText cannot be resolved or is not a field
line 41  mRowId cannot be resolved or is not a field
line 42  mRowId cannot be resolved or is not a field
I'm guessing this is because the compiler is faked out by the use of the this keyword inside the "on the fly" call-back code, yet, removing it magically works (it know what/which mTitleText, mBodyText and mRowId to refer to in the statements).
line 38  Unqualified access to the field NoteEdit.mTitleText
line 39  Unqualified access to the field NoteEdit.mBodyText
line 41  Unqualified access to the field NoteEdit.mRowId
line 42  Unqualified access to the field NoteEdit.mRowId
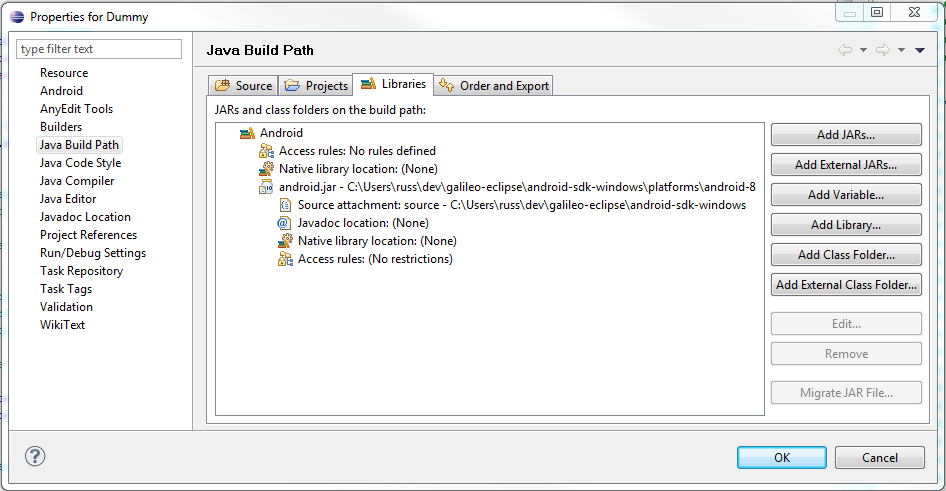
In order to compile successfully then, I must remove not only the this
from the code I'm wont to prefix the member field with, but I must also change,
at least for this project, my Java compiler errors/warnings settings
(Window -> Java -> Compiler -> Errors/Warnings) turning
this setting to Ignore. Otherwise, just removing this gives
me the errors seen above.
Now that I've said this, I would like to point out that, properly speaking, you should only use variables in call-back code that, when from outside that code, are marked final. That is sometimes difficult as in the example above, but I have so far been able to avoid it in my own code.
The refusal of Google engineers to supply source code in a suitable form to Android developers, despite that the source code is freely available, is very frustrating and leaves you wondering if they know or care about Eclipse development habits.
And, there's a lot of drivel out on the web about how to go about correcting this for your own use. Most of it doesn't work (if it ever did) and is very confusing. Whatever the case, here's what I've done, though it's a fairly extensive undertaking, yet it does not require git, Python scripts or any of the other crazy schemes suggested on the Internet.
Build Path -> Configure
	Build Path
.
Don't panic if you don't see /source on the end of this path once this is all done: Eclipse doesn't show it (or src if that's being used) nor sometimes some of the intermediate path for some reason.
How do you know this now works? Open that initial Java file created for you when you created the new project. Look for Bundle in the onCreate() argument list. Ctrl-click it. It will bring up the .class file in a text editor, but instead of the usual cryptic stuff.
I find also that once I've done this exercise for just one project, I start getting the source code even in older Android projects: I do not have to go adjust Build Path for them, but can just continue using the automatically provided Android SDK library. I assume that this is a function of the workspace and so if I ever move to a new one, I'll need to follow these instructions again.
After this exercise, you will no longer be using the Android SDK JAR as is automatically set up for you, but the same JAR set up by hand (by you) with sources referenced. You have to go through this mess because the Google engineers have locked the JAR as normally set up against attaching source code.
It seems useful to start a section of troubleshooting for those things I've observed that might help me later and also someone else.
It can take a really long time for the Eclipse debugger to show any signs of getting underway. I've waited 2 seconds, 10 seconds, 30 seconds and "never".
Watch the emulator window as it reacts much faster sometimes than the workbench notations. Before the workbench changes to the Debug perspective, you'll see a notice in the lower right-hand corner of the workbench window, "Launching com.domain.etc.appname".
Look for messages in the emulator that may require clicking the MENU button, such as "Sorry! The application Download (process com.domain.etc) has stopped unexpectedly. Please try again." This means you're not going to be running and you need to relaunch.
In particular, this quite often means there's something wrong with your application before the earliest breakpoint set. Usually, setting your first breakpoint at
...and you'll get the debugger perspective up before the application launch fails altogether.
The most immediate and important status, however, is given by the Eclipse Console view. If there's any red in the output during launch, it almost surely indicates a problem.
In Eclipse's Debug perspective (while debugging an Android
application), usually in the lower right corner, you should find a view named
LogCat. This is the Android console trace window. In it, you'll find
that anything you write to the screen from your application using
System.out.println() will be displayed (in green), any exception
traces will display (in red) such as the important cause why your application
crashed:

When starting to debug an app, "Source not found" is occasionally displayed. There are two things to do about this.
Another source problem occurs when you have a mix of library support. An example is the Apache HTTP component. This is included in android.jar, however, it is insufficient for me whenever I consume Apache HTTP interfaces unless I also add the Apache components to my Android project (which I do using a self-composed user library named HttpComponents (Apache 4.0.1).
When referencing code in the Apache HTTP components, I sometimes see it trying to reach the actual Apache code, which isn't there. This opportunity comes either during debugging or when Ctrl-clicking identifiers. If the Android source isn't reached, you have again the option of navigating to the Android library sources beyond which action you should begin to see them.
In your habitual source window, you see a message in red and a button:
Source not found.

  +----------------------------+
  | Edit Source Lookup Path... |
  +----------------------------+
There's a bug in the Android components that make it so that a newly imported project's Java-compliance must be set to Java 1.5 even though the workspace settings are that or higher. Also, the settings cannot be 1.6, but must be first explicitely 1.5, then they can be changed later to 1.6.
The problem with web images is that you have to download them before displaying them. This can lead to several problems:
Fortunately, there is a great library you can use to solve these problems, not have to write and debug your own code, and it also has lots of other cool functionality to offer. It's called Droid-Fu. Droid-Fu documentation can be found at: http://kaeppler.github.com/droid-fu/.
The class that solves the problems noted above is named WebImageView.
This is quite simple (see Java code at bottom of this appendix): You have a URI in hand, you begin a new Intent, set its data to the URI, then start the activity. Here are all the relevant code excerpts from an application I wrote. From a list of data the user scrolls through, clicking a button the user can see an advertisement by going to it in the browser.
.
.
.
<Button android:id="@+id/get_ad"
      android:layout_width="wrap_content"
      android:layout_height="wrap_content"
      android:text="@string/get_ad"
      android:onClick="@string/getAdButtonHandler">
</Button>
.
.
.
.
.
.
<string name="getAdButtonHandler">clickAdButtonHandler</string>
.
.
.
.
.
.
public static final class id {
    public static final int get_ad=0x7f050004;
    .
    .
    .
/**
 * Create a browser Intent and go to the URI of the displayed
 * sponsor.
 */
public void clickAdButtonHandler( View view )
{
   if( view.getId() != R.id.get_ad )
      return;

   String url = this.currentSponsorUrl;

   if( url != null )
   {
      Intent    intent = new Intent( Intent.ACTION_VIEW );

      intent.setData( Uri.parse( url ) );
      startActivity( intent );
   }
}
There are some great third-party libraries out there that can save you a great deal of time in development. However, adding them, while super simple as compared to doing this on BlackBerry (where the opertion is nigh-on impossible), isn't quite as straight-forward as it is in the development of "normal" Eclipse applications.
First, there's the problem that, while everything looks very normal in your Eclipse project, in fact, it's the Dalvik "JVM" and not an actual JVM that's executing your compiled code. As a third-party JAR is going to come outside of that format, it must be converted. This conversion happens during the steps I show below, at the point at which it is added to the application using Build Path -> Add JARS....
Second, you still need the JAR to be integrated into the Eclipse Build Path mechanism in order for the compiler to know about the various new classes you're consuming. So, you need to use this mechanism. However, there are many ways to get a third-party JAR into your Eclipse project; my usual way is through the elegant "User Library" solution, but that will not work.
Follow these steps to ensure there will be no ClassNotFoundException when running your Android application. (You won't find out about it until you run which may leave you perplexed when it happens. And, you won't find out why until you squint at LogCat while debugging your application.)
If you consume something in your layout file that comes from a third party, you may need to consume its prefix as well, something like "droidfu:" which occurs in several places in the XML construct below (we're using the third-party, Droid-Fu library as our example):
<com.github.droidfu.widgets.WebImageView android:id="@+id/webimage"
          android:layout_width="75dip"
          android:layout_height="75dip"
          android:background="#CCC"
          droidfu:autoLoad="true"
          droidfu:imageUrl="http://www.android.com/images/opensourceprojec.gif"
          droidfu:progressDrawable="..."
          />
This comes out of the JAR, but you'll also need to add the new "xmlns:droidfu" XML namespace definition...
<LinearLayout xmlns:android="http://schemas.android.com/apk/res/android"
      xmlns:droidfu="http://github.com/droidfu/schema"
      ...>
...or you'll get the unbound prefix error.
Error parsing XML: unbound prefix
For me, this was a failure to copy and paste all of the supplied XML example from the third-party library's web pages.
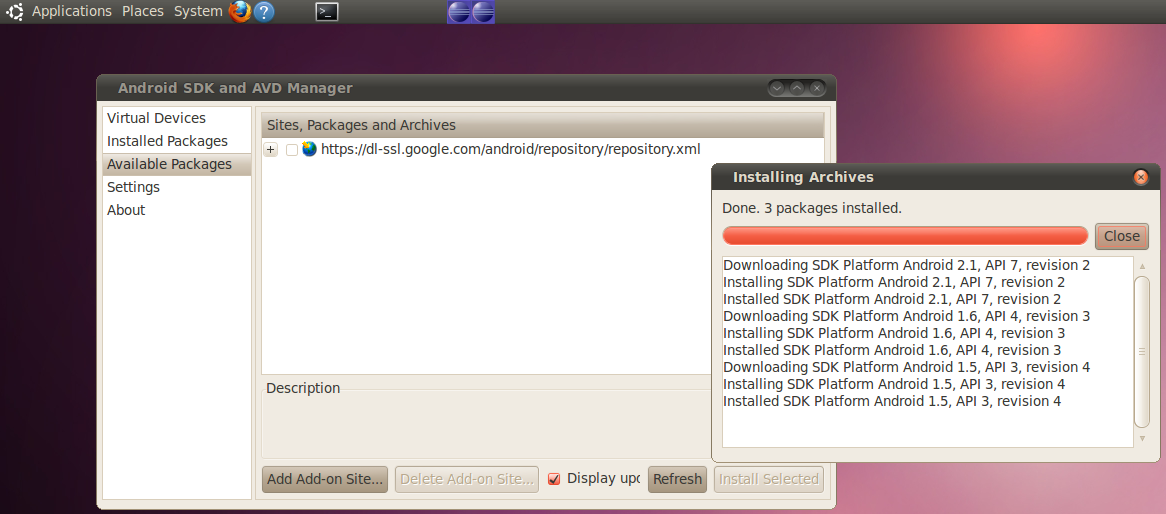
It's important to understand what's going on in the Android SDK. There are different levels corresponding to different versions of Android and the Google toolkits. In order to check to see that your application runs on older Android devices, you will need to download these other versions. Also, if you're using Titanium (Appcelerator), you can't use the very latest Android SDK (2.2, version 8), but only 1.6.
The downloads aren't separate things to get. Instead, think of the Android SDK executable as a sort of download manager.
Download additional "levels" via the SDK application executable whose path is android-sdk-location\SDK Setup.exe on Windows and android-sdk-location/tools/android on Linux.
Here's an illustration of downloading all of them; in this illustration, SDK Platform Android 2.2, API 8... had already been downloaded since I've long been developing with it, so it doesn't show here as I finish downloading the others in order to get Titanium to run.
See http://java.dzone.com/articles/getting-started-android-0.
...as yet unincorporated.
This article on using wifi instead of the USB cable to debug Android devices: http://java.dzone.com/articles/use-adb-over-wi-fi-without.
A visual guide to Android GUI widgets.
import android.app.Activity;
import android.os.Bundle;
import android.view.Display;
import android.view.WindowManager;

public class Fun extends Activity
{
   @Override
   public void onCreate( Bundle savedInstanceState )
   {
      WindowManager wm = this.getWindowManager();
      Display       d  = wm.getDefaultDisplay();
      int           w  = d.getWidth();
      int           h  = d.getHeight();
      .
      .
      .
Pay attention to the fact that your manifest must give you permission, just as to use the Internet you also need permission.
package com.etretatlogiciels.android.examples;

import com.etretatlogiciels.android.examples.R;

import android.app.Activity;
import android.content.Context;
import android.os.Bundle;
import android.telephony.TelephonyManager;
import android.widget.TextView;

public class PhoneNumber extends Activity
{
    @Override
    public void onCreate( Bundle savedInstanceState )
    {
    	Context	context = this.getBaseContext();

        super.onCreate( savedInstanceState );
        setContentView( R.layout.main );

        TelephonyManager	tm   = ( TelephonyManager ) context.getSystemService( Context.TELEPHONY_SERVICE );
        TextView			text = ( TextView ) findViewById( R.id.main );

        text.setText( tm.getLine1Number() );
    }
}
<?xml version="1.0" encoding="utf-8"?>
<manifest xmlns:android="http://schemas.android.com/apk/res/android"
       package="com.etretatlogiciels.android.examples"
       android:versionCode="1"
       android:versionName="1.0">

	<uses-permission android:name="android.permission.READ_PHONE_STATE" />

	<application android:icon="@drawable/icon" android:label="@string/app_name">
		<activity android:name=".PhoneNumber" android:label="@string/app_name">
			<intent-filter>
				<action android:name="android.intent.action.MAIN" />
				<category android:name="android.intent.category.LAUNCHER" />
			</intent-filter>
		</activity>
	</application>
	<uses-sdk android:minSdkVersion="8" />
</manifest>
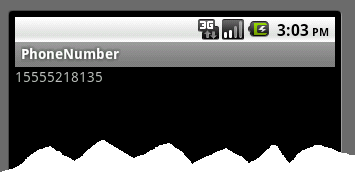
The number on my emulator appears to be 1 555 521-8135.
There is no need to create a ScrollView: TextView scrolls just fine using the up/down arrow keys as long as you
The ScrollView is not necessary...
<ScrollView android:id="@+id/scrollview"
		android:layout_width="fill_parent"
		android:layout_height="wrap_content">

	<TextView android:id="@+id/main"
			android:layout_width="wrap_content"
			android:layout_height="wrap_content" />

</ScrollView>
..., but only the TextView. Having an id is imperative to getting a handle to this widget:
	<TextView android:id="@+id/main"
			android:layout_width="wrap_content"
			android:layout_height="wrap_content" />
...then you can call this method to enable scrolling:
	TextView	tv = ( TextView ) findViewById( R.id.main );
	.
	.
	.
	tv.setMovementMethod( new ScrollingMovementMethod() );
Use WebView to display HTML content in an application just as if in a browser.
This requires permission in AndroidManifest.xml.
Here's some Java code:
Uri uri = Uri.parse( "http://www.example.com" );
Intent intent = new Intent( Intent.ACTION_VIEW, uri );
startActivity( intent );

// or...

WebView webview = new WebView( this );
setContentView( webview );
See http://developer.android.com/reference/android/webkit/WebView.html.
Some progress has been made on this topic; see here.
See Appcelerator®.
See Android Developers > Tutorials > Hello Views > Tab Layout.
I was casting around for help doing some tabs and stumbled upon the original, official Android tutorial example on tab layout. I did the tutorial, but it wouldn't work. I got a NameNotFoundException here (fortunately, I have and am able to debug through the actual Android JAR source code):
@Override
public ActivityInfo getActivityInfo(ComponentName className, int flags)
    throws NameNotFoundException {
    try {
        ActivityInfo ai = mPM.getActivityInfo(className, flags);
        if (ai != null) {
            return ai;
        }
    } catch (RemoteException e) {
        throw new RuntimeException("Package manager has died", e);
    }

    throw new NameNotFoundException(className.toString());  <------throws this!
}
Careful debugging finally revealed to me that I hadn't declared "this activity" in my manifest file. How did I do this? I had observed that the LogCat window lines are truncated. What I didn't know is that you must copy a truncated line, then paste it somewhere to see the full story. In this case, I saw (I wrapped it in several places):
09-29 00:46:23.722: ERROR/AndroidRuntime(606): Caused by: android.content.ActivityNotFoundException:
  Unable to find explicit activity class
	{com.android.developer.hellotabwidget/com.android.developer.hellotabwidget.ArtistsActivity};
  have you declared this activity in your AndroidManifest.xml?
However, the tutorial doesn't show how that should be done. Maybe it thinks that beginning Android developers already know everything. I looked high and low for an example, then found an obscure and slightly related posting that was using what's below on lines 16, 17 and 18.
So, the end result is (not to leave anything to chance):
<?xml version="1.0" encoding="utf-8"?>
<manifest xmlns:android="http://schemas.android.com/apk/res/android"
		package="com.android.developer.hellotabwidget"
		android:versionCode="1"
		android:versionName="1.0">
	<application android:icon="@drawable/icon"
			android:label="@string/app_name">
		<activity android:name=".HelloTabWidget"
				android:label="@string/app_name"
				android:theme="@android:style/Theme.NoTitleBar">
			<intent-filter>
				<action android:name="android.intent.action.MAIN" />
				<category android:name="android.intent.category.LAUNCHER" />
			</intent-filter>
		</activity>
		<activity android:name=".ArtistsActivity" />
		<activity android:name=".AlbumsActivity" />
		<activity android:name=".SongsActivity" />
	</application>
	<uses-sdk android:minSdkVersion="8" />
</manifest>
Here's a communiqué I received from a colleague who's dabbled in this:
"I had a Windows 7 machine and when I connected my USB cable to it, my phone showed up as another hard drive. I could transfer files just by dragging and dropping as if they were regular folders on a separate drive. Here at Novell, I have a Win 7 (64 bit) machine and I can charge the phone but it does not recognize it as a device? I need to do a little more digging on this. I do know that when phone is recognized you can just drop the application built directly on the phone and it will pick it up and run from there. I can't remember the folder to put the App into but it should be pretty easy to find."
Steps to installing an application on Android hardware given in an Eclipse forum as somewhat incomplete. The poster held that the Android tools in Eclipse should handle this themselves.
...according to Doron Zehavi.