 |
|
PyCharm Professional: Python Development for Flask
Russell Bateman
February 2022
last update:
|
I downloaded PyCharm Professional for a 30-day trial. My purchase price will be
$89 if I decide to continue. Right now, I'm most interested in Flask
development because I might be using it at the office.
Links
Notes on set-up
- My PyCharm subscription is valid until 3 March 2022.
- I have long used PyCharm Community Edition, however, Flask support comes
only in the Professional version.
- Even though Python 3.8.10 came natually installed on my Linux Mint
distribution, by default, PyCharm only offered the Python 2.7 interpreter.
Adding a Python interpreter was the first thing I tackled—offended
by the "old" mindset.
- python3 on my host is at /usr/bin/python3; this is what I
set up as my Python interpreter. Fortunately, that appeared to be enough.
- PyCharm will assist in downloading and installing a Python interpreter,
especially if there is no suitable Python on the host. I did not try
this.
- PyCharm sets up everything needed to develop for Flask—no need to
squint at pip3 command lines, especially no need to convert from
Python 2 to Python 3 pip commands as other tutorials I saw
require (because "everyone" doing Flask is still running on Python 2).
For example, commands like (these are Python 2). In times past, I have
followed instructions written for Python 2, but needed in Python 3 and
there were some gotchas (more than just adding '3' to the commands),
but I don't remember specifics. Anyway, I didn't have to do any of this:
- pip install virtualenv
- apt-get install virtualenv
- venv/bin/activate
- pip install Flask
- Deal directly with setting up WSGI, Jinja, Wekzeug
- A virtual environment may be set up and shared for use by other projects.
This appears to make set-up easier (and the same) for other projects.
First project: flask
- The project I created is flask and it's on path
/home/russ/dev/flask.
- The newly created Flask application, app.py, can be run by
- Run → Run 'flask'.
- Clicking the Run (green) arrow.
- Pressing Shift+F10.
- Running gets me this:
FLASK_APP = app.py
FLASK_ENV = development
FLASK_DEBUG = 0
In folder /home/russ/dev/flask
/home/russ/dev/flask/venv/bin/python -m flask run
 * Serving Flask app 'app.py' (lazy loading)
 * Environment: development
 * Debug mode: off
 * Running on http://127.0.0.1:5000/ (Press CTRL+C to quit)
- Though the tutorial didn't say to do it, I loaded the URL in my browser
to see:
Hello World!
- A note says if Flask support has been enabled in the PyCharm project, the
Python Console (reached along the bottom edge of the IDE as
installed on my host) begins acting as a Flask console. The Flask
console accepts Flask-specific commands (after >>>).
- The Flask console implements an "IntelliSense"-style interface,
i.e.: offers suggestions as soon as you begin typing a command. This is
especially convenient when you don't know what you're doing.
That was the whole tutorial.
Next, I moved on to "Creating Web Applications with Flask." The featured
application, MeteoMaster (obviously written by a speaker of French some
other language that uses meteo- for "weather," processes weather data
stored in a database and presents it in scatter- or line charts.
Second project meteomaster...
- It's very important not to forget to click on Flask down the
left-hand side of the New Project. Failing to do that results in
some confusion and back-tracking. We're using the existing virtual
environment—we can because we enabled that in our first project
above. We don't have to re-enable it this time.
- Apparently, kicking off a new project always results in app.py's
"Hello World!" code. Why not?
- This exercise teaches how to use requirements.txt in PyCharm. You
right-click the project root (that is, the bold-faced name of the project
and not the title bar Project), choose New → File,
and see requirements.txt added to the project's files just under
app.py. Edit that to add requirements in the format
requirement-name==version
I guess this is Python's answer to Maven.
- The requirement must be installed. If you lose track of the IDE link to
do that, just close the requirements.txt edit window and, if not
installed, you'll see a control to click for that.
- Disaster: Installing requirements can take considerable time. Installing
for this weather project took 5 mintues and, ultimately, failed.
JetBrains deflects criticism for this saying, "the problem is out of IDE
control."
- Pressing JetBrains on this for an answer, they tol me that a (very
slightly) different requirements list was needed for Python 3.8.10 as the
tutorial was written for Python 3.7. (Okay, this is just another reason
to prefer a world-class development language like Java or C/C++ to
Python, but saying it doesn't help.) I modified requirements.txt
and it worked:
Click==7.0
cycler==0.10.0
Flask==1.0.2
Jinja2==2.10
kiwisolver
MarkupSafe==1.1.0
matplotlib
numpy
pyparsing==2.3.0
python-dateutil==2.7.5
six==1.11.0
SQLAlchemy==1.2.14
Werkzeug==0.14.1
Setting up a database...
- Using
this database:
https://github.com/allaredko/flask-tutorial-demo/blob/master/user_database.
This must be saved to the root of the project and (it's already) named
user_database. Once you've saved it there, click the
Reload All from Disk button in the IDE (it's two spinning
arrows).
- Install the SQLite driver. Confusingly, there wasn't an identifiable
"warning" message, but there was, toward the right side, a hyper link
entitled, Download ver. 3.34.0. Then I clicked OK.
- It doesn't go identically to what's in the tutorial. I clicked the
user_database's hamburger menu (⋮) to do some playing
around to see what the tutorial was showing. Ultimately, however, you
just need to click the right-angle icon at the left of
user_database. It does look a little different that what's shown
in the tutorial.
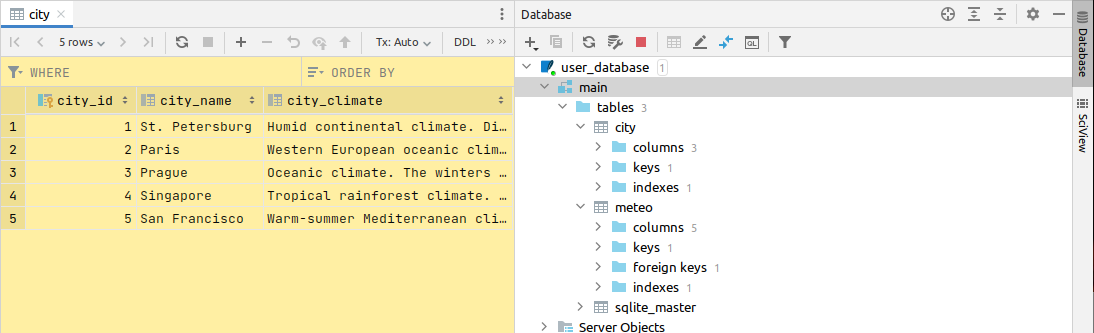
- There's no right-clicking user_database to get a
Properties context menu; it isn't there. Instead, there is a
"wrench" icon button in the Database toolbar leading to
Data Source Properties. In the dialog that appears, there is a
Test Connection hyperlink near the bottom. I got a notice that
my connection was good.
- Now we create the first, real Python-code workhorse,
user_database.py as suggested by the tutorial. This is done by
right-clicking on the root and choosing New → File, then
naming it user_database.py. (Now, meteomaster is
what I called my project, but I think the tutorial called theirs
flask-tutorial-demo. Keep this in mind.)
Notice that, based on the filename extension, PyCharm "decorates" the new
file by changing its icon from that of a simple file to a Python file
icon.
- We copy and paste the contents for this new Python file from the tutorial
to the new .py file we created (at the root). There are many
errors. If I click on (the first) line with red underlining, I then do
Alt+Enter and can choose to Import
alchemy-MetaData(SchemaItem) by just pressing Enter. I go
on to do the others like this too...
- ...however, be careful about how you do Column, Integer
and String as they must come in from SQLAlchemy (and from
nowhere else that happens to offer versions of these identifiers). To get
these, you'll do as above, but choose Import this name, press
Enter, but then you'll have to choose (very carefully) the
symbol prefixed with "sqlalchemy." If you don't, things will get real
confusing real fast.
If life gets too ugly, you can cheat by sneaking a peak at
allaredko/flask-tutorial-demo to get better oriented.
-
Plotting the scatter chart...
- New file charts.py gets created in the project root. You already
know now how to create a new file. Just copy the contents from the
tutorial, paste into your new file, then fix the errors as before.
It's harder to fix the red-underlined errors this time because their
solution is to create new symbols or functions in
user_database.py. (When was the tutorial going to tell us this?)
See
allaredko/flask-tutorial-demo/user_database.py starting after
class Meteo() and add lines 30 through 49 to
user_database.py. The errors in the pasted code of
charts.py will disappear.
- Stop and rerun meteomaster using Shift+F10 to preview the
advertised graph.
No, I couldn't find the preview graph either. This is the problem with
tutorials being written by authors who already know where they want this
to go and fail to imagine themselves as a developer who needs the
tutorial (or wants to follow it) and doesn't have all the answers.
Bug filed.
- It turns out that just running charts.py in the debugger was
enough.
- In the Project pane, right-click charts.py.
- Choose Run 'charts.py'.
(More to come...)