(Old) Chef Notes
With Chef, you can manage your servers by writing code, not by
running commands; integrate tightly with your applications,
databases, LDAP directories; easily configure applications that
require knowledge about your entire infrastructure; and create
perfect clones of QA environments, pre-production (staging) and
production environments, etc.
If these notes appear schizophrenic, it's because they are. I'm trying
to consume Chef at work and at home, the learning is somewhat painful
because I'm not a Ruby guy at all. Someday, after this has come together,
I'll try to consolidate and un-dummify these notes.
Note: I'm running Ubuntu Precise Pangolin in my examples.
I'm using a subdirectory named chef in the root directory of my
own development host as a place to work from. Names and passwords used
in these notes are taken from great French chefs, including me
Links
Collection of links to open source Chef:
Setting up the Chef server and client is even easier (than below)
In the very recent past, this has gotten easier.
Browse to
http://www.opscode.com/chef/install .
Under Installing the Chef client , select OS, version and platform
architecture.
If behind a proxy or firewall, don't use the Quick Install ,
but Downloads to download the Chef client*:
Choose desired Chef version.
Copy downloaded package to host to install.
* Note that the Chef server install is always a download.
Setting up the Chef server
Nota bene: This method is deprecated and no longer the preferred approach.
Prepare the advanced packaging tool for the installation. Put the following line into
/etc/apt/sources.list.d/opscode.list :
deb http://apt.opscode.com/ precise-0.10 main
Continue on to get the GPG key. Couldn't get gpg keys because of the firewall.
Had to do the following instead: From my personal host (not behind firewall),
I get the opscode-keyring.gpg file, then copy it to my server:
/home/russ/chef $ sudo mkdir -p /etc/apt/trusted.gpg.d cd /etc/apt/trusted.gpg.d/ sudo gpg --keyserver keys.gnupg.net --recv-keys 83EF826A sudo gpg --export [email protected] \
| sudo tee /etc/apt/trusted.gpg.d/opscode-keyring.gpg > /dev/null ll scp opscode-keyring.gpg russ@jacques-pépin.acme.com:/home/russ
Then, turning my attention back to my server (behind firewall):
root@jacques-pépin:/etc/apt/trusted.gpg.d# ll sudo apt-get update sudo apt-get install opscode-keyring
Upgrade the server software so that Chef's dependencies are the latest versions:
russ@jacques-pépin:~$ sudo apt-get upgrade
Now install Chef. Lots of stuff gets done here in terms of installing dependencies
that aren't already on the host. Ruby is a good example of this.
russ@jacques-pépin:~$ sudo apt-get install chef chef-server
The URL for the Chef server must be established and also the admin/password for the
web UI. This bit occurs as part of a TUI that's launched by the installation. I
chose the following:
    http://chef.jacques-pépin.acme.com
    password for user chef in vhost "/chef":  Escoffier
    password for user admin in vhost "/chef": Escoffier
And, the installation continues from there unpacking lots more crap.
    ...
    Setting up libqtwebkit4 (2.2.1-1ubuntu4) ...
    Setting up libgecode27 (3.5.0-1~maverick1) ...
    Setting up libgecodegist30 (3.7.1-3) ...
    Setting up libgecodeflatzinc30 (3.7.1-3) ...
    Setting up libqt4-dev (4:4.8.1-0ubuntu4.2) ...
    update-alternatives: using /usr/bin/moc-qt4 to provide /usr/bin/moc (moc) in auto mode.
    update-alternatives: using /usr/bin/uic-qt4 to provide /usr/bin/uic (uic) in auto mode.
    update-alternatives: warning: skip creation of /usr/share/man/man1/uic.1.gz because associated file /usr/share/man/ma...
    Setting up libgecode-dev (3.7.1-3) ...
    Setting up libdep-selector-ruby (0.0.8-0opscode1) ...
    Setting up chef-server-api (10.16.0-1) ...

    Creating config file /etc/chef/server.rb with new version
     * Starting chef-server           ~ In 27728 [ OK ]
    Setting up chef-server (10.16.0-1) ...
    Setting up libqt4-opengl-dev (4:4.8.1-0ubuntu4.2) ...
    Setting up libqtwebkit-dev (2.2.1-1ubuntu4) ...
    Setting up chef-server-webui (10.16.0-1) ...

    Creating config file /etc/chef/webui.rb with new version
     * Starting chef-server-webui     ~ In 27914 [ OK ]
    Processing triggers for libc-bin ...
    ldconfig deferred processing now taking place
At this point, the documentation says it's a good idea to verify that six
processes are running and gives the list. I did this very crudely:
russ@jacques-pépin:~$ ps -ef | grep [c]hef-server ps -ef | grep [c]ouchdb ps -ef | grep [r]abbit ps -ef | grep [s]olr ps -ef | grep [c]hef-expander
Configure the knife command line tool. I'm not certain yet why this would
be done on the Chef server.
(Much more to come here...)
Setting up the Chef client
Install a Chef client on every node you wish to control. These would be VMs
set up for this purpose.
The installation is identical to what went on above except when you reach the
apt-get command. If you're not operating from behind a firewall, you don't need
to find someplace outside the firewall, but if you do, from a personal host with
rights through the firewall:
/home/russ/chef $ sudo mkdir -p /etc/apt/trusted.gpg.d cd /etc/apt/trusted.gpg.d/ sudo gpg --keyserver keys.gnupg.net --recv-keys 83EF826A
(In fact, this puts the keys on the path ~/.gnupg and they'll belong
to root.) Continuing on...
/etc/apt/trusted.gpg.d $ sudo gpg --export [email protected] \
| sudo tee /etc/apt/trusted.gpg.d/opscode-keyring.gpg > /dev/null scp opscode-keyring.gpg [email protected] :/home/russ
In the last bit, julia-childs.acme.com just happens to be the server
where you want to copy the key-ring you had to get outside the firewall. If
you did this directly on your server in the first place, the stuff's already
there, but it's on the path /etc/apt/trusted.gpg.d/opscode-keyring.gpg .
So, the next commands are unnecessary. (The "client node" is the server on
which you're installing the Chef client as opposed to the host on which you
have or will install the Chef server piece.)
From the client node:
russ@julia-childs:~$ sudo apt-get update sudo apt-get install opscode-keyring
Now for the installation-proper which can be done because the key-ring's
just where it needs to be. You're still on the host where you're installing
the Chef client here. Note: if your host is a brand new VM in a data center
and you've not upgraded it through apt yet, you're going to see a lot
of puzzling stuff go on. Just sit back and be patient.
$ sudo apt-get upgrade
You'll be prompted for the Chef URL (where the Chef host will live) as
discussed above. You may not want to specify it now, but save that for
later if you don't yet have a Chef server set up.
$ sudo apt-get install chef
Read the comment at the end of the next section on giving the path
to the Chef server.
Setting up the Chef client on a data center VM
This relates more than just Chef. Here are scrapes and comments for installing
Java, Tomcat and Chef client on a VM. Not covered here: setting up NTP (crucial).
$ sudo apt-cache show sun-java
--assumed Java not there. Basically, it's a mess to install Oracle Java; I'm
going to use openjdk-6. If it's already there, this first command is not
useful. The second command installs Tomcat 6.
$ sudo apt-get install openjdk-6-jre-headless sudo apt-get install tomcat6 tomcat6-admin tomcat6-common tomcat6-user
Note: I actually installed a proper Sun JDK/JRE
before hand,
as well as
Tomcat , so this wasn't a problem. I did find it necessary to install package
tomcat6-user as it was not installed by the method linked here.
Now I'm ready to install the Chef client. I follow the instructions at:
http://wiki.opscode.com/display/chef/Installing+Chef+Client+on+Ubuntu+or+Debian
Be very careful! Do not do anything as root, only use sudo where shown here2
or you end up with a mess.
$ sudo vim /etc/apt/sources.list.d/opscode.list
Place this line into that (new) file:
deb http://apt.opscode.com/ precise-0.10 main
...because I'm installing on Ubuntu Precise Pangolin 12.04. Then, below, be
really careful that you do NOT do the second two commands using sudo
or you will sink yourself. I know because I tried it, then backed it out,
because root can't do the second or then it can't do the install keyring.
$ sudo mkdir -p /etc/apt/trusted.gpg.d gpg --keyserver keys.gnupg.net --recv-keys 83EF826A gpg --export [email protected] | sudo tee /etc/apt/trusted.gpg.d/opscode-keyring.gpg > /dev/null
You should get no errors updating apt . If you do, you might not have put
the right thing into opscode.list .
$ sudo apt-get update sudo apt-get install opscode-keyring sudo apt-get upgrade
When I installed chef, I was careful NOT to supply a URL. Instead, I pressed
Tab and then Enter (for OK ). This is because a friend
says not supplying one will make it so that the current VM can be converted to
a more generic VM template, i.e.: you're doing the installation on a VM created
with vSphere and are going to convert it to a template for creating later,
definitive VMs.
sudo apt-get install chef
There is nothing left to do (installing Ruby, etc.) if the VM is only going to run
the Chef client.
The Chef server
The Chef server is not really a server at all. It doesn't do anything
except publish. It stores data about nodes, roles, and user-provided data that's
retrieved via essentially API calls. It provides a search API too.
The Chef client
Every time a Chef client runs, typically on one of the managed nodes, the
following occurs:
The node is built.
Cookbooks are synchronized.
The resource collection is compiled.
The node is configured.
Notices are given and exceptions handled.
The Chef node
The Chef node is a Ruby object that represents the host (or machine) that's
being configured. It has attributes and a run list. The object is rebuilt every
time the Chef client is run, merging input from the local host, the Chef API and
attributes and run lists from roles.
The Chef cookbook
Cookbooks contain data including recipes, attributes and more. They are
requested from the Chef server where they reside.
The resource collection
The resource collection is a list of resources that must be used to configure
the node. This includes the results of evaluating recipes and attributes. Once
resource collections are compiled, the required actions are taken by the
providers and the node is saved back to the server where it's indexed for
searching.
Chef Solo
Here is a tutorial on Chef Solo:
http://www.youtube.com/watch?v=1G6bd4b91RU .
Chef Solo is where you don't necessarily install a server. Instead, you develop
and test-deploy your recipes to your local development host. Later, you can use
those recipes on any Chef server. On the Chef server, you invoke the chef-colo
command and the server runs the recipes on all the nodes specified.
Step-by-step Chef configuration
Here are some instructions that assume that a Chef server is already set up and
running, and that Chef clients are set up. The following configuration file is
used in these steps. Prior to these steps, stuff is set up on the server (in its
Chef repository) that's not shown here, but referred to in this file. Please see
_________.
The Chef server URL below is the one you supplied during the installation of the
Chef server.
knife.rb :
log_level :debug
log_location STDOUT
node_name 'jack'
client_key '/home/jack/dev/chef-repos/.chef/jack.pem'
chef_server_url 'http://16.86.192.111:4000/'
cookbook_path [ "/home/jack/dev/chef-repos/cookbooks",
"/home/jack/dev/chef-repos/site-cookbooks" ]
cookbook_email "[email protected] "
cache_type 'BasicFile'
cache_options( :path => '/home/jack/dev/chef-repos/checksums' )
Node registration
Do these steps, except as noted, on a client...
Using NTP, synchronize time between clients and server. Chef will error out if
the drift exceeds 15 minutes. (See Notes on NTP .)
Get root.
Create /etc/chef and make that the current working directory.
Run knife configure client, knife.rb :
# knife.rb ./
This will generate client.rb and validation.pem . Edit client.rb
and change log-level from "info" to "debug".
Replace validation.pem with the one your Chef server as these must match
perfectly.
Run chef-client .
# chef-client
Unless everything is magically perfect, this will produce numerous errors that must
be fixed. Frequently, these are errors in the configuration file, client.rb ,
such as a failure to find the server. In my observation, Chef will not make use of
anything in /etc/hosts, so hard IP addresses must be used. I don't know
whether it uses DNS as my set-ups have always been using ad hoc internal ESXi
VMs or scrap hardware, never formal hosts noted in DNS tables.
Now go to the Chef web interface to make sure that node is registered. You can do
this from a browser running on your development host, which would not typically be
the Chef server or any client. It's at this point that you'll make use of the
password you supplied when installing the Chef server. Here, the username/password
are (from the installation instructions earlier on this page),
admin/Escoffier
http://16.86.192.111:4040
(NOTE THAT, STARTING HERE, NOTES ARE QUICK, ROUGH AND AS YET UNREFINED. PLEASE COME
BACK LATER.)
Knife-up recipes
(Note that existing recipes already used on one client can be ferretted out using
knife . Just find the look-up option for knife .)
These steps happen on any development host, except as noted, but not on the server or any client.
Create a new subdirectory on your development host such as
/home/jack/dev/chef-repos and create a hidden .chef directory. Place a copy of
the knife.rb there. Change the properties to match that host.
Go to the Chef web interface and create a user with admin rights.
(See how to do this.) . Copy the private key to a file named
user.pem , e.g.: jack.pem . (Note: if you already had an admin user, and
don't have access to the original PEM, i.e.: if you're inheriting maintenance of the Chef
process, you'll have to re-create it and the original creator becomes invalid.)
Create a cookbooks directory and add any cookbooks.
Use knife commands to up-load the recipe (or recipes) which are Ruby
files.
In the web interface, verify that the cookbook is loaded correctly into the
cookbook section.
Create a role
These steps happen in the web interface and on a chef client (node).
Go to Roles and create a new role. In the menu assign it the cookbook from the
steps above.
Go to the web interface representation of the node being configured and add this
role for it.
Next go to the actual client node and run chef-client again.
Verify that the changes have taken effect.
Creating a client
A client is...
a VM that is a node to Chef
a role
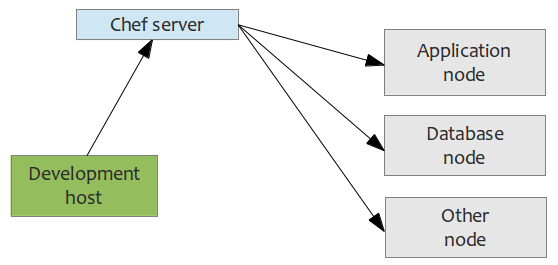
a developer on a development host (see green box in illustration)
To create a developer client, do this:
Open the Chef web interface.
Click the Clients tab.
Click the Create tab.
Fill in the new Name .
Click Admin if appropriate.
Copy (by scraping) and do not lose the private key presented.
Create a PEM file to hold the key, probably on a path like
/home/jack/dev/chef-repos/.chef/jack.pem .
Ensure the PEM file is referenced from knife.rb .*
* This is the knife.rb placed usually on a path like
/home/jack/dev/chef-repos/.chef . The path to the PEM file is
indicated by client_key in knife.rb as shown
here .
Errors
This is the most brittle part of using Chef. You will almost always get:
~/dev/chef-repos/.chef $ knife node list
ERROR: Failed to authenticate to http://16.86.192.111:4000/ as app02 with key /home/jack/dev/chef-repos/.chef/jack.pem
Response:  Failed to authenticate. Ensure that your client key is valid.
Hmmmm...
Retrieving an existing recipe
Recipes are managed (or can be) from an independent development host (rather than
the Chef server or a client node).
Recipes are written in Ruby; filenames will end in .rb .
Let's imagine that a recipe already exists and is in use for one or more nodes.
You've just taken over maintenance of your group's Chef installation and you
want to use that recipe for another node that's not using it. To fetch an existing
recipe down to your development host, do this:
Launch a browser and point it at the Chef web interface, e.g.:
http://16.86.192.111:4040
Click the Cookbooks tab, the recipe should be in the list.
Click the version number for the recipe.
Under the recipe name, click the recipes link.
Click on the Ruby file(s) associated with the recipe and scrape or
otherwise save them to the appropriate place in filesystem, e.g.:
/home/jack/dev/chef-repos .
Random notes as yet to coalesce
Chef controls nodes through recipes. Chef, when run, likes to create /etc/chef
to do its work.
$ knife configure client ./
—creates a certificate and Ruby file with configuration in it.
Go to http:// hostname:4040 , username: admin ,
password: Escoffier (set in TUI when Chef server installed).
Create a new client "installer" (what's this? "installer" was chosen, but any name
could have been specified).
generates private key that will be used.
replace ____________ in ____________.
Role example: tomcat-role , recipes to configure Tomcat on a node.db-role , recipes to configure, say, MongoDB on a node.
To change Tomcat's server.xml , see
cookbook/tomcat/template/default/server.xml.erb , default.rb .