Ok, so you are here because you have a penchant for self-abuse, I will try to walk you through doing this from the command line.
When you installed MySQL server it came with a set of command-line tools, one of which is mysql.exe. These tools can be found (assuming you did the default install path) at C:\Program Files\MySQL\MySQL Server 4.1\bin. When I used to do this via the command line, I found it was much easier to put that directory onto my PATH variable rather than have to go to that directory every time.
Here are the steps to create a database, set up a user, give him privleges and create a table using the command line, be prepared for a lot of typing, but remember you asked for it.
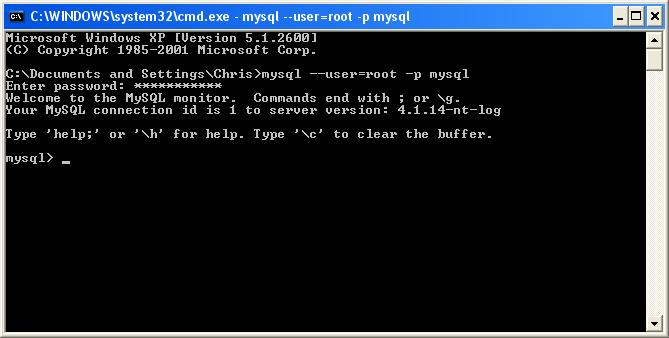
Launch a command-line window and if you didn't set the MySQL directory into your path, then you need to go there now. First thing you need to do is log into the MySQL server as root. Type the following into your command line:
mysql --user=root --password mysql
This command will log you in, it will prompt you for the root username that you set up when you installed MySQL. Now that you are logged in, your command line should look like this.
Now you will be able to issue SQL Query commands to the server to create users, add a database and create tables. First we need to create a database. Type this query into the command line:
CREATE DATABASE dvdcat;
You then need to use the database by typing,
USE dvdcat;
Then type the following into your command line to add the user j2ee:
GRANT ALL PRIVILEGES ON dvdcat TO 'j2ee'@'localhost' IDENTIFIED BY 'some_pass' WITH GRANT OPTION;
(Note: be careful not to type the command OVERRIDE ALL SECURITY
for then both the Six Million Dollar Man AND Superman would be in danger.)
If you would rather j2ee be able to log in from any machine rather than just localhost, change localhost to %.
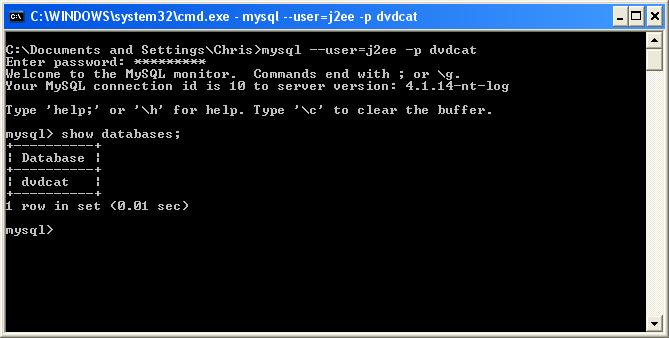
To make sure that you infact created the database and your user has rights on it, type exit and log in with your new user using the login above but replace root with j2ee and mysql with dvdcat. Then at the mysql> prompt type in:
show databases;
If everything was set up correctly you should see the following:
You are now read to create your table and with your columns. This next query will be a long one. Type in the following:
   CREATE TABLE `dvdcat`.`dvdtitle` (`itemID` INTEGER UNSIGNED NOT NULL AUTO_INCREMENT,
   `title` VARCHAR(80) NOT NULL,`year` DATETIME,`length` INTEGER UNSIGNED,
   `rating` INTEGER UNSIGNED NOT NULL DEFAULT 0,
   `url` VARCHAR(255),`stars` LONGTEXT,PRIMARY KEY(`itemID`))ENGINE = MYISAM;
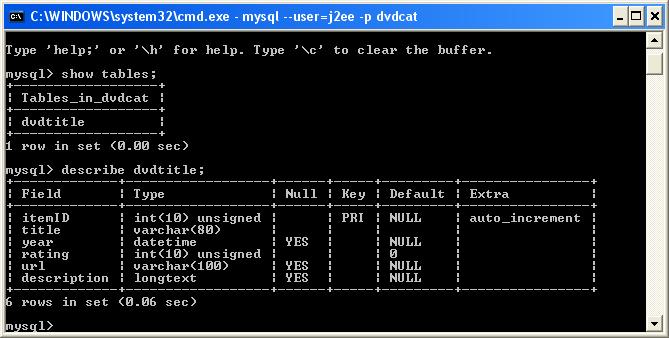
Now lets check to make sure everything is set up correctly. Type show tables; into the command line, you should see the table name we just created. Then type in describe dvdcat; you should have a screen that looks somewhat like the following graphic (note: the basic, required fields were changed to what is recorded in the instructions above instead of what is illustrated here.)
You can do quite a bit with the command-line line interface, and in many cases it is much faster to use. If you think you would prefer this type of interaction, you can read the documentation for everything you can do, from this point, we are done with our database setup, we will now write a basic application to load data into the database.