
|
HandbrakeRussell Bateman |
Handbrake is a tool for converting or transcoding video content to several, widely supported codecs, in particular Matroska (MKV) which is what I almost exclusively use.
If you have subtitles in a file with the extension .srt, you can (in theory) transcode your video file and include this file together into an MKV file so that there is only one file to copy around. I have also used this, but rarely with success and it's never become so important an option that I've invested much effort in debugging it. Generally, I'm only interested in those that come with the media I buy.
I'm using Handbrake only to transcode content I own for organizing on my Plex Media Server. I haven't tried to use Handbrake specifically for any other destinations like iPod Video.
Table of Contents
- Download and install
- Steps to rip DVDs or Blu-rays with Handbrake
- Dealing with the Linux filesystem
- The Plex server
- Matroska (MKV) format
- Finessing Handbrake
- Using Handbrake on Microsoft Windoz
- Random notes to integrate properly as time goes
- Handbrake custom settings
- XML-surgery way of specifying presets
- YIFY-MKV, latest attempts
- What movie/television file is HandBrake currently transcoding?
- How to use HandBrake to snip (or pre-snip)
Download and install
Download and install handbrake from here and/or get instructions.
In particular, as you see below, you'll need to do much with apt to accomplish this including adding to the sources, getting a key (use the one proposed by the GPG error message you get) and doing all this by hand. And, as you do that, you must realize which version of Debian you're working with. In my case, when I recorded these installation steps, I was installing on Linux Mint 17 Quiana, a distribution based on Ubuntu Trusty Tahr.
tol-galen apt # apt-get update
Ign http://dl.google.com stable InRelease
Ign http://extra.linuxmint.com qiana InRelease
.
.
.
Reading package lists... Done
W: GPG error: http://ppa.launchpad.net trusty Release: The following signatures couldn't be verified because the public key is not available: NO_PUBKEY 8771ADB0816950D8
tol-galen apt # gpg --keyserver pgpkeys.mit.edu --recv-key 8771ADB0816950D8
gpg: directory `/home/russ/.gnupg' created
gpg: new configuration file `/home/russ/.gnupg/gpg.conf' created
gpg: WARNING: options in `/home/russ/.gnupg/gpg.conf' are not yet active during this run
gpg: keyring `/home/russ/.gnupg/secring.gpg' created
gpg: keyring `/home/russ/.gnupg/pubring.gpg' created
gpg: requesting key 816950D8 from hkp server pgpkeys.mit.edu
gpg: /home/russ/.gnupg/trustdb.gpg: trustdb created
gpg: key 816950D8: public key "Launchpad HandBrake Snapshots" imported
gpg: Total number processed: 1
gpg:               imported: 1  (RSA: 1)
tol-galen apt # gpg -a --export 8771ADB0816950D8 | apt-key add -
OK
tol-galen apt # apt-get install handbrake-gtk
Reading package lists... Done
Building dependency tree
Reading state information... Done
The following NEW packages will be installed:
  handbrake-gtk
0 upgraded, 1 newly installed, 0 to remove and 37 not upgraded.
Need to get 10.4 MB of archives.
After this operation, 21.5 MB of additional disk space will be used.
Get:1 http://ppa.launchpad.net/stebbins/handbrake-releases/ubuntu/ trusty/main handbrake-gtk amd64 0.10.0ppa1~trusty1 [10.4 MB]
Fetched 10.4 MB in 5s (1,824 kB/s)
Selecting previously unselected package handbrake-gtk.
(Reading database ... 150825 files and directories currently installed.)
Preparing to unpack .../handbrake-gtk_0.10.0ppa1~trusty1_amd64.deb ...
Unpacking handbrake-gtk (0.10.0ppa1~trusty1) ...
Processing triggers for hicolor-icon-theme (0.13-1) ...
Processing triggers for gnome-menus (3.10.1-0ubuntu2) ...
Processing triggers for desktop-file-utils (0.22-1ubuntu1) ...
Processing triggers for mime-support (3.54ubuntu1) ...
Setting up handbrake-gtk (0.10.0ppa1~trusty1) ...
Update
Update: here the instructions I used the last time I did this:
- Edit /etc/apt/sources.list.d/handbrake.list and add (for Ubuntu Truty Tahr
14.04 LTS—See website for PPA for other Linuces):
deb http://ppa.launchpad.net/stebbins/handbrake-releases/ubuntu trusty main
deb-src http://ppa.launchpad.net/stebbins/handbrake-releases/ubuntu trusty main
- Update apt-get:
# apt-get update - Install key:
# gpg --keyserver pgpkeys.mit.edu --recv-key 8771ADB0816950D8
# gpg -a --export 8771ADB0816950D8 | apt-key add -
- Install HandBrake:
# apt-get install handbrake-gtk
Steps to rip DVDs or Blu-rays with Handbrake
- Launch HandBrake.
- Mount a disk in the DVD/Blu-ray reader; you may need to dismiss whatever software launched automatically in response to mounting the DVD or Blu-ray (Movie Player, etc.).
- Click Source to scan the disk. Navigate to the disk's root subdirectory. If that doesn't produce anything (read on), then try one named VIDEO_TS. The disk should show up on the path /media.
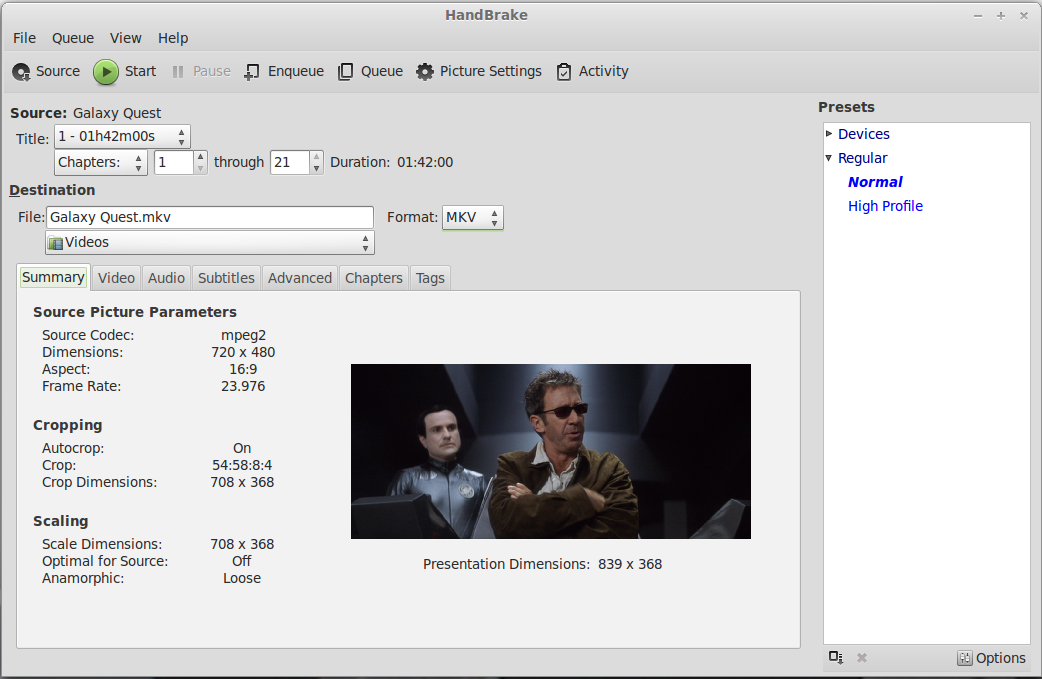
- You probably want to select Format: as MKV as shown here. Please also see Finessing Handbrake below.
- When finished, click the Title drop-down menu and choose the title you want to rip. If it's a feature-length movie, this is probably the longest title. If it's a television DVD with multiple episodes, Handbrake will likely have chosen the longest episode. Whatever the filename ends up being, you can easily change it and, especially in the case of a television episode, you surely will want to.
- For television shows, the naming format is pretty critical. See Plex support and scroll down to Media Preparation, Naming and Organizing TV Shows. Consult sources like IMDB and Wikipedia (use Wikipedia entry to find IMDB link) to figure out season and episode (sNNeNN) component. Please also see Television example: Inspector Lewis and any additional examples.
- Note the filename. This will probably be created on the path ~/Videos plus whatever is in the field just below File: You can change it to whatever you like here in this dialog or wait to change it in your filesystem.
- You might fill in Tags tab with movie metadata if you like. I don't know whether Plex makes use of it or not.
- Choose a preset from the right-side pane, Normal or High Profile.
- Video tab: 18 for standard definition (DVD). This controls the resolution. The lower the number, the higher the resolution and the more space the movie will take in the filesystem.
- You can queue up titles if you like or rip them one at a time.
- Click Start and wait; when finished, rename and copy your rip to your Plex server.
- If you wish to kill performance for every other thing going on on your
Linux system while Handbrake runs, discover Handbrake's pid,
then use renice to set its priority higher:
# ps -ef | grep [g]hb
russ     10729  2784 99 Nov08 ?        8-11:16:57 ghb
# renice -20 -p 10729
# top
top - 22:33:34 up 1 day,  5:34,  1 user,  load average: 11.50, 11.33, 11.36
Tasks: 240 total,   1 running, 239 sleeping,   0 stopped,   0 zombie
%Cpu(s):  7.3 us,  0.5 sy, 79.3 ni, 12.3 id,  0.5 wa,  0.0 hi,  0.0 si,  0.0 st
KiB Mem : 16295268 total,  7883540 free,  2942292 used,  5469436 buff/cache
KiB Swap: 16644092 total, 16518652 free,   125440 used. 12811708 avail Mem

  PID USER      PR  NI    VIRT    RES    SHR S  %CPU %MEM     TIME+ COMMAND
10729 russ       0 -20 4695180 1.793g  53888 S 750.0 11.5  12207:25 ghb
 2784 russ      20   0 2222092 222564  83200 S  25.0  1.4  69:44.85 cinnamon
10919 russ      20   0  206436  23020  19892 S   0.3  0.1   1:53.66 xsensors
    1 root      20   0  185376   5116   3368 S   0.0  0.0   0:01.16 systemd
    2 root      20   0       0      0      0 S   0.0  0.0   0:00.00 kthreadd
    4 root       0 -20       0      0      0 S   0.0  0.0   0:00.00 kworker/0:0H
    6 root       0 -20       0      0      0 S   0.0  0.0   0:00.00 mm_percpu_wq
    .
    .
    .
Dealing with the Linux filesystem
Linux, like UNIX, tolerates colons, hyphens, slashes, spaces, etc. in filenames, but it's not always the easiest thing to manage.
Here are sample commands I use to move ripped DVDs from my development host (workstation) to my Plex Media server (hostname, taliesin), and clean up afterwards. Following that is a filesystem snapshot from my server illustrating this point taken in the middle of ripping this series.
~/Videos $ scp "Foyle's War - s02e02 - Among the Few.mkv" taliesin.site:/plex-server/TV/Foyle\\\'s\\\ War/Season\\\ 2
~/Videos $ rm "Foyle's War - s02e02 - Among the Few.mkv"
russ@taliesin:/plex-server/TV$ tree "Foyle's War"
Foyle's War/
+-- Season 0
|   +-- Foyle's War - s00e01 - Writer, Anthony Horowitz.mkv
|   +-- Foyle's War - s00e02 - Writer, Anthony Horowitz.mkv
|   `-- Foyle's War - s00e03 - Recap of Seasons 1-6.mkv
+-- Season 1
|   +-- Foyle's War - s01e01 - The German Woman.mkv
|   +-- Foyle's War - s01e02 - The White Feather.mkv
|   +-- Foyle's War - s01e03 - A Lesson in Murder.mkv
|   `-- Foyle's War - s01e04 - Eagle Day.mkv
+-- Season 2
|   +-- Foyle's War - s02e01 - Fifty Ships.mkv
|   `-- Foyle's War - s02e02 - Among the Few.mkv
+-- Season 3
+-- Season 4
+-- Season 5
+-- Season 6
+-- Season 7
`-- Season 8
    +-- Foyle's War - s08e01 - The Eternity Ring.mkv
    +-- Foyle's War - s08e02 - The Cage.mkv
    `-- Foyle's War - s08e03 - Sunflower.mkv
In the previous example, there is a bewildering string of backslash (escape) characters. Some command-line tools will auto-complete when the Tab key is pressed with only part of the name specified. That's helpful: let the shell figure out how best to render. This strategy works also in the case of quoting the name.
If I have a particularly nasty character such as a colon, I cannot copy it. Even on Windows, it's impossible to use a colon in a file name since it indicates a volume. On Linux, you can use it in a filename, but it's devilishly hard to get command-line tools to be okay with it.
~/Videos $ scp "Jack the Ripper: My Story.mkv" taliesin.site:/plex-server/Movies
ssh: Could not resolve hostname Jack the Ripper: Name or service not known
And, it is similarly impossible to specify a subdirectory as scp's target with a colon too. So, I change it thus and it works very well:
~/Videos $ mv "Jack the Ripper: My Story"  "Jack the Ripper--My Story"
~/Videos $ scp "Jack the Ripper--My Story" taliesin.site:/plex-server/Movies
Jack the Ripper--My Story                                       100%    0     0.0KB/s   00:00
~/Videos $ rm Jack\ the\ Ripper--My\ Story
My last observation is that if you're fastidious with the backslash, you can avoid the double quotes. This is useful if your filename makes use of double quotes.
Last, it is possible to entitle movies and television series filenames using dots (periods) in place of spaces and otherwise simplify filenames making them easier to manage. I did not know this when I started, and have not experimented with it, though I've seen it done on other Plex servers, and I do not plan to for sake of a) clarity and b) uniformity.
The Plex server
See also Steps ripping DVDs with Handbrake. These are a rehash of what I've written above. I'll try to conflate both into the best documentation at some future point. Also, see more information below at Finessing Handbrake.
You should have created a folder, Movies (or Videos), on your Plex server. The Videos folder is typically more for stuff that's not a formal movie in mkv format, etc. For television series, use TV. See Television example: Inspector Lewis.
Under this folder, create another folder by the name of the DVD you've copied. Copy the ripped movie there.
Pop up a browser to hostname:32400/manage, then, under My Library, click Movies (or Videos, depending) and then, near the upper-right, look for the clockwise circular arrow. Click that to tell Plex to refresh and bring your movie in to see.
If you hover over the movie, you can get three icons to the upper-right, one of which will be a pencil. Click that and fill in:
- Title—as you wish to see it.
- Summary—as you wish.
- Change Poster—only if Plex supplied something really bogus. You will often be given alternatives to choose or you can just download an image to a file, then copy and paste it in yourself.
- Fill in anything else that suits your fancy.
- Click Save.
Matroska (MKV) format
Plex can transcode just about any file type. Matroska is nice because the multiple audio streams, subtitles, etc. are all in one file.
This is not the case for all formats. For example, .mp4. If you look at .mp4 movies with subtitles, they'll have a separate .srt file for subtitles.
So far as the Plex clients can tell, these formats are exactly the same. Performance is identical.
Finessing Handbrake
It's best to use Matroska format, this produces a .mkv instead of a .m4v file.
Subtitles
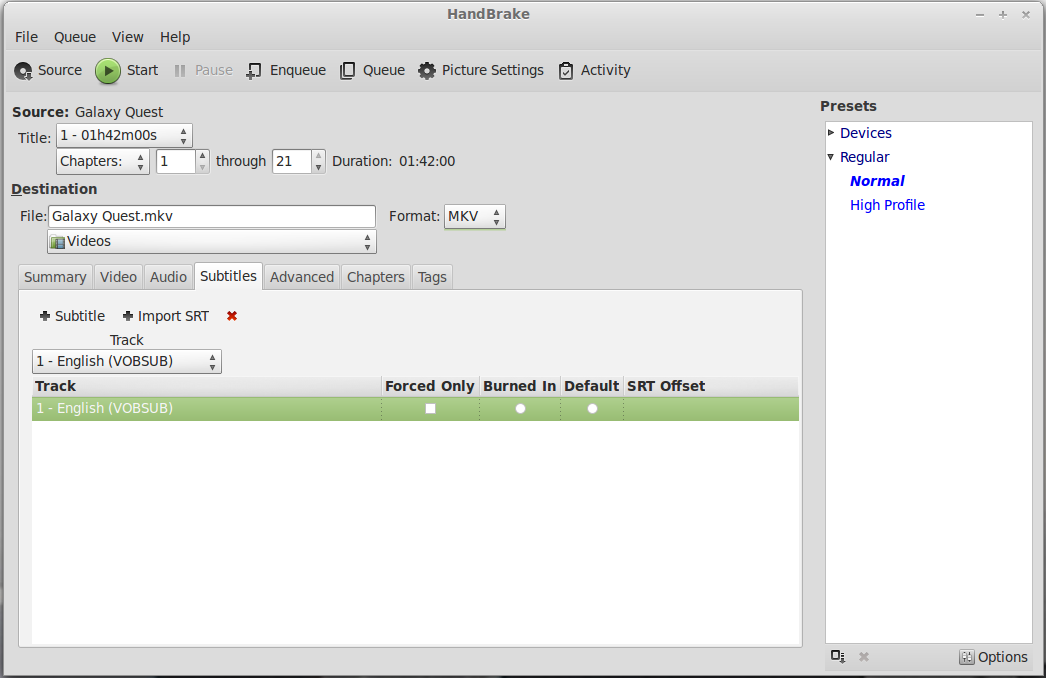
You must format as Matroska in Handbrake to get subtitles included in the file with the contenti (this is the virtue of Matroska). Please note that here, I expect to have English subtitles optionally for the title, Galaxy Quest, I will have to select them by hand if I want them and I assume they're adequately synchronized with the content. (Click this image to see full size.)
If you have a subtitles file, usually with the extension .srt, you can "fold" it into the final MKV file by selecting it through the subtitle mechanism in Handbrake. Look for this if it's your case; I'm not really covering it here, however, the following still mostly applies.
- Click Subtitles tab.
- Click + Subtitle.
- Choose language.
- Select how you wish subtitles to work:
- Forced Only means, blah, blah, blah. (I don't do this.)
- Burned In means that the subtitles will become as if part of the image and you can not make them go away. This option is mutually exclusive with Default.
- Default means that by default, the subtitles are turned on and you'll have to turn them off if you don't want them. This option is mutually exclusive with Burned In.
- SRT Offset gives you the possibility of specifying how many (seconds?) to delay or advance the subtitles. You would decided this based on observing the content, I presume. This may be more for when you import the subtitles from another or separate source.
Using Handbrake on Microsoft Windoz
Download and install Handbrake as you would another Windows application. (This is here for completeness; Windoz interests me not at all.)
Steps to rip a DVD or Blu-ray movie:
- Put disk in drive.
- Dismiss VLC Media Player (or other player as comes up).
- Click Source button.
- Choose Open Folder.
- Choose This PC.
- Select DVD/Blu-ray volume that has the movie.
- Select either the movie by name of "VIDEO_TS."
- Click Select Folder to dismiss the find-file dialog.
- Select Output Setting, MKV.
- Name the movie: Destination: (edit field)
- Put in extension .mkv.
- Setting the name is actually a browsing or find-file operation, a "Save as" exercise to pick where the output file is to go.
Warning
Windows desperately wants to name the file with a .mp4 extension. Be careful to change it at the bottom of the "Save as" dialog to mkv. - Click Video tab.
- Adjust the slider to 18.
- Click Subtitles tab.
- Click Add
- Ignore voice-over setting (Vob), choose captions or English subtitles.
- Click Picture tab.
- Click Start (the green button).
Random notes to integrate properly as time goes
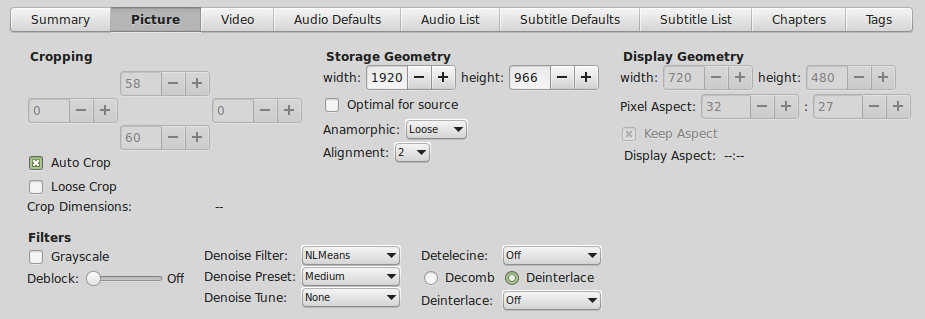
- The Advanced tab makes it so you can change from "Unknown" to the actual language name if that's a problem. Put Sample Rate on 48 (the highest).
- Summary tab: If adjustable, never turn on Autocrop. This might be under the top tab, Picture Settings.
- Picture Settings. Dimensions to change, Filters, normally not touched.
- While ripping multiple files, while one is ripping, you can get ready for the next by choosing the next Title: and File: name and being ready to click Start before the current one has finished ripping.
Handbrake custom settings
This used to be inserted surgically into a presets file (XML), but in the last couple of versions of HandBrake, this has no longer been possible (but then, in later versions, it began to be possible again; see next section). Instead, I offer these (Linux version) screen dumps for adjusting the settings tediously by hand. The first thing to do is to create a yify-mkv in the presets list by doing Presets → New Folder. I have had some trouble getting this work cleanly (I think it's simpler in the Windows version).
These settings were originally done using similar screen dumps from my nephew's Windows version. Not all the settings matched, but when I finished, I was nevertheless getting the smashing 10%-sized Matroska files with great video.
Warning: these setting are not guaranteed to be the best treatment of a film in every case. I've found if you've got a movie with nasty visual stuff going on inside, like the sandstorm at the end of American Sniper, the result is pretty botched and you'll see precious little of what's going on in any detail. (I sacrifice excellent quality at rare moments to the overall effort to minimize impact on my disks.)
HandBrake main page
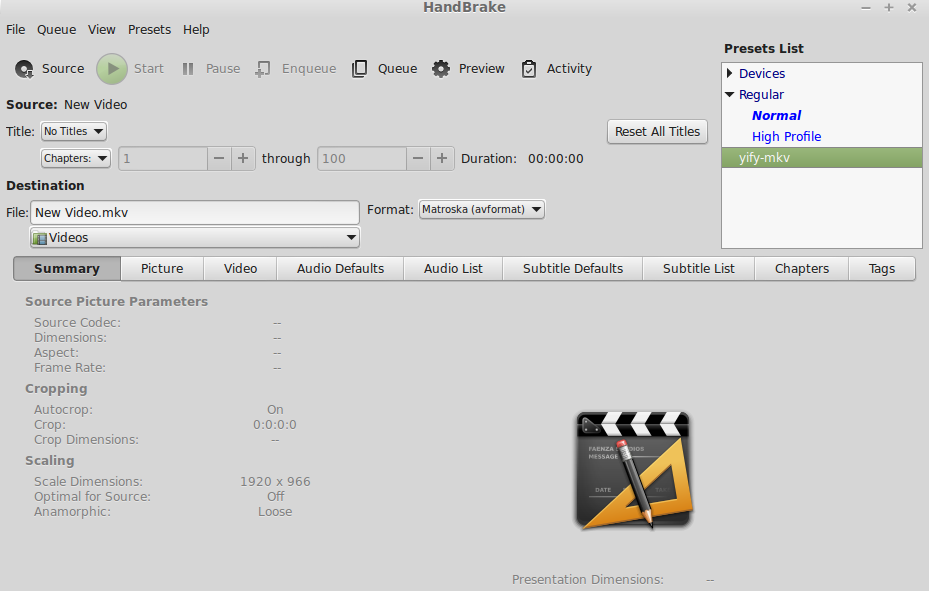
Select this new folder and then, tab by tab, effectuate these settings.
Picture
Video
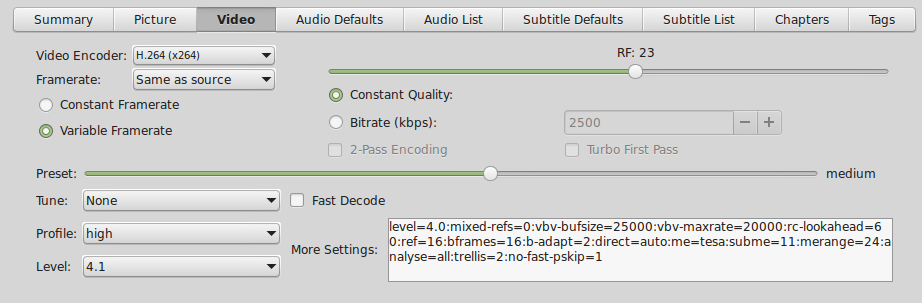
Here are the text-video settings for copying and pasting. Because of page width here, it's in two pieces. There should be no space between the pieces when you've finished. Indeed, there should be no spaces whatsoever in this data.
level=4.0:mixed-refs=0:vbv-bufsize=25000:vbv-maxrate=20000:rc-lookahead=60:ref=16:bframes=16:
b-adapt=2:direct=auto:me=tesa:subme=11:merange=24:analyse=all:trellis=2:no-fast-pskip=1
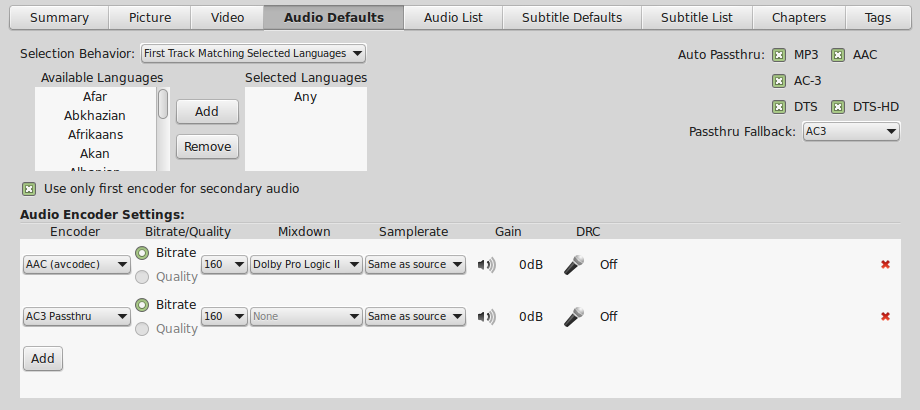
Audio defaults
When finished, I think you do Presets → Save. This part is also botchable and you may need to start over until you get the hang of the Presets menu sequence. I'm writing this a year later bracing myself for an update to HandBrake.
XML-surgery way of specifying presets...
Here are the custom settings I got from my nephew, who's been ripping Blu-rays for years for use with Handbrake. If you know how to import- or otherwise integrate them into Handbrake, they'll serve you well.
- Insert from file all between plist (exclusive) at a good point, which you'll have to analyze by looking at successful one.
- Play with importing preset.
<?xml version="1.0" encoding="utf-8"?>
<!DOCTYPE plist PUBLIC "-//Apple//DTD PLIST 1.0//EN" "http://www.apple.com/DTDs/PropertyList-1.0.dtd">
<plist>
  <array>
    <dict>
      <key>AudioList</key>
      <array>
        <dict>
          <key>AudioBitrate</key>
          <string>160</string>
          <key>AudioEncoder</key>
          <string>AAC (faac)</string>
          <key>AudioMixdown</key>
          <string>Dolby Pro Logic II</string>
          <key>AudioSamplerate</key>
          <string>Auto</string>
          <key>AudioTrack</key>
          <integer>1</integer>
          <key>AudioTrackDRCSlider</key>
          <real>0</real>
          <key>AudioTrackDescription</key>
          <string>Unknown</string>
          <key>AudioTrackGainSlider</key>
          <real>0</real>
        </dict>
      </array>
      <key>AudioAllowAACPass</key>
      <integer>1</integer>
      <key>AudioAllowAC3Pass</key>
      <integer>1</integer>
      <key>AudioAllowDTSHDPass</key>
      <integer>1</integer>
      <key>AudioAllowDTSPass</key>
      <integer>1</integer>
      <key>AudioAllowMP3Pass</key>
      <integer>1</integer>
      <key>AudioEncoderFallback</key>
      <string>AC3 (ffmpeg)</string>
      <key>ChapterMarkers</key>
      <integer>1</integer>
      <key>Default</key>
      <integer>0</integer>
      <key>FileFormat</key>
      <string>MKV file</string>
      <key>Folder</key>
      <false />
      <key>Mp4HttpOptimize</key>
      <integer>0</integer>
      <key>Mp4LargeFile</key>
      <integer>0</integer>
      <key>Mp4iPodCompatible</key>
      <integer>0</integer>
      <key>PictureAutoCrop</key>
      <integer>1</integer>
      <key>PictureBottomCrop</key>
      <integer>0</integer>
      <key>PictureDeblock</key>
      <integer>4</integer>
      <key>PictureDecomb</key>
      <integer>0</integer>
      <key>PictureDecombCustom</key>
      <string />
      <key>PictureDecombDeinterlace</key>
      <integer>1</integer>
      <key>PictureDeinterlace</key>
      <integer>0</integer>
      <key>PictureDeinterlaceCustom</key>
      <string />
      <key>PictureDenoise</key>
      <integer>3</integer>
      <key>PictureDenoiseCustom</key>
      <string />
      <key>PictureDetelecine</key>
      <integer>0</integer>
      <key>PictureDetelecineCustom</key>
      <string />
      <key>PictureHeight</key>
      <integer>0</integer>
      <key>PictureKeepRatio</key>
      <integer>1</integer>
      <key>PictureLeftCrop</key>
      <integer>0</integer>
      <key>PictureModulus</key>
      <integer>2</integer>
      <key>PicturePAR</key>
      <integer>2</integer>
      <key>PictureRightCrop</key>
      <integer>0</integer>
      <key>PictureTopCrop</key>
      <integer>0</integer>
      <key>PictureWidth</key>
      <integer>720</integer>
      <key>PresetBuildNumber</key>
      <string>2013052900</string>
      <key>PresetDescription</key>
      <string>No Description</string>
      <key>PresetName</key>
      <string>YIFY-MKV</string>
      <key>Type</key>
      <integer>1</integer>
      <key>UsesMaxPictureSettings</key>
      <integer>1</integer>
      <key>UsesPictureFilters</key>
      <integer>1</integer>
      <key>UsesPictureSettings</key>
      <integer>2</integer>
      <key>VideoAvgBitrate</key>
      <string />
      <key>VideoEncoder</key>
      <string>H.264 (x264)</string>
      <key>VideoFramerate</key>
      <string>Same as source</string>
      <key>VideoFramerateMode</key>
      <string>cfr</string>
      <key>VideoGrayScale</key>
      <integer>0</integer>
      <key>VideoQualitySlider</key>
      <real>20</real>
      <key>h264Level</key>
      <string>Auto</string>
      <key>x264OptionExtra</key>
      <string>ref=16:bframes=16:b-adapt=2:direct=auto:me=tesa:merange=24:subq=11:rc-lookahead=60:analyse=all:trellis=2:no-fast-pskip=1</string>
      <key>x264Preset</key>
      <string>medium</string>
      <key>h264Profile</key>
      <string>none</string>
      <key>x264Tune</key>
      <string>none</string>
      <key>x264UseAdvancedOptions</key>
      <integer>1</integer>
      <key>VideoQualityType</key>
      <integer>2</integer>
      <key>VideoTargetSize</key>
      <string />
      <key>VideoTurboTwoPass</key>
      <integer>0</integer>
      <key>VideoTwoPass</key>
      <integer>0</integer>
      <key>x264Option</key>
      <string>ref=16:bframes=16:b-adapt=2:direct=auto:me=tesa:merange=24:subq=11:rc-lookahead=60:analyse=all:trellis=2:no-fast-pskip=1</string>
    </dict>
  </array>
</plist>
Update, 30 August 2016
Having had to reinstall my present (i7) host from scratch, which I did using Linux Mint 18 LTS, I'm trying to use the above presets this way:
- Copy the presets above to a new file; I named mine, ~/Downloads/yify-presets.plist.
- Launch HandBrake.
- Do menu Presets → Imports, (see below) then navigate to Open this new file.
- You should see, in the Presets List, YIFY-MKV appear.
- From now on, when launching HandBrake, just select this new set of presets before transcoding.
Update, 16 February 2021
Imports —in the latest version much of the interface has changed. It looks nicer, but it's harder to use. Also, it appears that the preferred language of presets now is JSON. Fortunately, XML is supported by legacy. The instructions above work.
My preliminary assessment is that this works. I did this for The Gypsy Warriors and for a new copy of Ferris Buellar's Day Off from a Blu-ray I just bought.
What movie/television file is HandBrake currently transcoding?
This might arise if I happen to be at work and wonder what's going on at home where I'm running HandBrake. In other words, I'm at the command line not in the GUI.
~/Videos $ ps -ef | grep [g]hb
russ     24753  2086 99 Mar09 ?        4-18:17:51 /usr/bin/ghb
~/Videos $ ll /proc/24753/fd
total 0
dr-x------ 2 russ russ  0 Mar  9 21:03 .
dr-xr-xr-x 9 russ russ  0 Mar  9 21:03 ..
lr-x------ 1 russ russ 64 Mar  9 21:03 0 -> /dev/null
l-wx------ 1 russ russ 64 Mar  9 21:03 1 -> /dev/null
lrwx------ 1 russ russ 64 Mar  9 21:03 10 -> socket:[30394220]
lrwx------ 1 russ russ 64 Mar  9 21:03 11 -> /home/russ/.config/ghb/ghb.pid.24753
lr-x------ 1 russ russ 64 Mar  9 21:03 12 -> anon_inode:inotify
lrwx------ 1 russ russ 64 Mar  9 21:03 13 -> socket:[30375777]
lrwx------ 1 russ russ 64 Mar  9 21:03 14 -> socket:[30394763]
lrwx------ 1 russ russ 64 Mar  9 21:03 15 -> anon_inode:[eventfd]
lrwx------ 1 russ russ 64 Mar  9 21:03 16 -> socket:[30394224]
lrwx------ 1 russ russ 64 Mar  9 21:03 17 -> socket:[30394225]
lr-x------ 1 russ russ 64 Mar  9 21:03 18 -> pipe:[30394226]
l-wx------ 1 russ russ 64 Mar  9 21:03 19 -> pipe:[30394226]
l-wx------ 1 russ russ 64 Mar  9 21:03 2 -> pipe:[30394226]
l-wx------ 1 russ russ 64 Mar  9 21:03 20 -> /home/russ/.config/ghb/Activity.log.24753
lrwx------ 1 russ russ 64 Mar  9 21:03 21 -> socket:[30394779]
lrwx------ 1 russ russ 64 Mar  9 21:03 22 -> socket:[30392179]
lrwx------ 1 russ russ 64 Mar  9 21:03 23 -> socket:[30407764]
l-wx------ 1 russ russ 64 Mar  9 21:03 24 -> /home/russ/.config/ghb/EncodeLogs/Madea Goes to Jail 2017-03-09 21-05-53.log
lr-x------ 1 russ russ 64 Mar  9 21:03 25 -> /home/russ/Videos/MADEA/Madea_Goes_to_Jail_t00.mkv
l-wx------ 1 russ russ 64 Mar  9 21:03 26 -> /home/russ/Videos/Madea Goes to Jail.mkv
lrwx------ 1 russ russ 64 Mar  9 21:03 3 -> socket:[30394216]
lrwx------ 1 russ russ 64 Mar  9 21:03 4 -> anon_inode:[eventfd]
lrwx------ 1 russ russ 64 Mar  9 21:03 5 -> socket:[30394218]
lrwx------ 1 russ russ 64 Mar  9 21:03 6 -> anon_inode:[eventfd]
lrwx------ 1 russ russ 64 Mar  9 21:03 7 -> socket:[30394219]
lrwx------ 1 russ russ 64 Mar  9 21:03 8 -> anon_inode:[eventfd]
lrwx------ 1 russ russ 64 Mar  9 21:03 9 -> anon_inode:[eventfd]
How to use HandBrake to snip (or pre-snip)
I figured out how to reopen a video I wanted to truncate, set the Range in Seconds to 23:30 (down from 25:50 or something like that), then click Start. When it finished, I recopied it back out to Plex and it was just right. It's also possible (from right there) to pre-snip it too if needed.