Chef Quick-start
Russell Bateman
28 June 2013
last update:
Chef Quick-startRussell Bateman |
(If the floating menu to the right overlays
too much of the content of this article,
widen your window or contact me.)

Sometimes, people make something complex very complicated and put-offish indeed and perhaps not intentionally. Or, they suffer from a complex that makes them want to wear pointy black hats with moons and stars on them. Whatever the case, I found the Chef learning curve particularly steep and this is me flattening it albeit with a few caveats.
Caution: I'm not an experienced Chef expert. I'm not an expert at all; this is more an attempt at documenting willy-nilly the path of success I found while hacking my way through the forest. Here's a work that is more professional and might be better if longer: Getting Started with Chef
Chef tends to over-burden with the importance of Ruby and Gem. As you go, you'll understand why this happens, but it doesn't need to be at least at first.
My experience with Chef began a month or so before I wrote this. At work, I have a working if still emerging environment. At home, where I have a small VMware ESXi installation of my own to play with, I have a complete Chef 11.x set-up I play with. Beware: this article was written as I teetered between Chef versions 10 and 11. I have tried to note the differences.
Once you get up and going and want to write sophisticated cookbooks and recipes that do very sophisticated things, you'll really need to a) learn to write them using Ruby and JSON, and/or b) steal existing recipes (and there are a lot available). Your head will ache when you read the recipes you steal (b) until you become more or less capable of (a).
'Nuf said, let's get started. Here are the steps to a minimal, stand-alone VM set-up using Chef and a couple of cookbooks and recipes.
In an appendix at the end of this page (and in the floating index to the right here if it's working) is an even more concise list of steps of all that's going to happen here if you'd like a much higher view before getting started or any time during this tutorial.
There exists the ability to use a community set-up where Opscode hosts the server portion, but this isn't what I needed, so I'm not covering it here. There also exists something named Chef Solo—still not what I'm covering here. This is a real, if still no-cost, Chef server running on your hardware.
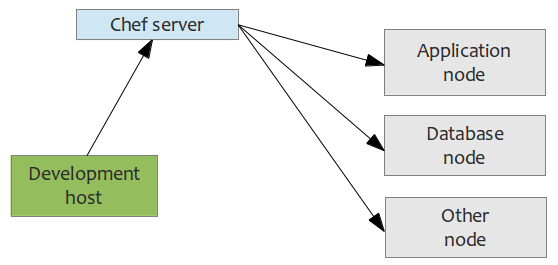
This is the VM or other real hardware whose set-up is the very reason you want to learn Chef in the first place (grey in the adjoining illustration). Again, this is your hardware whether virtual or real.
This is just a workstation. It could be Windows, Macintosh or Unix/Linux. My examples are on Linux Mint, so you'll need to understand shell commands and how to translate them to Windows if that's what you're running. It's from this host that you'll administer Chef and perform the vast majority of the steps.
This happens on the development host and is probably what you came to this page for in the first place.
In the very recent past (May 2013), this has gotten easier. It is two downloads. It's supposed that disparate versions of Chef can be mixed. (I run a 10.x server with 11.x client nodes.)
$ dpkg -i chef-server_10.18.2-1.ubuntu.12.04_amd64.deb
During this installation, you'll be asked (probably via some TUI), for some information:
              IP address/URL for Chef server: 16.86.192.111
    password for user admin in vhost "/chef": Escoffier
...including an administrator password. (The password I chose for this guide is the name of a famous French chef.) Make note of your password for later. Note also your server's IP address.
1 Note that the Chef server install is always a download.
2 In versions of Chef prior to 11.x, this was named /etc/chef.
$ dpkg -i chef-server_11.4.4-2.ubuntu.12.04_amd64.deb
$ knife configure client ./
This will create...
    root@app01:/etc/chef# ll
    total 20
    drwxr-xr-x  2 root root 4096 Jul  1 18:00 ./
    drwxr-xr-x 92 root root 4096 Jul  1 17:44 ../
    -rw-r--r--  1 root root  128 Jul  1 17:44 client.rb
    -rw-r--r--  1 root root    1 Jul  1 17:44 validation.pem
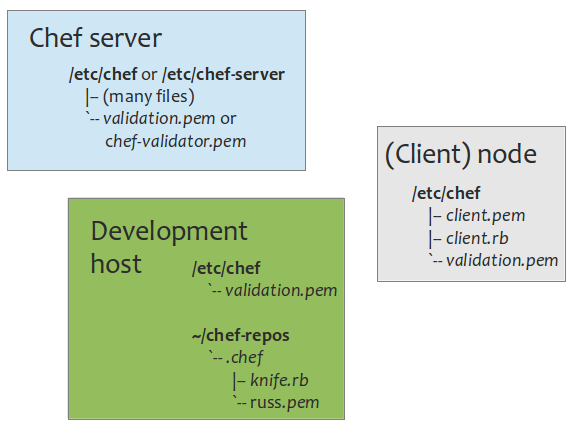
Note: validation.pem will always exist, but contain only a newline on client nodes (including on a development host).
chef_server_url 'http://16.86.192.111:443'
It was probably created by default as "localhost:443". (Note that, prior to Chef 11.0, the port numbers were 4000 and 4040 for HTTPS.)
    -----BEGIN RSA PRIVATE KEY-----
    MIIEpAIBAAKCAQEArrttkL6iiv8l9UMLkxth6v7I+Mu5vf+0M/t+HXqqikuq0Nui
    Zd8xMUalAwd0nnaXSYlOC2pa/BMmml98abGh+jlTCJ0VpxyLUjqc24Y9mEmEBpP1
    /Yoj9pZS8V8W8w8tm5sYdjiVhAYKafad/aA2gXXo6ztCYwnxjj8wjsGnV9I+81Sf
    pA0zZ5qzbFlaW95MYeuSwe9zTu4Ve0UK9TwqbraijpxzzAHoMtdFsk+MUd+7DXGm
    nl4GiLWhWyEBY9Rhh5zZOpK+OtyGKe1qShUHb/WqE1Yk0yPKd8SaBDvvjGO62Oiz
    XVh8cIfR1/mbrnTS85UG2BKfb17Ii0lRbGOCSQIDAQABAoIBAAVTBsKrXG6Z2cFA
    esDPy8sKWntiUdWdThNrbWteioXOSnU0zB0IkQosWejeuEn/2RpPicZFRmJ5/uoj
    ULozxHjIeGRBzSAbeY9W4+K4k3Xpf5Fnvs4sAG6KJBrgx+U+KCiesD8h+ERensCd
    2DCbSi3ltuQ8GQjFi8vG1ybydbPyUj5q7SHjgRtRzZ+0eVr3RMoilZu2RskV0RF8
    V2V2EnJBSQyFPsCTgbKHhMUGZbLlojWh0H7Blmnszbk5DGEIv7KEjJDTTko3pMI7
    znX4gDBuDDG+9ccl8g42/9yQ/eB2IMkaupmFrIaTdpwt66fRhEhVmYnyt/cxrH8F
    dflDjgUCgYEA16bQzAre0G5XJzk5tx4XymQJAk3+5SduQxk1NhHdSQjnoKWp2pBu
    ROH1VXNgL8dx+Qxtt1stzT386qxkliAdVCNkdTc0W2NBW366D/+d4LQnzoXjBLKE
    hn03DLkcE7k/LZ1usehT9BEcY53V+cgPa1QgtjXeJu2/nQOC93p6tScCgYEAz2yr
    XhHbUY/mvmLMbuHo5QhZTaBv6iZlhdBBM2Qk0jqkaJ3q3z+lSx1zJFm0r1CzGKC9
    aZzpkWwm4DamKiHbG9fRcQpvjJDaPYdczEhKhRePOEMUEV8WVH62Tqm/yS3GK6Xw
    PKZWL2AP4J7UjxbUqak2SUGkpmkOGJjUdADXEw8CgYEAwSd9JQUnhXEPRuaOt2GQ
    1Yq8NwA9Kmsi656Mdp2RonUDYnR/qnBrE+9/msX4hVMS1os3Sl+0qny3KEq43W5u
    VopM1GBZ2PER/S2I4gOGGVnDvctWB0MOSJem0xKJ/3CREf5Mw7TgXV9mGiOpIEz8
    4pk7o3ikPiH82lnm2FsvxUkCgYANtsSZwpp6iQYbflK/3gXU5rlozXu4wnMh5sP4
    zt00XRYzqIU333BhSAAt3hR5Jt/AeBgt3GcA62KinlpcHMLs01cQnz0C0Szstn9n
    LjxnEkiw0paIE35Zdcs95jE87t7UUfNRPzohhbtnAXlSQJMs6HgjXciyC+4XqDsb
    tFaD9wKBgQCYaKDq5hbF/m5e9VCmCr38iy/okCQRQuVUGpXvFFYP9dx2qJMDL2f+
    a7wD2zWX/V2Lg3YG0VCj+0qiYxWOD+wxHsUKvvqXnSEtS2GsY8fLeB8MtHadEG2Q
    wHxZNXK2TxennULyWrjqH5JYg9l2FmsGdLlDQQmX+d+dT/h+UIKShQ==
    -----END RSA PRIVATE KEY-----
We'll have to leave off setting up our Chef client node just a bit to set up our development host. We could do it using the Chef server web interface,* but it's not how I want to show it. First, we have to set up the developer host we're going to use to administer Chef. After that we'll finish this step.
* With Chef, there are always half a dozen ways to do any one thing.
I leave the choosing to you with the caveat that I use Linux here.
Please install a Chef client on the development host you've chosen just as you did for the VM node you chose to install in step 2, but don't run the knife configure client command yet.
Once the Chef client is installed on your development host, here are the steps to setting it up.
    ~ $ tree chef-repos
    chef-repos
    |— .chef
    |— cookbooks
    |— nodes
    `— roles

    4 directories
16.86.192.111 chef-server
    log_level                :debug
    log_location             STDOUT
    node_name                'russ'
    client_key               '/home/russ/chef-repos/.chef/russ.pem'
    chef_server_url          'https://16.86.192.111:443/'
    cookbook_path            "/home/russ/chef-repos/cookbooks"
    cookbook_email           "[email protected]"
    cache_type               'BasicFile'
    cache_options( :path => '/home/russ/chef-repos/checksums' )
http://16.86.192.111:400/
You'll discover that you must use username admin and the password you gave during the Chef server installation.
At this point, you should be able to get some warm fuzzies from typing
$ knife cookbook list
It won't return anything, but the fact that it doesn't display an error means you've contacted your Chef server and it has replied that you've not created any cookbooks.
This file controls a lot of things you're about to use such as:
Note: You can create as many instances of this chef-repos filesystem on your development host as you like and these instances can be named anything you like. If you're a developer operations persons working with more than product team, this might come in handy.
Remember we said we'd need to tell Chef about the node we want to administer? Here's where we'll do it using knife and a file (or some files) we create. In order to use knife instead of the web interface, we had to get our administration node—our development host—set up first. As I say elsewhere in here, we want as much of our set-up done using files where possible so that we can a) remember this stuff in Git and b) recover from catastrophic system errors that would erase this knowledge in the Chef server web interface.
Nota bene: Even though we're talking about setting up a Chef client node here, this is all done on the development host.
This is a JSON representing of information defining this node. In some systems, this is done using a .yml file, but I haven't reached that grade in Chef school yet. What's really important is the run_list1.
{
    "normal": { },
    "name": "app01",
    "override": { },
    "default": { },
    "json_class": "Chef::Node",
    "automatic": { },
    "run_list":
    [
        "recipe[tomcat6]",
        "recipe[xyz]",
        "role[application_node]"
    ],
    "chef_type": "node"
}
    ~/chef-repos $ knife node from file app01.json
    knife node from file app01.json
    Updated Node app01!
1 The run_list tells Chef what recipes to install and in what order. It also tells it what role is going to do this. In our case, these are cookbooks with exactly one recipe each.
For this tutorial, we're only setting up a single node. Any additional nodes are set up identically. There is sophistication you can perform in Chef, using .yml files, etc. to fold a lot of common and redundant stuff into this process. I'm not showing that.
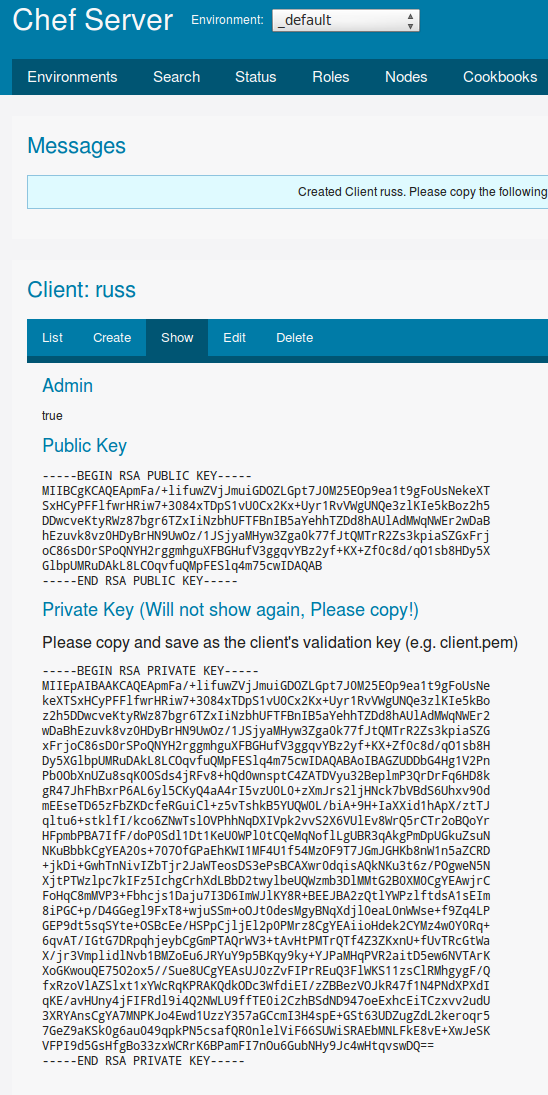
Unless you don't wish to log into the Chef server web interface as admin, there aren't many reasons to create another user. However, we do want to create a client, just as we did for the client node we want to manage, which is really crucial to finishing our development host set-up.
Chef documentation is slightly confusing with its use of the word client. To help disambiguate, I like to keep this term for the up-coming concept and, if I use it with nodes, I make sure I never say only "client" when I mean "client node". Here, we're talking about your Chef client that does real work, i.e.: the administrating development host and not the working node you're going to set up (on which you'll only ever run the command, chef-client).
While you will usually log into the Chef server web interface as admin, you'll use the Chef knife utility as yourself. This is what we're setting up here and Chef knows you as the .pem file which contains your private key when you use knife. Here, I'm russ.pem.
We're only going to create one client. If you've got a colleague that's going to help you administer Chef, he or she will need a separate one (all the while probably consuming the chef-repos contents from common Git repository).

    ~/chef-repos $ ll .chef
    total 16
    drwxr-xr-x 2 russ russ 4096 Jun 28 10:23 .
    drwxr-xr-x 9 russ russ 4096 Jun 28 10:09 ..
    -rw-r--r-- 1 russ russ  133 Jun 28 10:23 client.rb
    -rw-r--r-- 1 russ russ 1679 Jun 28 13:34 russ.pem
Roles are an artificial designation in Chef to help organize who does what in the setting up of a Chef client node. For example, ensuring the installation of Tomcat or your database might be considered a role.
You can make a role to be as powerful and run as many recipes as you like, for example, set up an entire application or database server node, or as granualar and pointed, such as only to install Tomcat or MySQL as part of what a node needs. As you chef more and more, it will dawn on you just how granular you should be. If in doubt, be granular. This will make Legos™ you can use to set up different types of nodes.
For our purposes, we're going to create one role, application_node. We could use knife to set up our role, which we'd immediately see in the Chef server web interface, but we want a written record of what we're doing so we don't have to look in the web interface, which might go missing if the Chef server ever died.
You should give thought here to commiting everything to Git or a suitable version-control system that we do here for recoverability.
    name "application_node"
    description "Role for managing web application server nodes"

    for_application_servers = %w{
	    recipe[tomcat6]
	    recipe[xyz]
    }

    run_list for_application_servers
    ~/chef-repos $ knife role from file application_node.rb
    Updated Role application_node!
This installed a new role, application_node, into Chef which you can see in the web interface by clicking the Roles tab. It also told Chef that this role knows of and uses two recipes (out of two cookbooks), which we haven't written yet.
We set up a node, app01, with a file, app01.json, in a previous step here. By "node" or "client node", we mean one or more VMs you're administrating using Chef.
Cookbooks are another area in which Chef terminology gets flaky if in a different way. You may become confused about the difference between recipes and cookbooks.
Cookbooks are collections of recipes. Your cookbook here, in its subdirectory, is one and it will hold one or more recipes. You could create others. I'm not going to illustrate that so all you'll see is a bunch of cookbooks under the Cookbooks tab of the web interface, but no recipes by name.
Much of Chef documentation uses "recipe" for "cookbook" when a cookbook contains only one recipe. It's confusing. Just beware.
We'll create two cookbooks with one recipe each here.
This is a recipe for an imaginary web application, xyz.
~/chef-repos/cookbooks $ mkdir -p xyz xyz/files/default xyz/recipes templates/default
    maintainer       "Despicable Me"
    maintainer_email "[email protected]"
    license          "Apache 2.0"
    description      "Fun web application (xyz) for application node (server) cluster"
    long_description IO.read(File.join(File.dirname(__FILE__), 'README.rdoc'))
    version          "1.0.0"
    = DESCRIPTION:
    Chef recipe for fun XYZ web application.

    = REQUIREMENTS:
    Tomcat
Note: When you grow up in Chef, these files, especially the second, will tend to acquire more and better information as you'll see soon when we create the tomcat6 recipe.
Admittedly, this is where my Chef quick-start tutorial goes south: I'm not going to go the trouble of creating your web application. Also, this recipe will install a Debian package. I'll try to come back later and add another recipe that copies a WAR file to /var/lib/tomcat6/webapps instead. I use a Debian package since I need to populate the filesystem under /opt with data.
    #
    # Cookbook Name::
    # Recipe:: xyz
    #
    # The purpose of this recipe is ONLY to deploy xyz.deb.
    #
    # The way this works is:
    # 1. A new xyz.deb is copied into cookbooks/xyz/files/default.
    # 2. The updated recipe is committed to Git.
    # 3. A Jenkins project notices that there's something new in Git.
    # 4. Jenkins runs a script that knifes the new recipe up to the Chef server.
    # 5. The next time an application node runs chef-client, which is controlled
    #      by a cron job, the new xyz.deb is deployed by this recipe
    #      using dpkg -i.
    #
    # Possible failures:
    # 1. xyz.deb doesn't have a later version than the existing one. This
    #      results in dpkg -i failing to install it.
    # 2. Something else we'll learn by experience and document here.
    #
    # Copyright 2013, Etretat Logiciels, LLC and Russell Bateman
    #

    # Copy the Debian package to /tmp. This package is put into the
    # recipe before replacing/updating the recipe on the Chef server.
    cookbook_file "/tmp/xyz.deb" do
	    source "xyz.deb"
	    mode   "0644"
	    owner  "root"
	    group  "root"
    end

    # Install the Debian package...
    dpkg_package "xyz" do
	    source "/tmp/xyz.deb"
	    action :install
    end
    ~/chef-repos $ knife cookbook upload xyz
    Uploading xyz            [1.0.0]
    Uploaded 1 cookbook.
There are two reasons I'm illustration the creation of a recipe that installs Tomcat 6 on a Chef node. First, the example of a web application simply requires it. Second, and more important, it illustrates how you can steal your way to Chef glory and win fame among your peers without much effort (sometimes).
The Internet is full of great, useful Chef cookbooks/recipes to do all sorts of things. Pop up your favorite browser and Google for "opscode chef recipe for tomcat". (When I Google for Chef stuff, I often add "opscode" to keep myself from getting distracted by food offerings.)
At or near the top of the list will be Opscode's own Tomcat recipe. I tried
that and found it wasn't quite what I wanted. However, removing "opscode"
from the search netted me, near but not at the top, this link:
https://github.com/b441berith/chef-cookbook-for-apache-tomcat-cluster
This is someone's somewhat simpler cookbook/recipe, if for Tomcat 7. The copyright notices do not discourage me from consuming this recipe though I preserve them.
Here's what I did to make this just the recipe I needed:
    ~/chef-repos $ knife cookbook upload tomcat6
    Uploading tomcat6        [1.0.0]
    Uploaded 1 cookbook.
At this point, we've finished our quick-start tutorial except for forcing one node (or as many as we want) to install itself with Tomcat 6 and our web application. We use ssh to get into our node, get root, then use the chef-client command to load our recipes, which is another way of saying "install software and configure" our client node:
    ~/chef-repos $ ssh app01
    Welcome to Ubuntu 12.04.1 LTS (GNU/Linux 3.2.0-48-virtual x86_64)

     * Documentation:  https://help.ubuntu.com/

      System information as of Fri Jun 28 15:43:59 MDT 2013

      System load:    0.0             Processes:           97
      Usage of /home: 6.1% of 937MB   Users logged in:     1
      Memory usage:   5%              IP address for eth0: 16.86.192.114
      Swap usage:     0%

      Graph this data and manage this system at https://landscape.canonical.com/

    Last login: Wed Jun 26 14:31:30 2013 from kalevala.site
    russ@app01:~$ sudo bash
    root@app01:~# chef-client
If you fail to create a client in the Chef server web interface, copy its private key and paste it into /etc/chef/client.pem, you'll get an error such as:
    root@app01:/etc/chef# chef-client
    ...
    Chef encountered an error attempting to create the client "app01"
    ...
If you get the following error...
    Authentication Error:
    ---------------------
    Failed to authenticate to the chef server (http 401).
    The request failed because your clock has drifted by more than 15 minutes.
    Syncing your clock to an NTP Time source should resolve the issue.
...or something like:
    [2013-07-08T18:29:08+00:00] INFO: HTTP Request Returned 401 Unauthorized: Failed to authenticate. Please synchronize the clock on your client

    ================================================================================
    Chef encountered an error attempting to load the node data for "app01"
    ================================================================================
...you'll need to ensure your client node has the same time as the Chef server. Did you set up NTP on your Chef server and client node as instructed? For help with this, see Notes on ntp.
Here are hints on more errors...
Try these steps to trouble-shoot:
At the end of this tutorial, here's the /home/russ/chef-repos filesystem:
    ~ $ tree chef-repos
    chef-repos
     |— .chef
     |   |— knife.rb
     |   `— russ.pem
     |— cookbooks
     |   |— tomcat6
     |   |   |— attributes
     |   |   |   `— default.rb
     |   |   |— files
     |   |   |   `— default
     |   |   |       `— apache-tomcat-6.0.37.tar.gz
     |   |   |— metadata.rb
     |   |   |— README.rdoc
     |   |   |— recipes
     |   |   |   `— default.rb
     |   |   `— templates
     |   |       `— default
     |   |           |— context.xml.erb
     |   |           `— server.xml.erb
     |   `— xyz
     |       |— files
     |       |   `— default
     |       |— metadata.rb
     |       |— README.rdoc
     |       `— recipes
     |— nodes
     |   `— app01.json
     `— roles
         `— application_node.rb
For more information, you can sort through the mess of the Chef Notes I took before writing this quick-start tutorial.
Of course, at some early point, you should spend time directly in Opscode Chef Home.
The biggest changes are here. If you are familiar with Tomcat, they are easily made. Otherwise, examine these and adapt to your environment. In particular, the ones in green almost certainly need to be different for you.
Of course, this is all overkill. When you install Tomcat, you don't usually need to modify the default server.xml. However, quibbling about this is beyond the scope of this document.
    node.default[:installPath] = "/usr/share/tomcat6/"
    node.default[:tomcatPath] = "/var/lib/tomcat6/"
    node.default[:serverPort] = 8005
    node.default[:connectorPort] = 8080
    node.default[:ajpPort] = 8009
    node.default[:hostIP] = "16.86.192.114"
    node.default[:multicastIP] = "228.0.0.4"
    node.default[:multicastPort] = 45564
    node.default[:nioAddress] = "16.86.192.114"
    node.default[:nioPort] = 4000
    node.default[:tempDir] = "/var/lib/tomcat6/webapps/"
    node.default[:deployDir] = "/var/lib/tomcat6/webapps/"
    node.default[:watchDir] = "/tmp/war-listen/"
The values in green are what I changed.
    maintainer       "Despicable Me"
    maintainer_email "[email protected]"
    license          "Apache 2.0"
    description      "Apache Tomcat 6 configuration for cluster"
    long_description IO.read(File.join(File.dirname(__FILE__), 'README.rdoc'))
    version          "1.0.0"
This wouldn't have to be changed, but I changed it a bit to make it more relevant to my use.
    = DESCRIPTION:
    Chef cookbook for Apache Tomcat in clustered environment

    = REQUIREMENTS:
    Ubuntu

    = ATTRIBUTES:
    node.default[:installPath] - path to install tomcat
    node.default[:tomcatPath] - full tomcat path after installation
    node.default[:serverPort] - by default 8005
    node.default[:connectorPort] - by default 8080
    node.default[:ajpPort] - by default 8009
    node.default[:hostIP] - use the host address
    node.default[:multicastIP] - by default "228.0.0.4" (per Apache)
    node.default[:multicastPort] - by default 45564 (per Apache)
    node.default[:nioAddress] - use the host address
    node.default[:nioPort] - by default 4000
    node.default[:tempDir] - temp dir for deploying
    node.default[:deployDir] - dir to deploy WARs
    node.default[:watchDir] - dir to watch WARs

    For more information see opscode tutorials.
Remember, we want to use this for Tomcat 6, not Tomcat 7. So, lots of stuff has to change. We picked the latest Tomcat 6 build. Also, as I plan to use this on an Ubuntu platform, I had to change from "debian" because, even though Ubuntu is Debian, I got an error out of Ruby land if I didn't change this.
    #
    # Cookbook Name:: apache-tomcat
    # Recipe:: default
    #
    # Copyright 2011
    #
    # Licensed under the Apache License, Version 2.0 (the "License");
    # you may not use this file except in compliance with the License.
    # You may obtain a copy of the License at
    #
    #     http://www.apache.org/licenses/LICENSE-2.0
    #
    # Unless required by applicable law or agreed to in writing, software
    # distributed under the License is distributed on an "AS IS" BASIS,
    # WITHOUT WARRANTIES OR CONDITIONS OF ANY KIND, either express or implied.
    # See the License for the specific language governing permissions and
    # limitations under the License.

    # TODO extract version to attributes

    # currently tested just with Debian
    if not node['platform'] == "ubuntu" then
      raise RuntimeError, "Unsupported platform: #{node['platform']}"
    end

    # make install folder if it doesn't exist
    execute "mkdir" do
      command "mkdir -p #{node[:installPath]}"
      action :run
    end

    # copy tomcat distrib to install folder
    cookbook_file "#{node[:installPath]}/apache-tomcat-6.0.37.tar.gz" do
      source "apache-tomcat-6.0.37.tar.gz"
      mode "0644"
    end

    # extract tomcat
    execute "tar" do
      command "tar -xvf #{node[:installPath]}/apache-tomcat-6.0.37.tar.gz --directory #{node[:installPath]}/"
      action :run
    end

    # remove archive from install folder
    execute "rm" do
      command "rm -i #{node[:installPath]}/apache-tomcat-6.0.37.tar.gz"
      action :run
    end

    # configure context.xml
    template "#{node[:installPath]}/apache-tomcat-6.0.37/conf/context.xml" do
      source "context.xml.erb"
      mode "0644"
    end

    # configure server.xml
    template "#{node[:installPath]}/apache-tomcat-6.0.37/conf/server.xml" do
      source "server.xml.erb"
      mode "0644"
    end
The steps below are concrete, an attempt to condense them in order to make the whole visible, but assumptions about platform (Ubuntu Precise 12.04), Chef version (11.x), etc. have to be made. This appendix has worth mostly to remind and orient. Some steps are too complex to enumerate simply here and, accordingly, links are given to the deeper details.
(server) $ sudo dpkg -i chef-server_10.18.2-1.ubuntu.12.04_amd64.deb
    (node) $ sudo dpkg -i chef_11.4.4-2.ubuntu.11.04_amd64.deb
    (node) $ sudo mkdir /etc/chef
    (node) $ cd /etc/chef
    (node) $ sudo knife configure client ./
Finish configuring the client node completely as explained here.
    (host) $ sudo dpkg -i chef_11.4.4-2.ubuntu.11.04_amd64.deb
    (host) $ sudo mkdir /etc/chef
    (host) $ cd /etc/chef
    (host) $ sudo knife configure client ./
    ~ $ cd
    ~ $ mkdir chef-repos
    ~ $ cd chef-repos
    ~/chef-repos $ mkdir .chef cookbooks nodes roles
    ~/chef-repos $ knife cookbook upload xyz
    ~/chef-repos $ knife cookbook upload tomcat6
~/chef-repos $ knife role from file application_node.rb
~/chef-repos $ knife node from file app01.json
(node) $ sudo chef-client
|
A more concise list of steps and commands: Install server Install client node and configure Install development host Create development host filesystem Configure development host (client) Edit knife.rb Obtain recipes Create application node role Create application node Run chef-client to load recipes |